Yes it can be the same, a normal knit cast on. The edge isnt going to be seen so it’s not vital.
Excellent question because, you’re right, it will look a bit different to a knit cast on, on the right side.
If you prefer, you can use a purl cast on.
See this video, it’s in chapters and the purl cast on which matches the knit cast on is at 6 min 27
The main thing for this is to use a matching cast on for this piece and again when you do the right front. So here knit or purl cast on, and the right front also knit cast on, don’t switch to e loop cast on for instance
Do I have to do the whole diagram? Because the pattern says “When increases are done, cut the yarn. Last row worked is from wrong side” or I have to cut the yarn at row 24 (last row for increases).
You will stop after the last row of increases. This is a wrong side row (row 24, as you said), do those increases, work the rest of the row, then stop.
Cut the yarn long enough to weave in tails later, about 10cm.
Next you work the right front. On here you will see the increases are on the right side row. After the last increase row, work one more row, the wrong side row.
Both piece should now have the same number of chart rows done and both pieces are ready to work the next row from the right side (and be on the same chart row, no jog in pattern).
You can put a pencil mark on the pattern on that row, or write a note for yourself to remember to check they are worked equally.
The next part is joining the two and both pieces will be worked with the next row of the pattern chart.
Yeah, I mean like this Left shoulder
beginning of increase: in 18th row
end of increase, and cut yarn: in 24th row Right shoulder
beginning of increase: in 17th row
end of increase: in 23rd row
Both end at different row at pattern chart, right?
You’re right to check this because it does matter and checking these things will lead to better understanding and outcomes.
The pattern takes this into account and asks you to work one more WS row on the right front piece, so it will end in row 24 like the left front.
I have just edited my previous post to bold a sentence which you might have overlooked.
Hey, I’m still working on Right Shoulder, cause I’ve been tied up lately, and finally I have much time to continue my project
I have a question again…
When I’m working on row 17, the pattern says “work the first stitch in A.1” and when I start on the first 4 stitches, the chart doesn’t seem aligned to the next stitches. How can I solve this?
The key phrase in the instruction is, “work the increased stitches in the pattern”.
Up to here you’ve been working
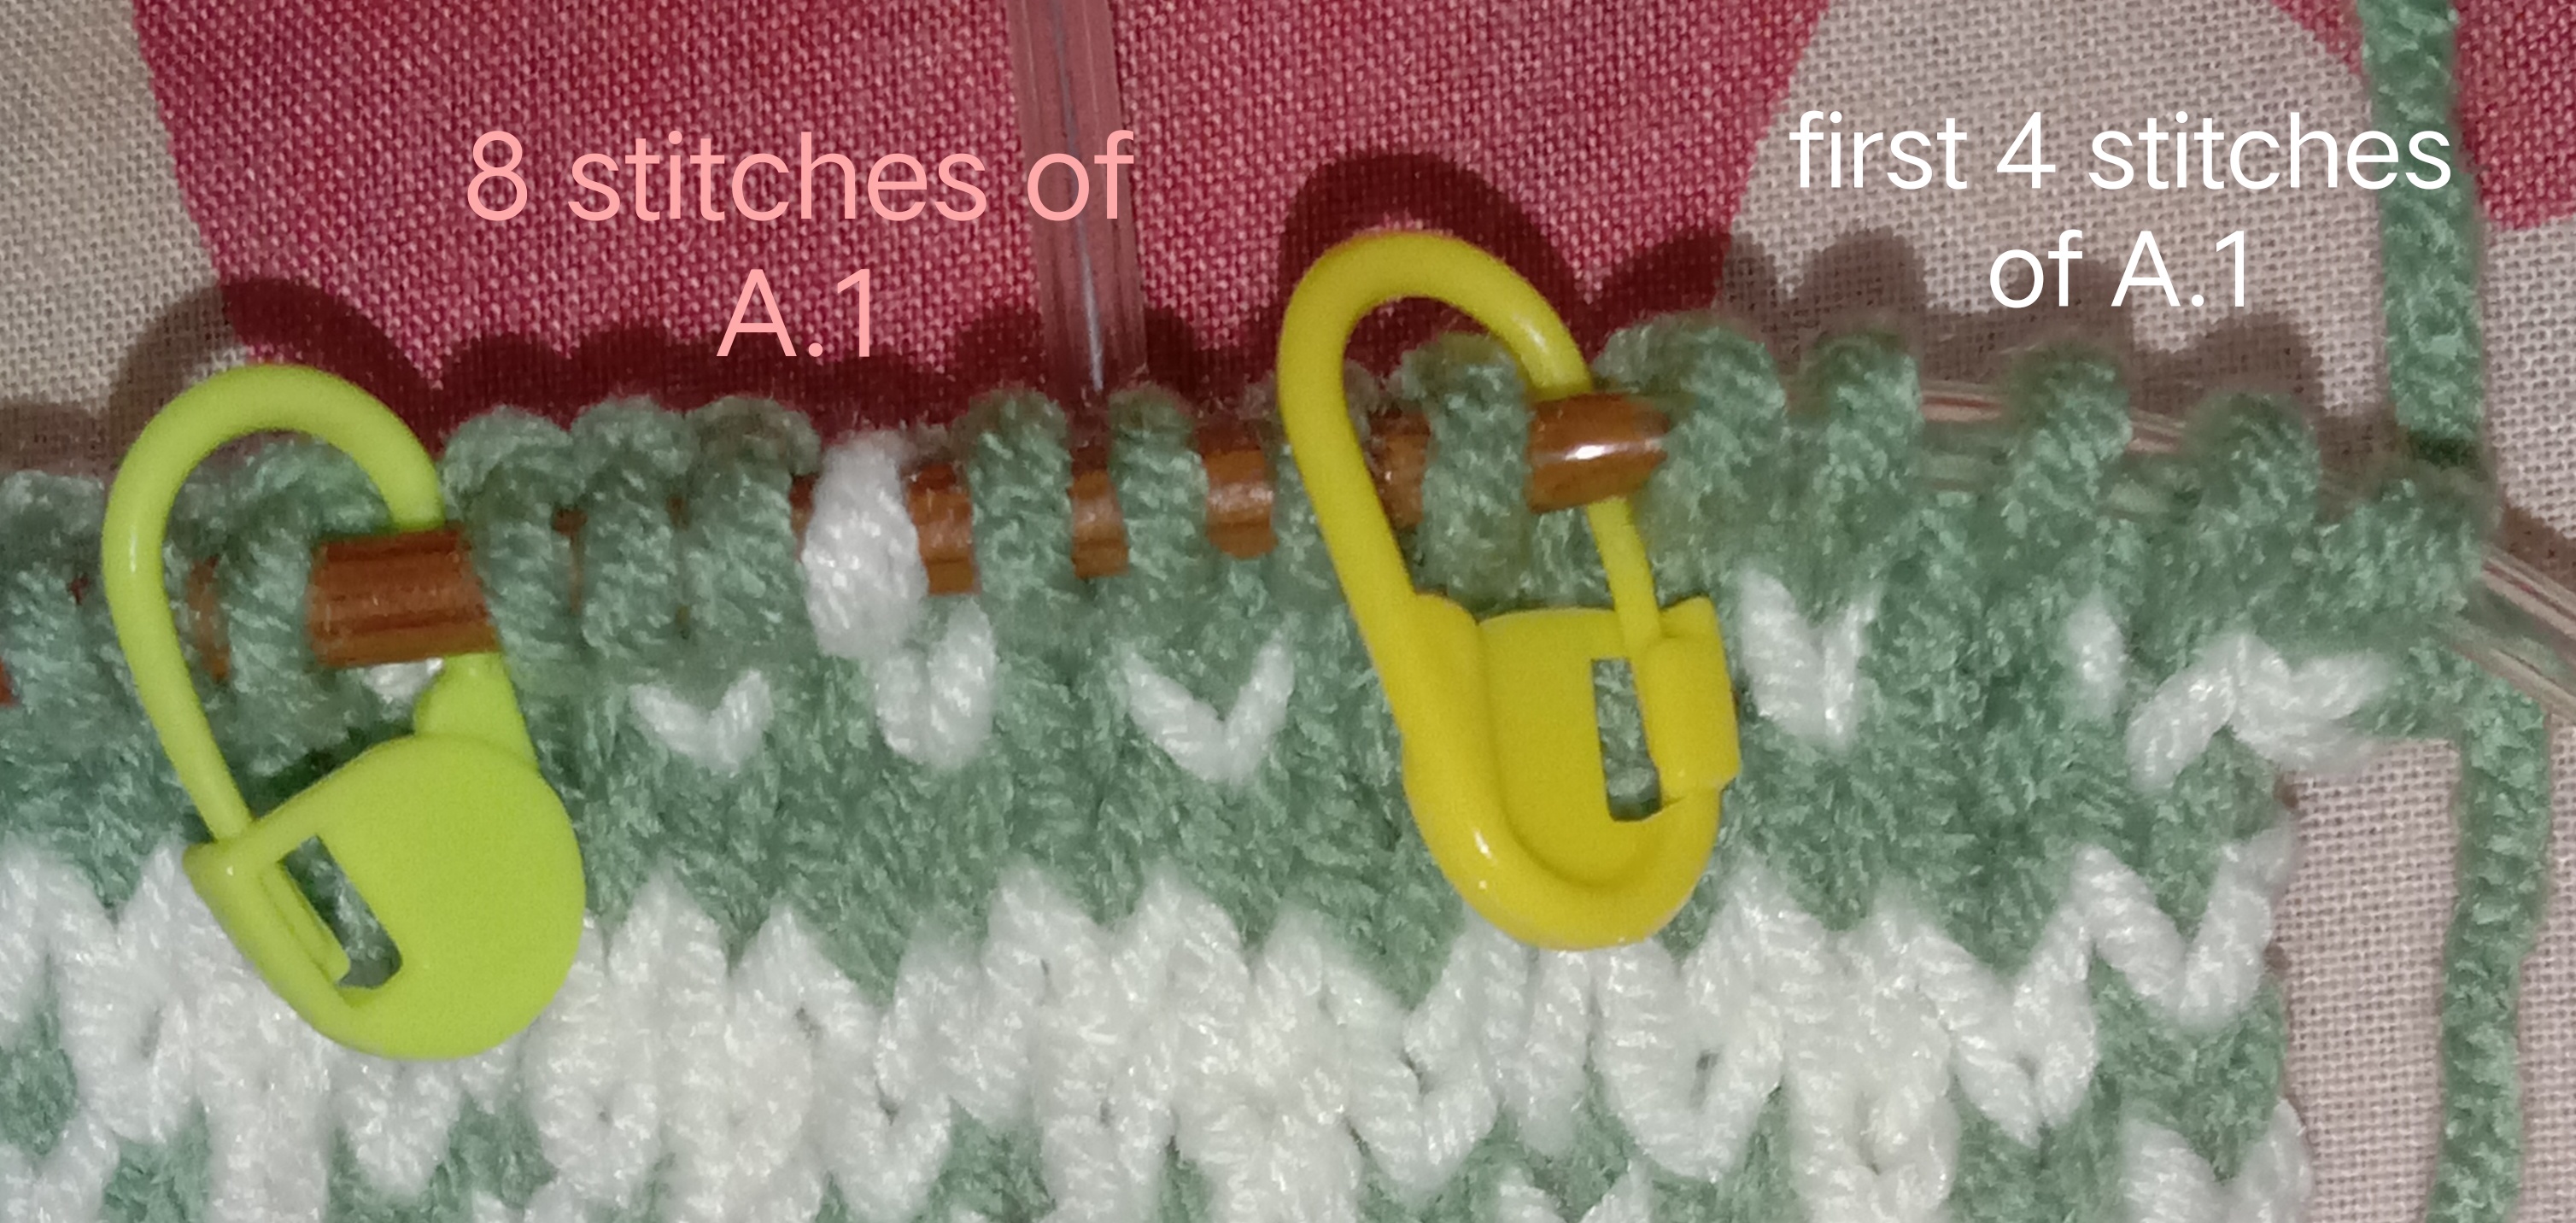
Edge, 48 sts of A1 (6 repeats of 8 stitches), first 4 stitches of A1, edge
When you increase stitches you need to account for this on the chart.
That first new stitch is at the neck edge, is that right?
If you viewed it from the RS this new stitch would be stitch 5 of the chart, so when you work the wrong side row you need to work from stitch 5, then 4, 3, 2, 1, then the 48 stitch repeat.
Playing markers every 8 sts for the chart repeat will help keep you on track. You will be able to look and see where the chart stitches begin and end in each repeat. Your increased stitches will become another repeat. Counting back from a marker can be helpful at the beginning of a row.
But I think you already worked the left shoulder and managed this, didn’t you? It is the same way the work the new stitches into pattern.
I suspect you may have set up incorrectly. Can you check this? I’ve copied from the pattern but edited down some.
RIGHT SHOULDER:
Cast on -54- stitches on circular needle size 4 mm
Purl 1 row from wrong side,
then work as follows from right side: 1 edge stitch in garter stitch, work A.1 over the next -48- stitches, work the first 4 stitches in A.1 -1- time, finish with 1 edge stitch in garter stitch
RiGHT shoulder, yes?
The half chart, the “first 4 sts of A1” comes after the 48 sts of A1. So it comes at the end of the row, not beginning of the row.
When you have added a new stitch to the end of the row there will be 48 sts of A1, then first 4 sts of the chart, then the 5th st of the chart.
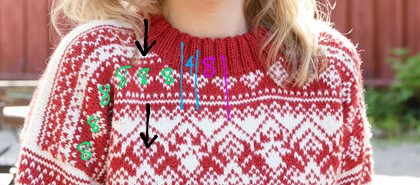
This may help
Black arrow is direction of knitting, top down.
Green marks the repeats of 8
Blue is the first 4 stitches at the end of the set up row.
Purple shows the increased stitches which are added gradually (starting just 1 increase) to make a shaped neck, but they total 8.
You’ll end up with a half chart (first 4 sts again) which will match up with the left front piece to make a full motif (full chart).
Hey, it’s been a while since I did my project in March. Being struggled at my work, family, and home didn’t let me to continued the project. 🥹
My last project is at the front piece, I also did the cast on tho. But I’m confused at “Work 1 edge stitch, A.1 until 2 stitches remain, work first stitch in A.1 (so that pattern begins and ends the same), 1 edge stitch in garter stitch.” Could you please help me?
It’s great you’ve been able to pick up the needles again.
The first and last stitch of the row is always knit (on both the right side and wrong side to create a garter selvedge for seaming), so that is the “work 1 edge stitch” , it may help to place a marker after stitch 1.
Then A1 is your 8 stitch colour chart which you repeat across the row, places markers every 8 sts and work the chart as you did with the other pieces, repeating row 1 of the chart until you are almost at the end of the row.
You should have 2 sts remaining.
The first of these 2 will be stitch 1 in chart A1, as though you were starting another 8 stitch repeat but just the one stitch this time, this will centralise the colour chart on the sweater front.
The last stitch is the selvedge, place a final arker before the last stitch to remind you to wok it as a knit or garter bump every row.
Once you get back into the flow you’ll do great. The set up rows are often one of the hardest parts.
oh yeah, I forgot to ask you this, “Work next row in A.1 over stitches from right shoulder” I have to work the next row up to what row? and the diagram for left shoulder is A.3 but why “continue A.1 from left shoulder” when I’m going to work on the front piece?
You’ll be joining the right and left shoulder together in this section.
You finished the previous section, right shoulder, on a wrong side row.
Turn to right side row and work as before, 1 garter st for the edge, then A1 repeated, when you get to the last stitch you will not put in the 1 edge stitch of garter but instead work it as the next stitch in A1, then cast on new stitches.
The cast on number for the smallest size is 23 sts. You can place markers on these for each 8 stitch repeat (as a smooth continuation of the right shoulder 8 st repeats), then you join to left shoulder stitches and what you should see is that all the 8 st repeats run smoothly across the entire front. If you had single stitches or partial repeats from the chart on right or left they will all align with the middle stitches included and should all make sense.
You continue with A1 because there is no need for A3 any longer. A3 was just the mirror of A1 whilst you worked the left shoulder. A1 will now run across the whole front and will match in the pattern.
Whatever row on the chart you have just worked (WS from previous section) you now just move on to the next row on the chart. Your next row of knitting (RS) is the next row of the chart. That’s all. It’s not multiple rows.
So, work the next row of chart over the right shoulder, then cast on new stitches, then work the chart over the left shoulder. You should see the pattern align on the left shoulder.
You then have the full front to work across.
I’m posting the link as I keep having to search back for it. This will just make it easier for me, or others, to find if anyone is following the thread.
One more thing, still didn’t figure it out btw
I’m doing what you’ve told, when I’ve done casting on new sts and continue A.1 for the left shoulder (last row I worked in left shoulder is 24), the next row chart in A.1 (row 25) isn’t fit for the left shoulder…
Am I still missing one steps that you’ve been told?
Do you have full repeat at the beginning of the left shoulder or partial repeat? Also the right shoulder is it a full or partial repeat at the end before the cast on stitches, from memory I think you had 1 chart stitch then a garter edge so now 2 sts of chart, then cast on… what comes next as you meet the left stitches?
I think it may help if you tell me the size you’re making.