You are a star!
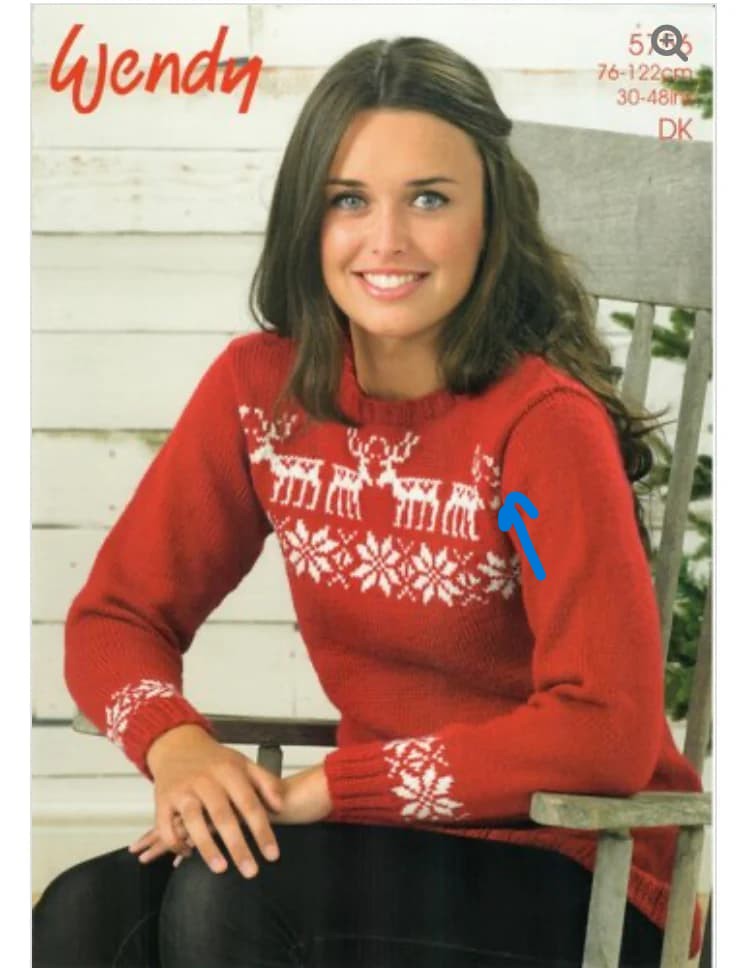
OK I’ve just thought of another problem. If I start the chart 11 rows underneath the armhole shaping, the decreases will now occur level with the deer, as the instructions are: Cast off 4sts at beginning of next 2 rows. Decrease 1st at each end of next and following 6 alternate rows. This is going to make me lose a portion of the first and last reindeer. What a nuisance. I don’t suppose this can be avoided.
You may still be ok since there are several rows of the main color within the armhole shaping. Even so, there’s part of a reindeer poking out from the armhole seam on either side in the photo. Those parts could be deleted in any case.
1 Like
I’m really dreading doing this chart again as it’s the most difficult one I’ve encountered, as the star pattern doesn’t start and end predictably and the chart isn’t like a graph. Since the armhole shaping will now occur inside the chart rather than at the start of it, the decreases will now differ from the instructions. Am I right in thinking that the 4sts to be cast off each end which start the shaping, should now be knitted in the main colour instead of being cast off and the instructions for decreases should be ignored and 1st in main colour should be knitted until the correct part of the picture is reached and then continue but then not forget to knit the 4sts at the end. This is so disorientating.
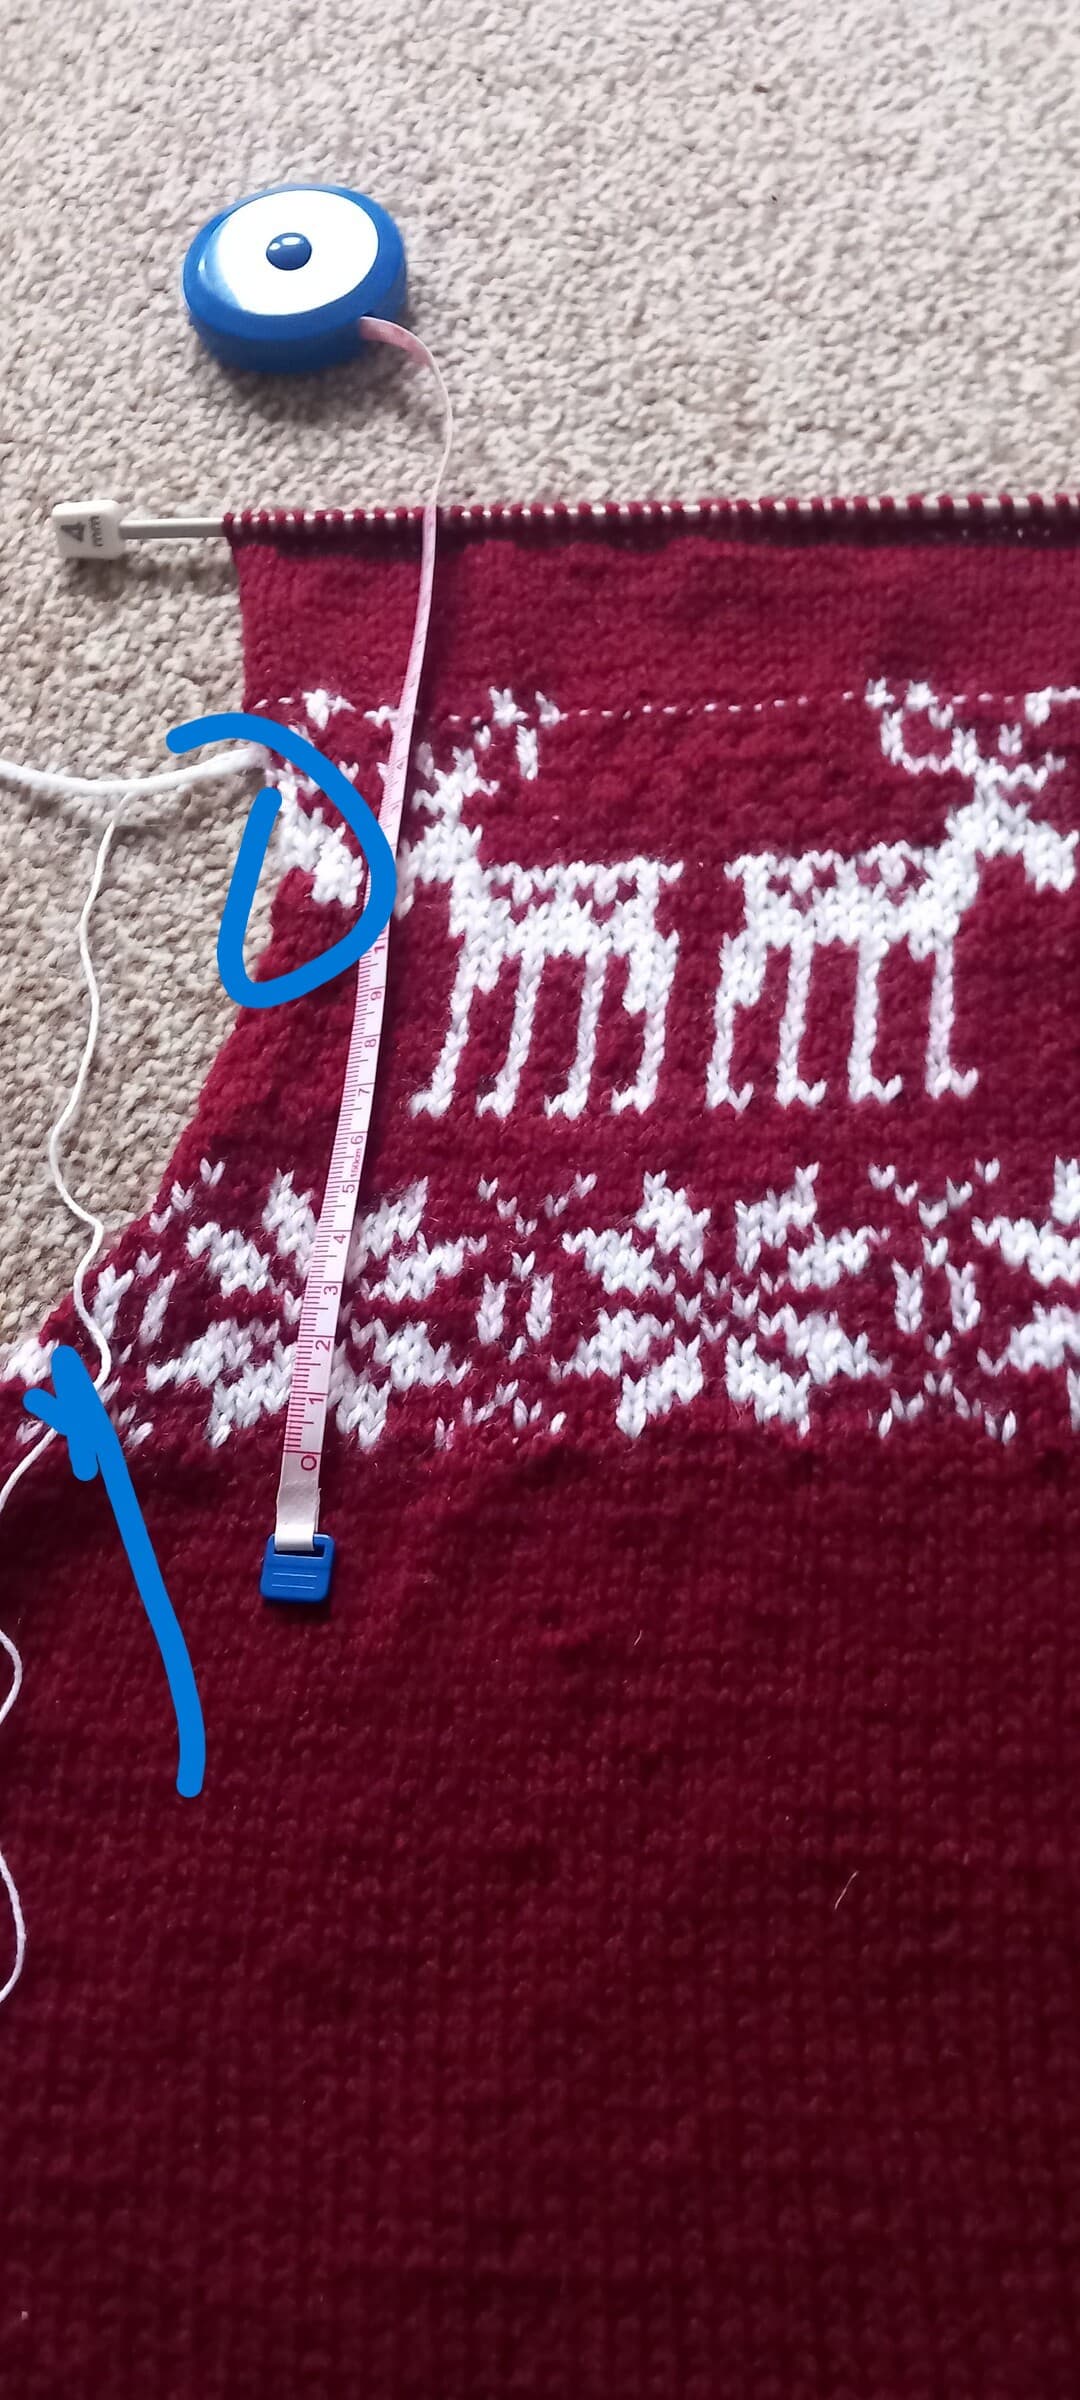
Yes, the decreases to shape the top will start with the 4sts cast off. Cast off the sts when you get to the same length as the armhole cast off on the back (see decreases on back, arrow below). You’ll be mostly working in the main color at the edges. It may help to keep at least the edge sts each side in the main color. You could delete those small repeats of the reindeer that may peek out at the armhole (see circle below). Just work in the main color. Follow the decreases and their spacing once you’ve started the underarm cast off of 4sts. It may help to make a spreadsheet with the row numbers and the decreases so that you can cross them off as you work them
You’re doing a little redesigning here to fit in the graph with your knitting. Watch the pattern in your knitting and you’ll be fine. The colorwork on the back is very nice and neat.
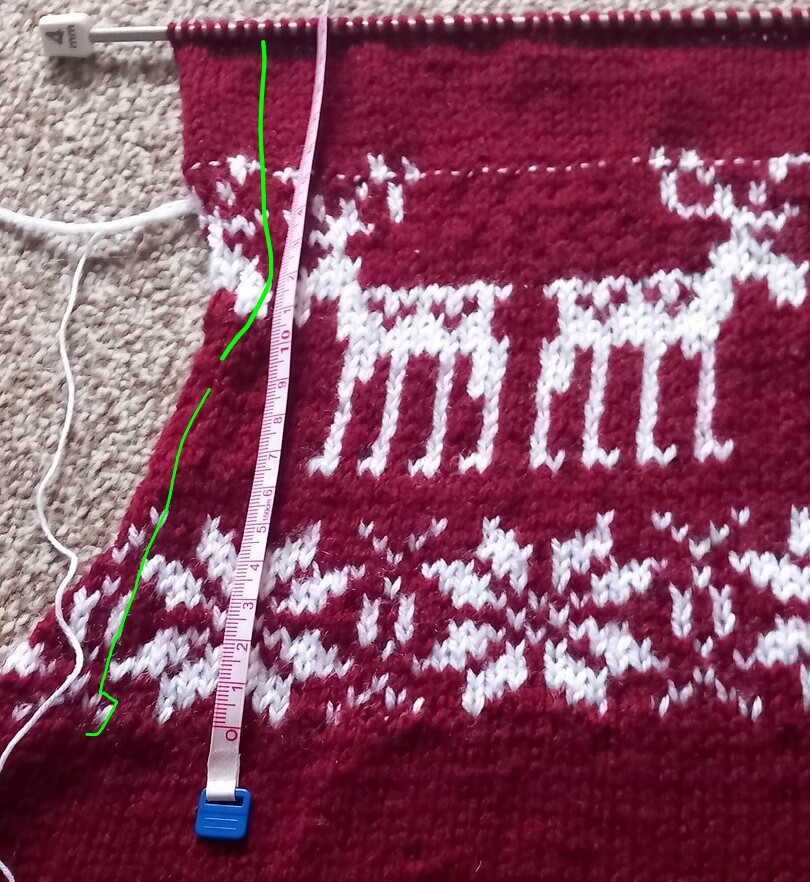
Thank you. Knitting the reindeer was actually more straightforward because it’s evenly balanced. It’s the stars that are more the problem. I’m more concerned with completing the first 11 rows before I cast off. Getting started was the problem I had initially. Row 2 on the wrong side was difficult. I don’t have the facility to do a spreadsheet. I wrote out the rows, identified the pattern repeats and then followed it. 1st wrong will jog the pattern with the stars.
Can you print out a couple of copies of the chart, or enough to tape it together to get the whole design, and then draw in the armholes based on the decreases? So you’ve thought it all out ahead and then only have to follow the chart. Or print out some graph paper and redo the chart so it’s easier to read as you’re knitting?
If the stars are tricky you can eliminate the bits of stars from each end and work main colour at the sides and begin with a full star. Basically what salmonmac suggested with the reindeer but doing ut in the staes section too.
You could then place a marker each end where the full star begins and everything outside the marker is main colour. It makes charts and colour work much easier.
Charts are generally easier to work from the chart too rather than from a written line of pattern. Learning to read a chart scared me but it was well worth the challenge as overall it is simpler.
1 Like
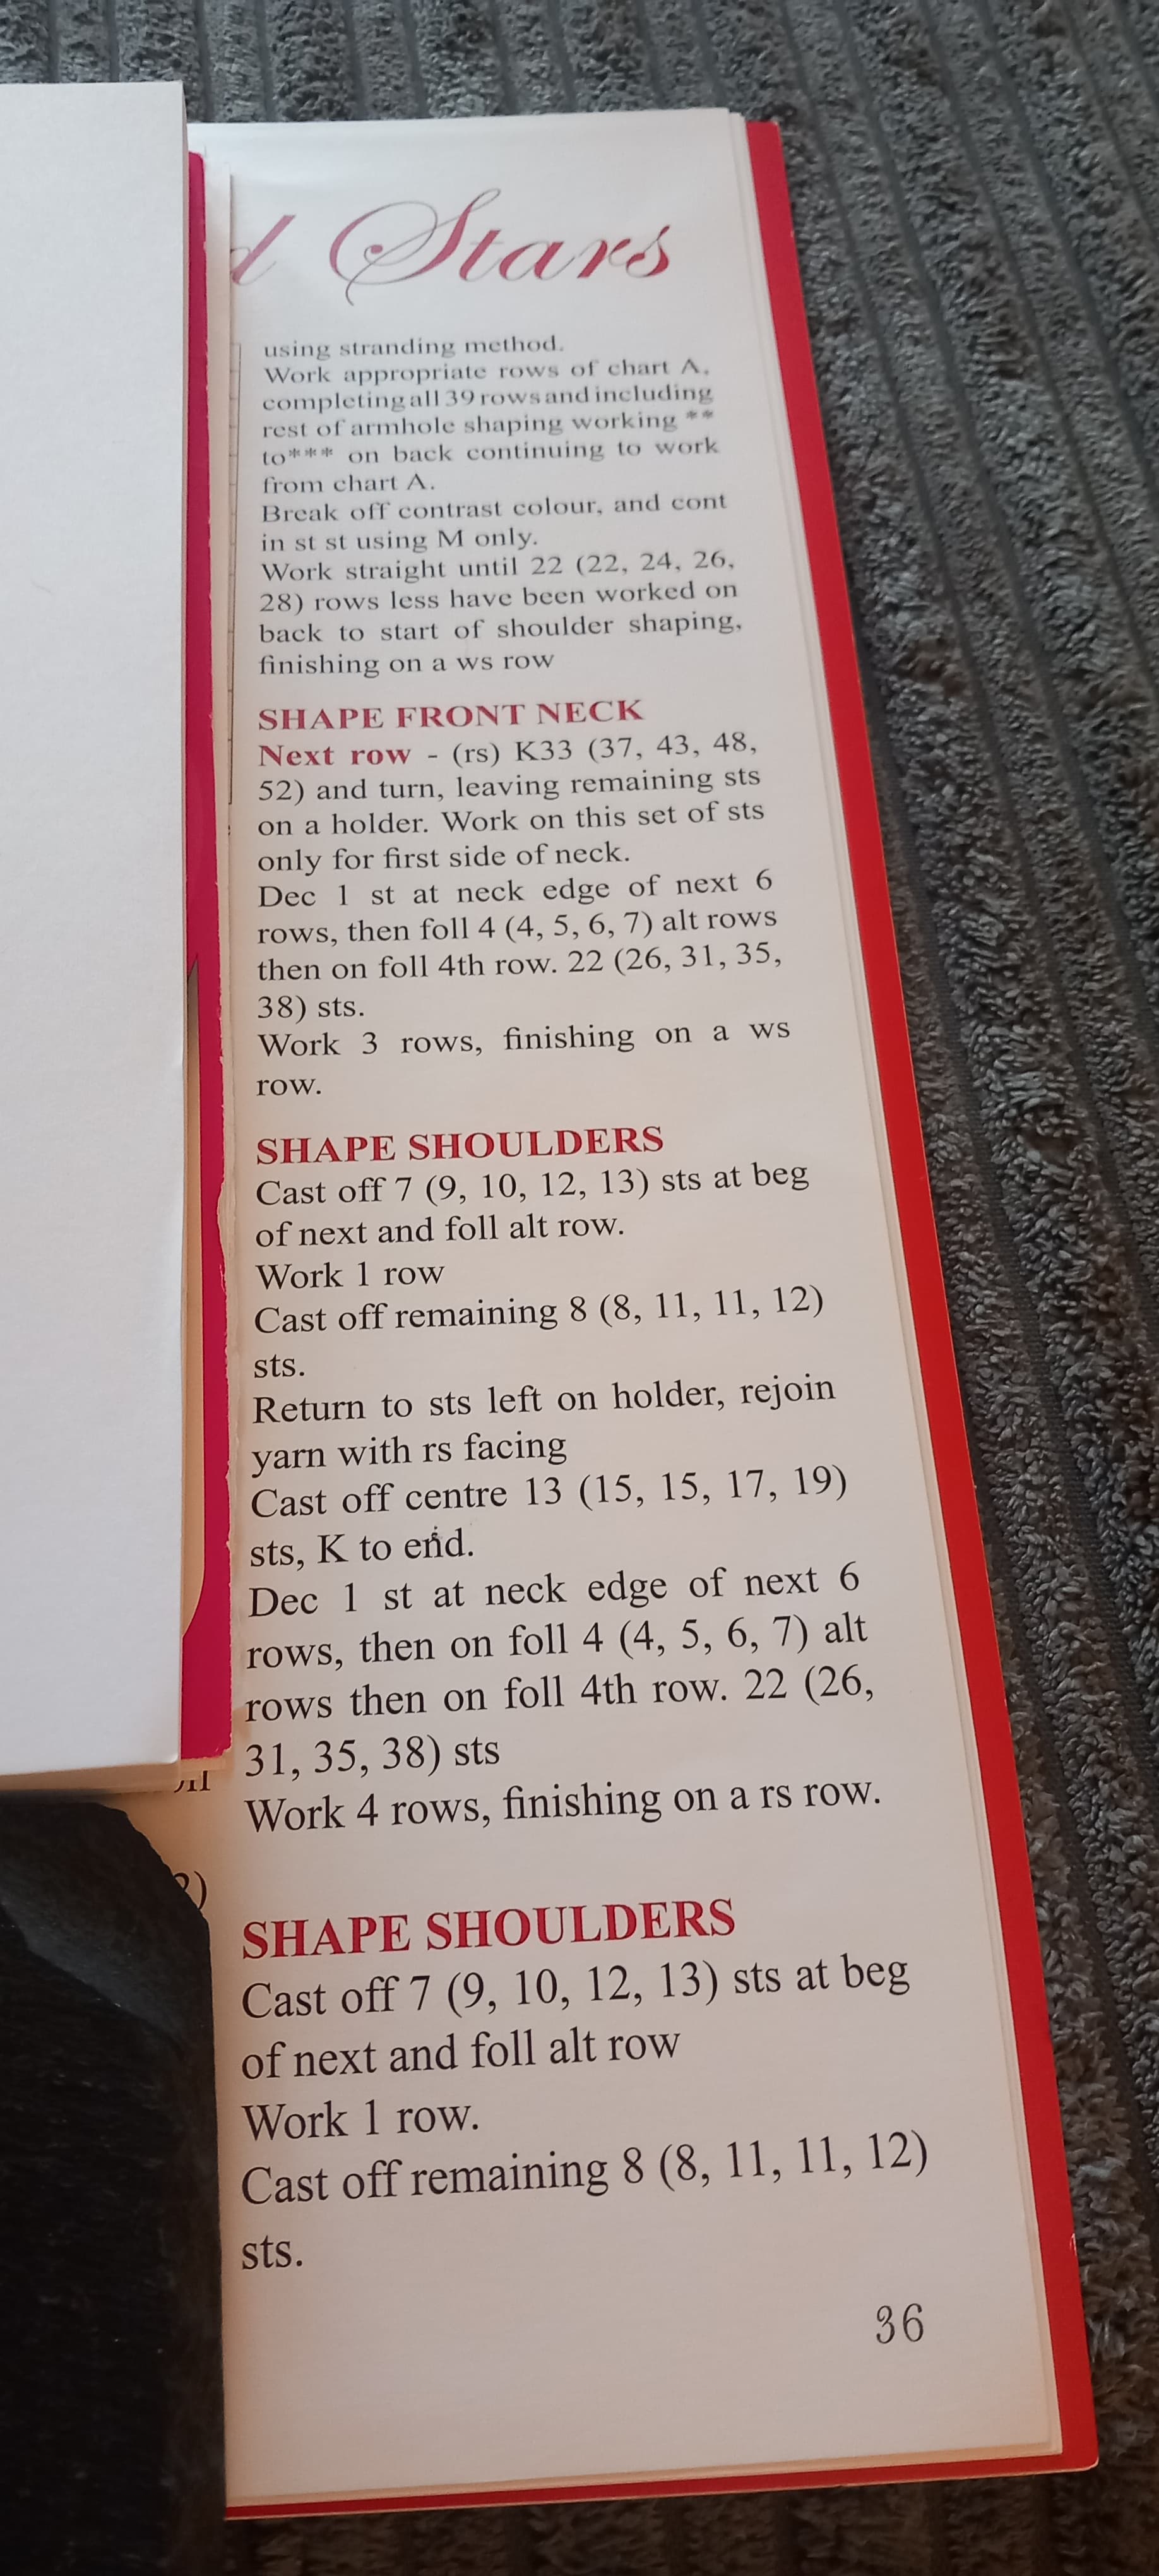
I think I’ve noticed another pattern discrepancy. Would you kindly take a look at it as I’d like to ascertain whether this is worth going on with. There’s two sets of instructions for the shoulder shaping on the front. I’ve photographed the instructions for the front from when it says to work 22 rows less than on back. I’ve completed the back together with the shoulder shapings. The stage I’m at at present is I’ve finished the ribbing and have worked 30 rows in stocking stitch, so there’s some way to go before the chart begins. I don’t know what to do about the front shoulder shapings when two sets of instructions are given.
I did think about doing that but the problem is there would be a wider gap at the left than the right if I were to do just full stars. The chart boxes are tiny and difficult to follow which is why I wrote them out and then identified a pattern repeat and followed it.
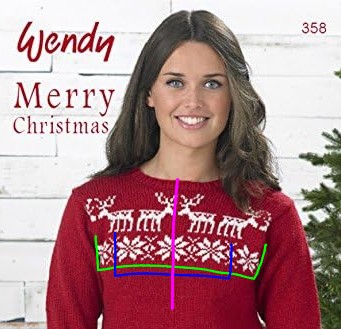
Perhaps I am misunderstanding something but to me it seems the stars are centred on the sweater so you could do 5 if 5 full stars fit (green lines) or 3 (blue lines) but either way you would have them centred (pink line) making a sort of heart shape between the deer and the stars.
1 Like
The front should shaping looks fine to me. For both right and left shoulders you’ll start with the same number of sts and make the same decreases. The shoulder shaping may begin on different rows (RS vs WS) but that’s ok. You need to bind off the shoulders starting at the armhole edge in each case. The difference of one row isn’t noticeable.
For the location of the stars on the front, it’s similar to the location on the back in that you want to center the pattern as much as possible. If that means shifting over a stitch or two that’s ok. Just locate your center stitch and count back from there. You’re planning ahead which is all to the good!
Thank you for this. I’ll just bite the bullet and go for it.
1 Like
It would be clearer if the instructions told you which shoulder they’re referring to! It looks to me as if you start with the Neck and Right shoulder (as you would wear it), then go back to finish the Left shoulder.
2 Likes
I’ll follow what is said and see how I get on. I’ve never had a pattern like this before and must admit I don’t have confidence with it.
The instructions for the neck and shoulder shaping are fairly common. With the RS facing you’re actually going to work the left shoulder first with decreases at the neck edge then bind offs from the armhole edge.
The cast off of the center sts is the center neck opening. Then the right shoulder is shaped at the neck edge and bound off at the shoulder from the armhole edge.
I find it also helps to make a little diagram of the sweater indicating the decreases and bind offs. You can check them off as you work the rows.
I don’t know if you’ve ever heard of anybody dying of terminal frustration with regard to knitting, but I may be the first? This is now the third day of my trying to do just row 2 of the star chart and whatever I do, it just doesn’t work. I thought we’d established that the star pattern is off centre unlike the photograph of the pattern as it appears on the model. Finding the centre of the pattern doesn’t work as the stars are off centre from the reindeer. I’ve photographed the centre of the chart. If I can’t manage to sort this out today, then I’m going to abandon the project for the sake of my own sanity,
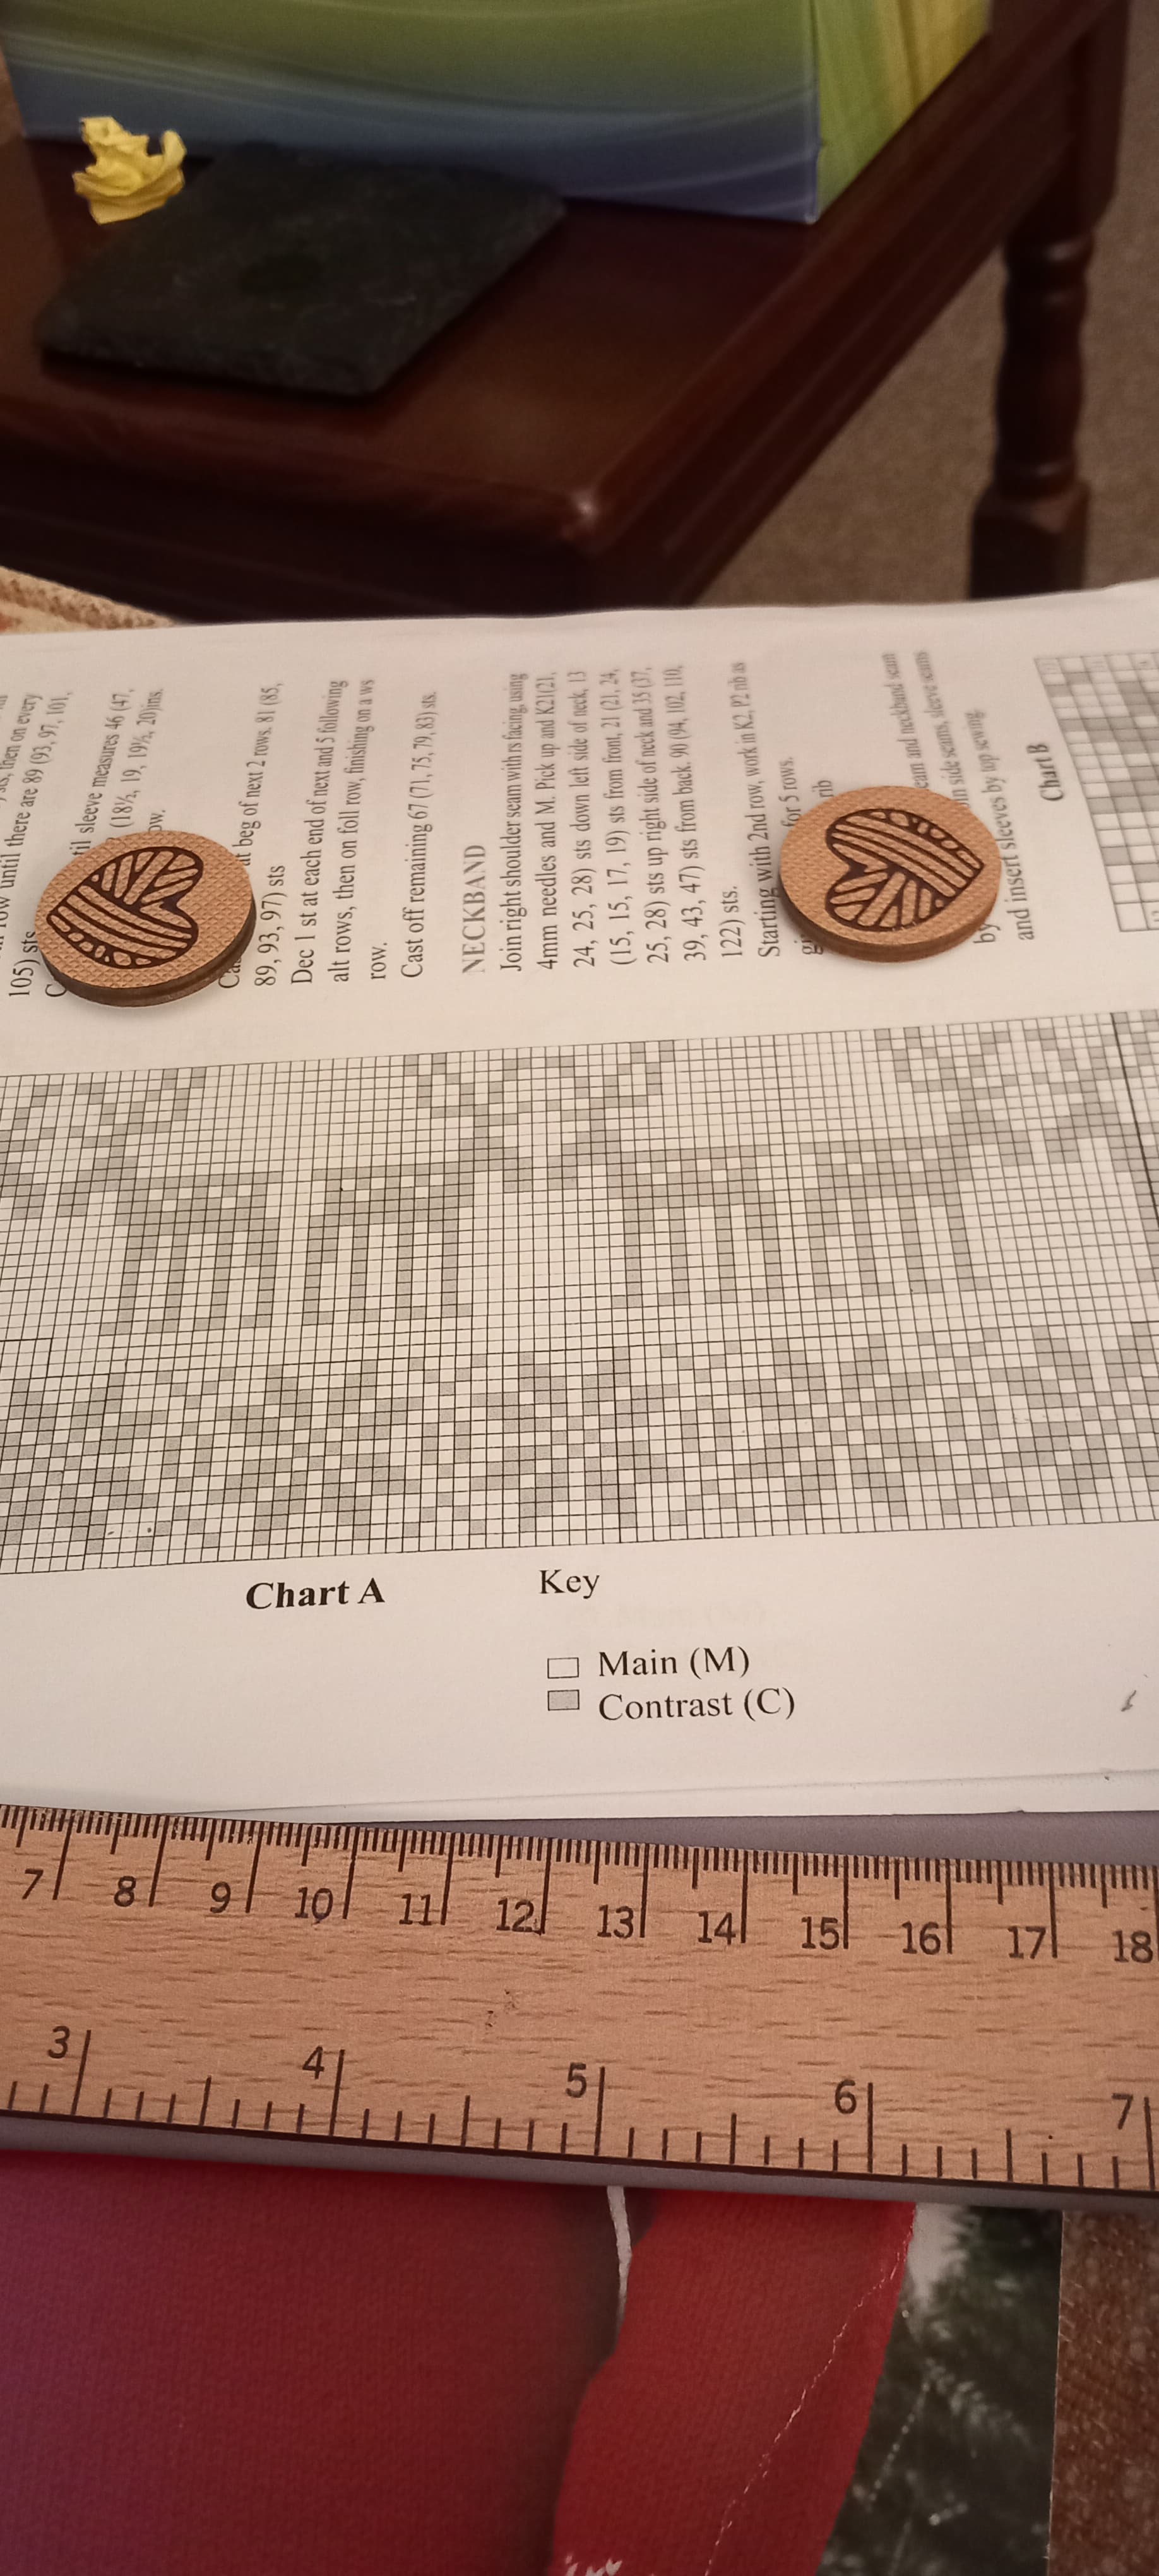
which is a pity because I’ve come so far. I’ve never felt this way about knitting before. It’s having 101sts which is the number before any decreases occur which has totally thrown me. The chart shows all the decreases as, I’ve photographed earlier, which I have to ignore until I get to the armhole shaping. I’ve tried marking the start of the star so I don’t get confused with the pattern in between the stars when working on wrong side rows, but it just doesn’t seem to work out. Thanks for your attention, but I think this might be the last time I’ll post anything.
1 Like
You’ve really been so good at persisting with this pattern. I understand the frustration.
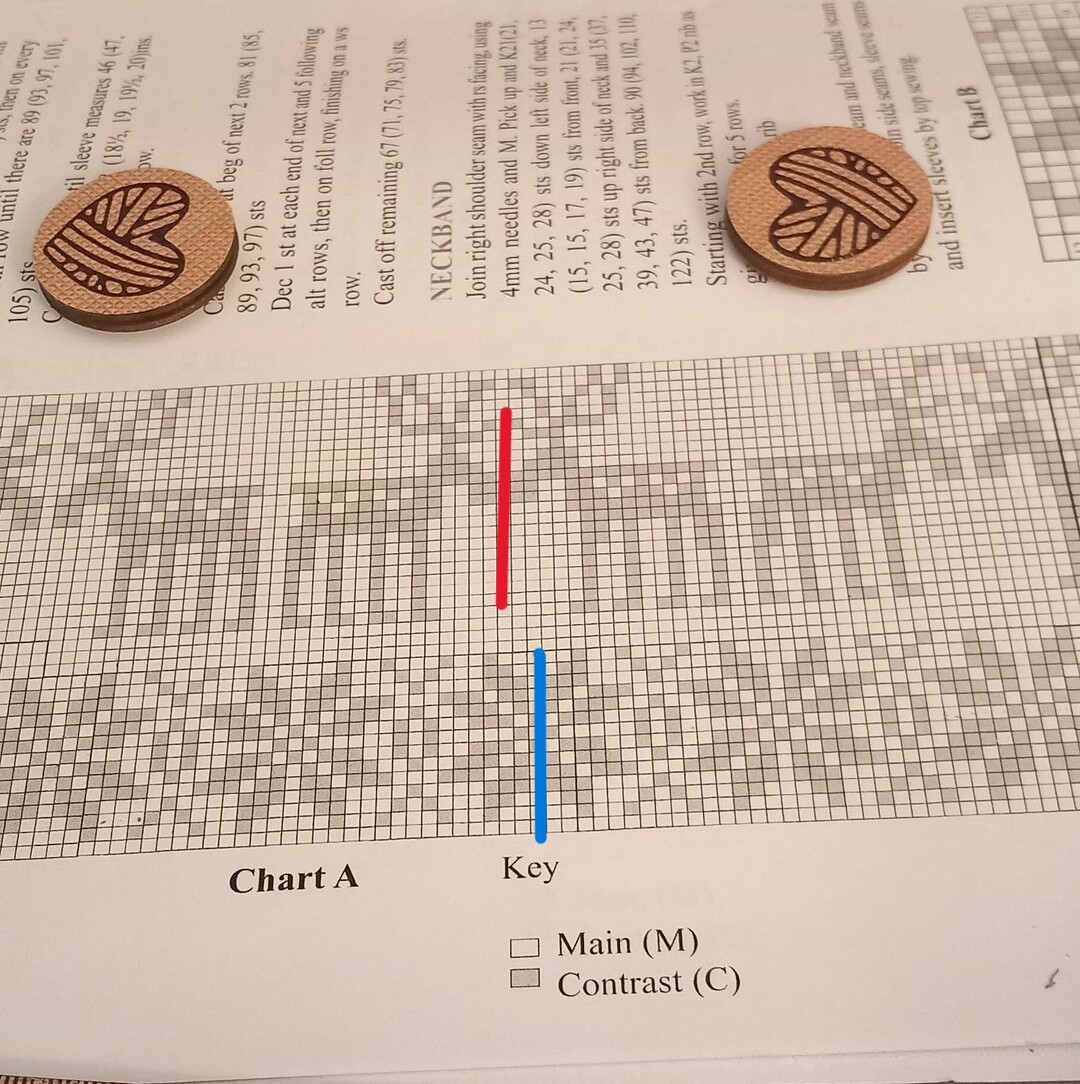
Line up the center of the stars with the middle stitch on your needle. Mark that middle stitch (blue line). Then count back from the middle stitch on the needle to the beginning of the row. You can then count back in the star chart to where the stars should begin. You can begin with a partial star or better still, work in the background color until you can start a complete star.
When you get to the reindeer, line up the stitch between them (red line) with the middle of the star.
3 Likes
What were they thinking, to put out a pattern like this?? I would cut the chart and tape it back together so it lines up. Once you’ve done that, you could pencil in your armhole shapes as well.
You’ve put so much into this, I hope you can work it out and finish it! But we’ll all understand if you decide to put it down. Some things just aren’t meant to be.
3 Likes
It’s an annoyingly off centre chart.
Along with salmonmac’s direction for how to centre the pattern, with a marker around the centre stitch, I would put a marker on the needle just before the first stitch of the first star you want to include and one just after the last star, this way you know where the colour work starts whether you’re on the right or wrong side. And I’d mark the chart with pencil or post it stickers so you can ignore both ends of ‘extra’ pattern.
This is the hardest bit, if you can get past this you’ll be away on the colour work.
If it’s any consolation I knitted and tinked the same 6 rows four times yesterday morning, and that was before I got to my colour work (I didn’t like how my armhole shaping looked), we’ve all had these very frustrating days. It will be worth all your effort when you wear this sweater.
2 Likes