Help with reading a chart

The pattern seems pretty clear about 20cm length (~56 rows) for the armhole before the shoulder shaping. For the front, the chart is worked (~39rows or about 14cm). That leaves 6cm or 17 rows. Buuut the pattern wants 22rows at this point when at best you have 17 rows (~1.8cm).

So even if you are on the pattern gauge (this pattern gauge is 28rows/10cm? @Christine_H ) there’s a discrepancy.

I think this can work out very well.

Gauge is 28 rows = 10 cm

You said you’re working at gauge, sometimes gauge can alter with the size of the fabric (frequently for me, I swatch and wash and measure and so on but knitting is a hand made item and fabric moves so there can always be some change).

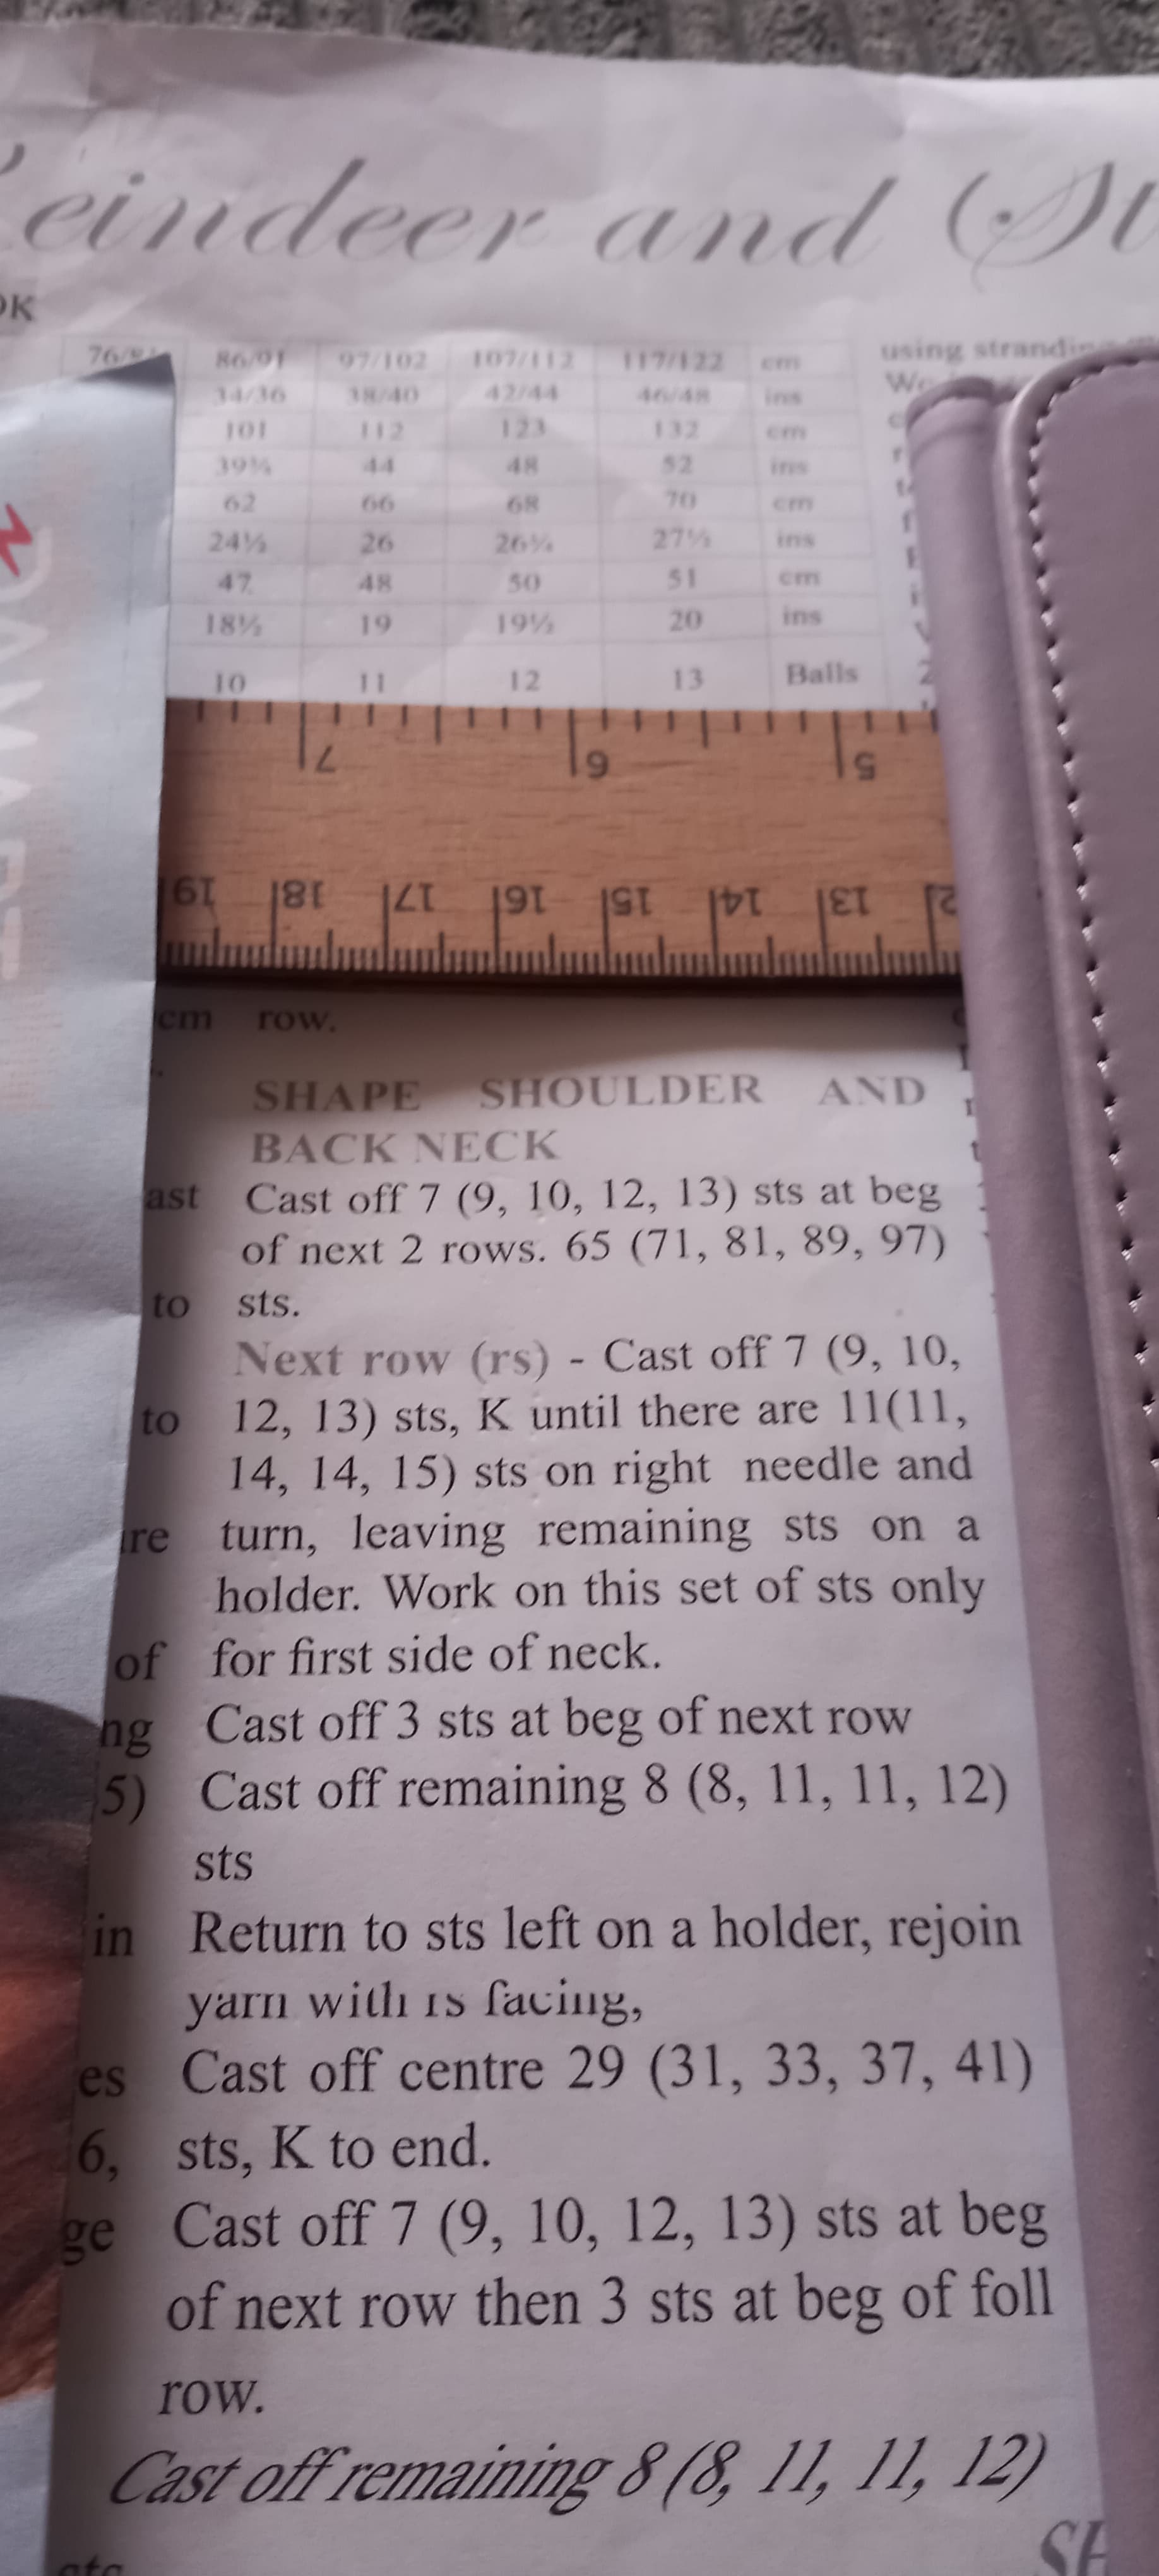
Going by the pattern instructions the back piece really needs to be worked to 56 rows = 20 cm (and maybe an extra row for bind off as this is seamed and the extra row gets taken up at the shoulder), not 39 + 11 = 50 rows. I know you measured with a tape measure but this is the number of rows in the pattern, and overall it is only going to add 2 cm (it’s not adding another 22 rows to equal the confusion over the front section). The 2cm won’t make the armhole massively oversize or the length over long, these discrepancies might just wash out leaving a perfect 20 cm armhole despite the few extra rows worked. You never know, if you leave the project with these 6 rows unworked you may result in a very small sweater as you are working to gauge and the gauge requires these additional 6 rows.

So the back would be 56 rows.

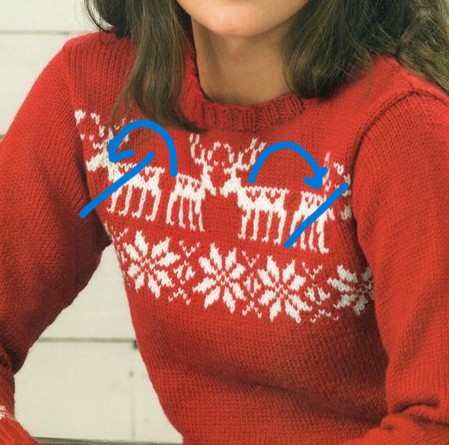
Front neck needs to be worked at 22 rows fewer than back, so at about row 34 of the chart (34 rows from underarm) you begin shape neck and continue the chart. This is around the same place you have a life line in your Back piece photo (it’s perhaps a row or 2 lower than your life line) and I can see from your life line there are around 15 stitches between the antlers (you might have missed a stitch with that life line one part looks like a stitch was skipped, otherwise 1 life line blip equals one stitch). The front neck shape instruction describes decreases each row on one side, then the other side is worked but looking at front centre neck where a bunch of stitches are bound off this is Cast off centre 13 (15, 15, 17, 19) I have not checked which size you’re making but you have enough stitches for the first 3 sizes without losing your antlers.

The total rows for front neck and shoulders is 26 rows, as has been said, which would result in 60 total rows

Row 34 to start neck + 26 neck and shoulderrows = 60 rows

This looks like a discrepancy of 4 rows in the pattern but I think this is explained by the back piece having no neck and shoulder shaping, just straight across. The front piece then is worked to row 56 where it seams to the back piece at 20 cm armhole, and then the front piece is continued to be worked for an additional 4 rows (shape shoulders) which wraps the fabric over the shoulder towards the back neck, rather than extend the length of the top (which stops at the 20 cm armhole) these rows fill in the gap over the shoulder/neck. If you look at the angle of the shoulder seam in the pattern pic it points towards the back neck, not towards centre neck. In effect all shaping has been shifted to the front rather than divided between front and back. The Shape Shoulders section which is 4 rows closes the gap left by the straight back, it could have been divided equally (58 rows back 58 rows front) but the designer wanted to shift the seam, which I think looks nice, it also reduces the amount of cutting and rejoining of yarn as it doesn’t have to be done on both front and back, but all on the front where the yarn was anyway going to be cut and rejoined due to neck shaping.

The back then I would do the extra 6 rows to total 56

The front I would work as given starting 22 rows earlier than the back, and working for 4 rows more than the back, to row 60.

I think it will all work out very nicely and, if it is too big or long due to the extra few rows then your gauge altered over time or with the weight of the sweater (that’s not an accusation, mine do this all the time) and this would be something you might want to try to take into account on future projects.

I hope this helps. I think your sweater is going to be fabulous and right on time for Xmas too.

Edited to add. Hmm… Just realised the animals (moose?) face the opposite direction on the front to the back and I have calculated the gap between the antlers from looking at the back piece. This might cause a slight problem. But can you look a the chart where the front neck shaping would be and count or mark off the bound off stitches, and the decreases and see how it effects the antlers? If it cuts into the antlers too much we can look again at how it will effect the neck shape and armhole length. It is probably only a couple of rows we’re talking about and you might be able to reduce the rib neckband by a couple of rows to compensate. Therefore beginning neck a few rows higher so the antlers are preserved and making rib shorter to preserve neck hole size to get it on and off.

Let us know what you think.

Thank you very much for your reply. Wendy Wools were unable to help as they bought the company from the administrators a while back and don’t have the pattern in their catalogue. All the suggestions I’m afraid sound very complicated. I wish it could be simplified.

Thanks for this, but it sounds too complicated and I’m doubtful if I’m going to be able to do it. I’ll upload a photo of the instructions for shaping the shoulder and back neck to give an idea of the amount of rows this will take. Row 34 is on the wrong side and I can’t see how it will really work out. Thanks anyway.

It still seems to me that the simplest approach is to move the beginning of the star design down before the armhole shaping on the front. To match the front and back it would mean redoing the stranded work on the back which may or may not work for you. Then all the numbers and shaping stay according to the pattern.

Alternatively, lengthen the back after the stranded section to give yourself the extra rows which will be needed on the front. It’s only ~4cm or 1.6 inches.
If the sleeve cap is straight across the top it would mean adding more sts there to accommodate the larger armhole but that’s do-able. If the sleeve cap is shaped, you can lengthen the sides. No schematic that shows the sleeve shape?

It’s too pretty a sweater not to work it out and you’ve done it so nicely. It’s very bad that Wendy has their name on the pattern and is unable or unwilling to support it. I wrote to them too and got a similar reply.

1 Like

OK, sorry, I didn’t realise there was back neck and shoulder shaping and thought you were saying the back was finished where you took the photo.

With the back neck and shoulder shaping there are the additional few rows which then match to the number needed on the front.

If you don’t want to frog the back colour work to begin the chart below the armhole as salmonmac has suggested, then just adding the 6 rows to the back before you do the neck and shoulder shaping would resolve the problem. It seems only that 20 cm in pattern gauge is 56 rows rather than the 50 rows you have worked. It would match up with the front. The front neck does start lower than the back neck but should still fit the chart and shaping.

Thank you so much for contacting Wendy. I really struggled with the chart and actually inserted a lifeline in every row, so couldn’t entertain ripping it all out and starting below the armhole. It’s been suggested that only another 6 rows need to be knitted until the shoulder shaping. I’m getting confused with all the different advice.

We’re all trying to help with different approaches. Sometimes all the suggestions can be overwhelming. What if you pause on the back for now and work on the front? Finish the chart and begin the neck shaping immediately after. Once you have that in hand it’ll be easier to see how to adjust the back.

I’m sorry if I’ve caused you any confusion. It’s your sweater so it’s your choice how you work it, always. My posts are really only suggestions that the pattern works if on gauge.

Just looked at your pic again (I zoomed in) and the gauge in the colourwork looks like 25 rows per 10cm rather than 28 rows as per pattern gauge. It could be your gauge is spot on with the plain stockinette but changes with the stranded work (which is very normal). The difference in your gauge is what is causing the question of the number of rows. Losing 3 rows every 10 cm will make a difference, you’ve reached the 20cm armhole length sooner than expected by the pattern gauge.

I did think to try that, but it will be a long time before I knit the front up to the chart. It’s been suggested that I begin the neck shaping in the front as well as knitting the chart but I’m wondering if this will look messy as well as being very difficult to do. If I commence it at the armhole level like the back and reach the same place as the back, what do I do then as I won’t be 22 rows lower?

You could then shape the neck on the front. See how many more rows you need to finish the back so that the distance from armhole to beginning of shoulder shaping is the same. Even if the front is a few rows longer than the back it just means that the shoulder seam will fall a bit to the back rather than right on your shoulder.

This will also give you an idea of the size of the neck opening. You may well find that you don’t need all the rows of neck shaping because the neck is large enough to fit over your head without the extra rows. It’s not for sure that this will work but it seems too bad to leave this sweater when you have come so far.

OK, one more thought and maybe this is more straightforward. Rather than depending on working 22 rows fewer than the back, convert the 22 rows to cm. It’s about 8cm.

That would mean finish the back and measure 8cm down from the beginning of the shoulder shaping. I hope that’s just about at the last row of the chart. That’s the point where the front neck shaping would begin. You may have to decrease for the front neck more rapidly to get the shaping in but that’s do-able. (Maybe work decreases every row instead of the alternate rows.)

1 Like

Sorry can’t grasp this at all. I’m at the stage at the back where I am about to commence the shoulder shaping and 8cm down is into the pattern and not at the last row of it. The way I’m viewing things is that to knit another 11 rows before commencing the shoulder shaping will make the sweater so long and the sleeves would be baggy under the armpits. It’s also been acknowledged that it would be tricky to start the neck shaping whilst completing the chart in the front. It sounds like it’s just not going to fit very well.

Ah, I’m sorry that’s not going to work. It’s not so difficult to work the chart while shaping the neck but it does make a hash of the reindeer pattern. You’d have to leave off the two outer reindeer and move the inner two to the sides. Might work?

I really struggled with the chart as it is and certainly would not have the skills to do what you suggest. It does seem that the only way is to commence the chart lower down before the armhole cast off which will make the chart lower down in the front than the back, which is a bit peculiar, but better than ending up with an ill-fitting sweater if this is the only other alternative. Thanks for bearing with me and for your advice.

1 Like

That’ll work. It’s going to be such a great looking sweater and worth all the thought and work you’re putting in.

Considering you say you struggled with the chart, you did a great job of it.

Enjoy working the rest of your sweater.

Thank you very much. Thank you for your help.

Thank you for your help. I’ll begin the front chart 11 rows below the armhole cast off.