Need help how to shape raglan armholes please
What is the name of your pattern and designer?
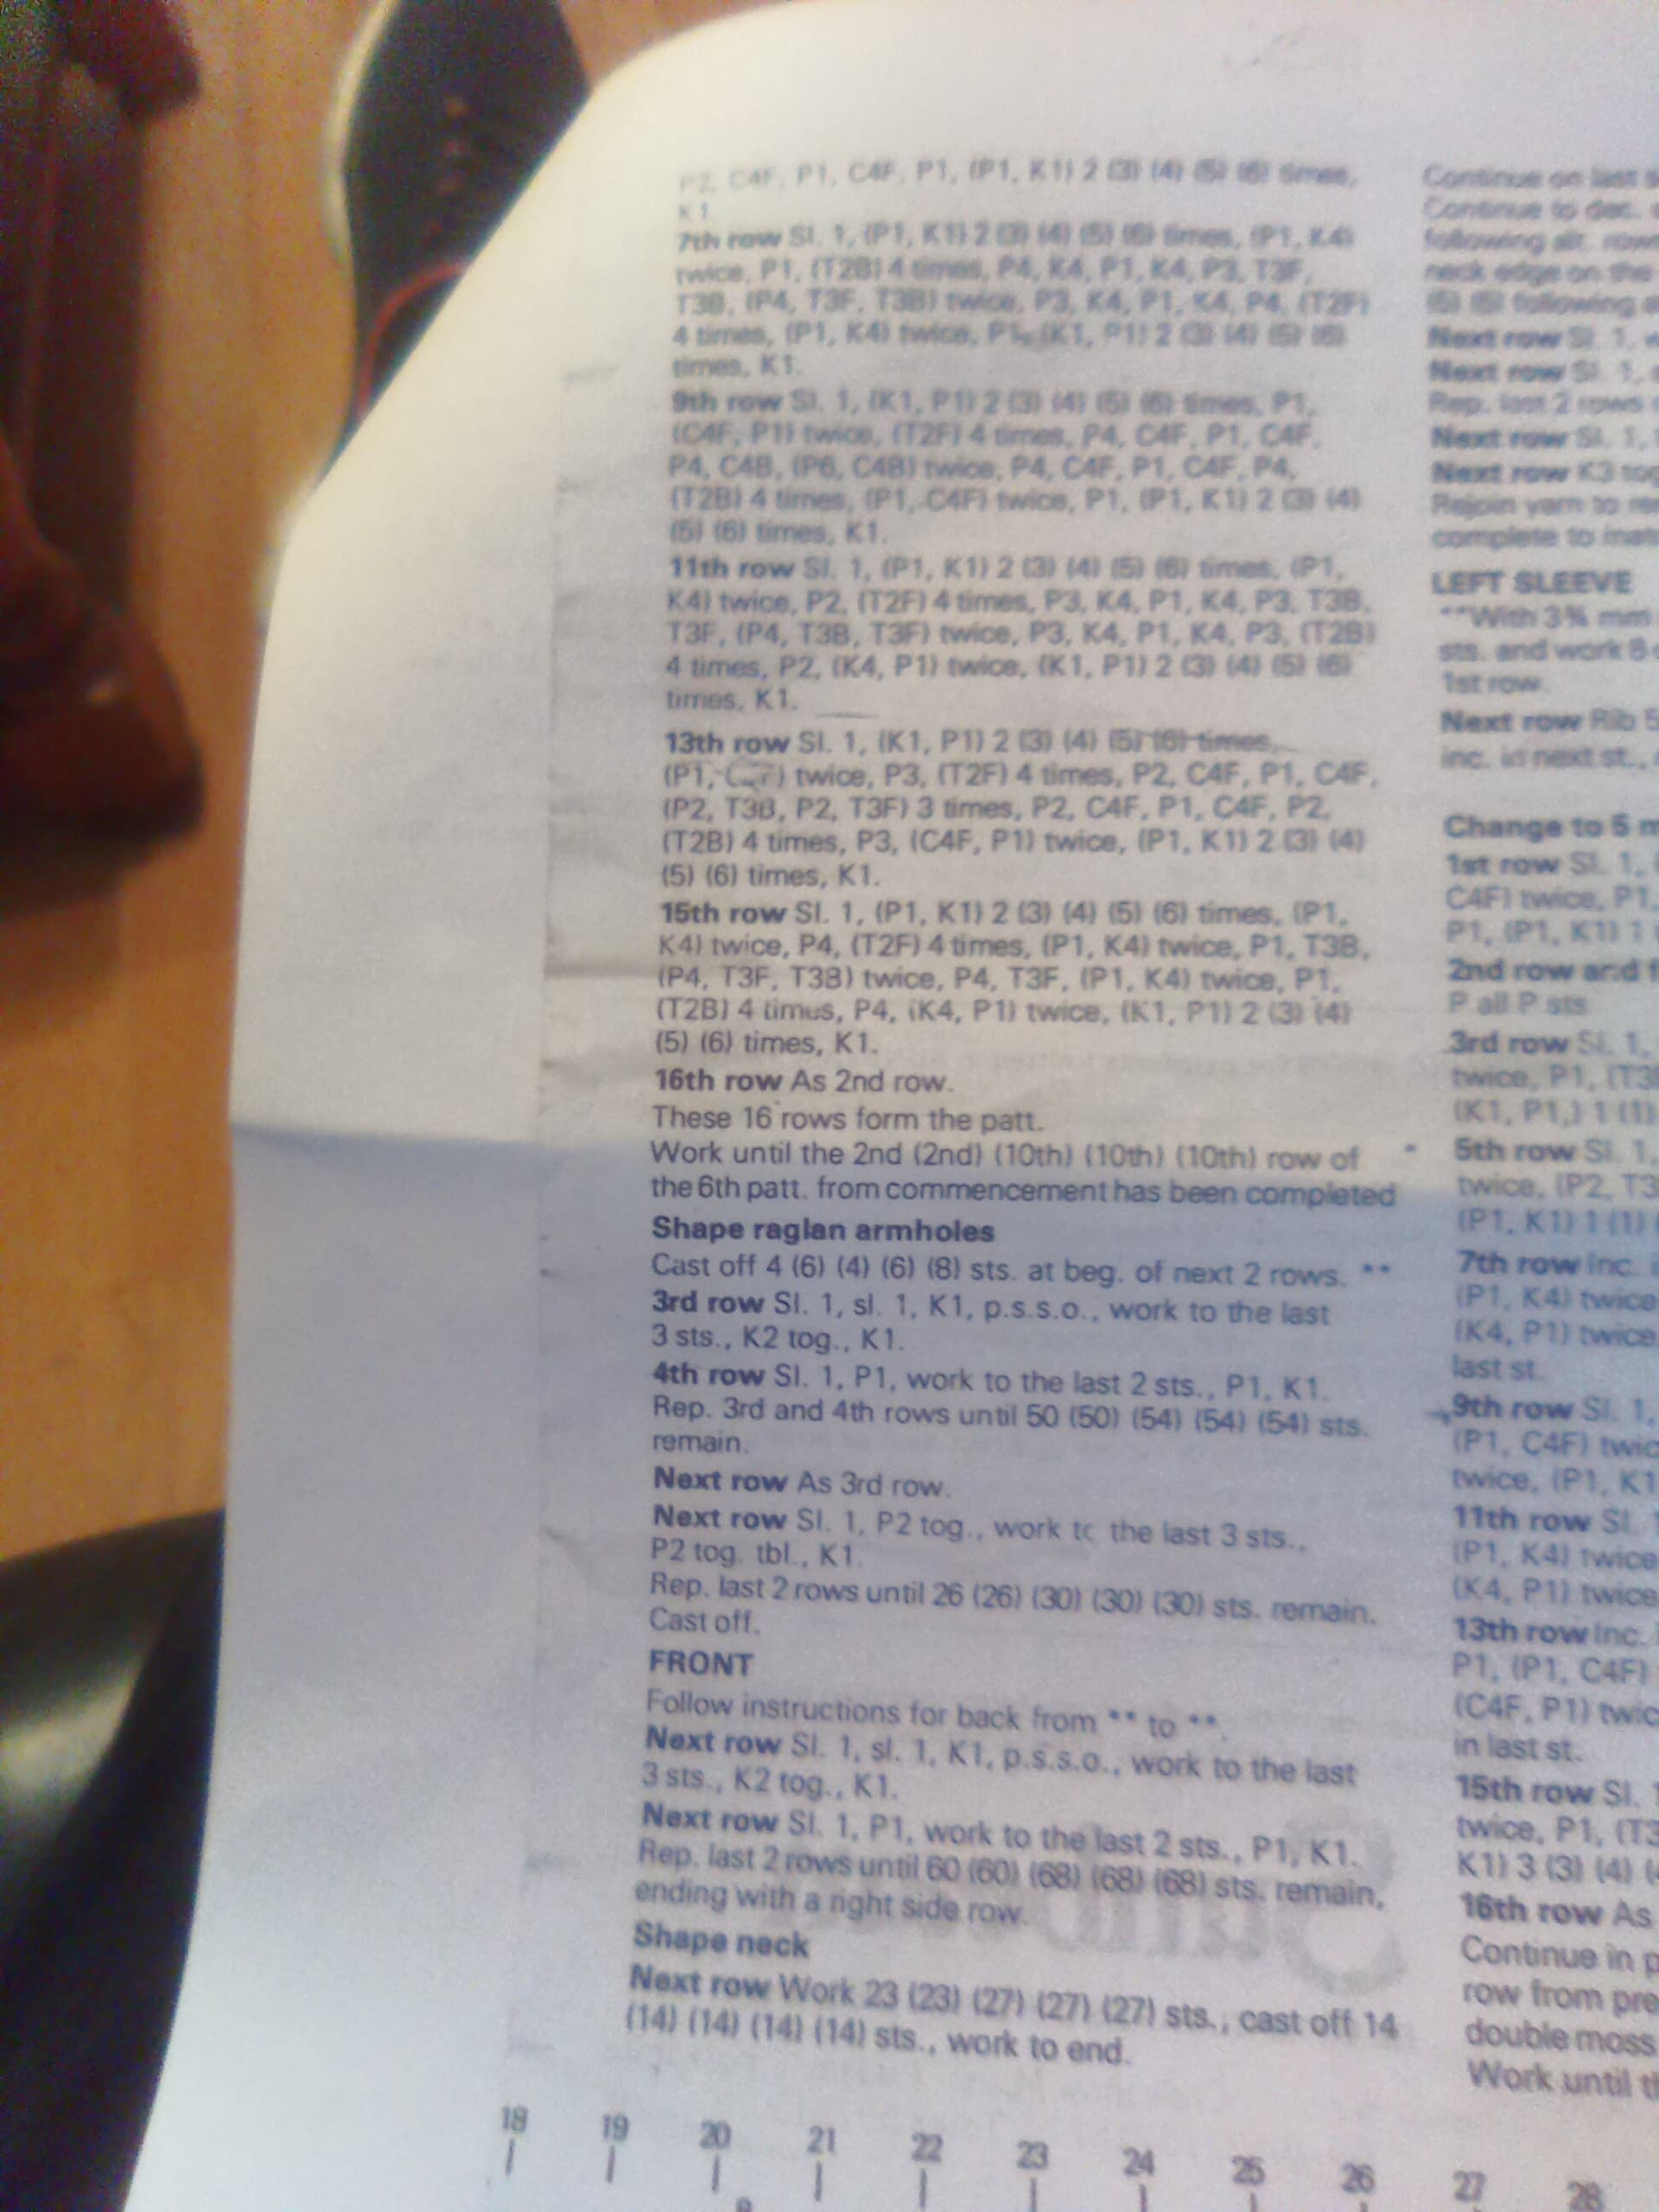
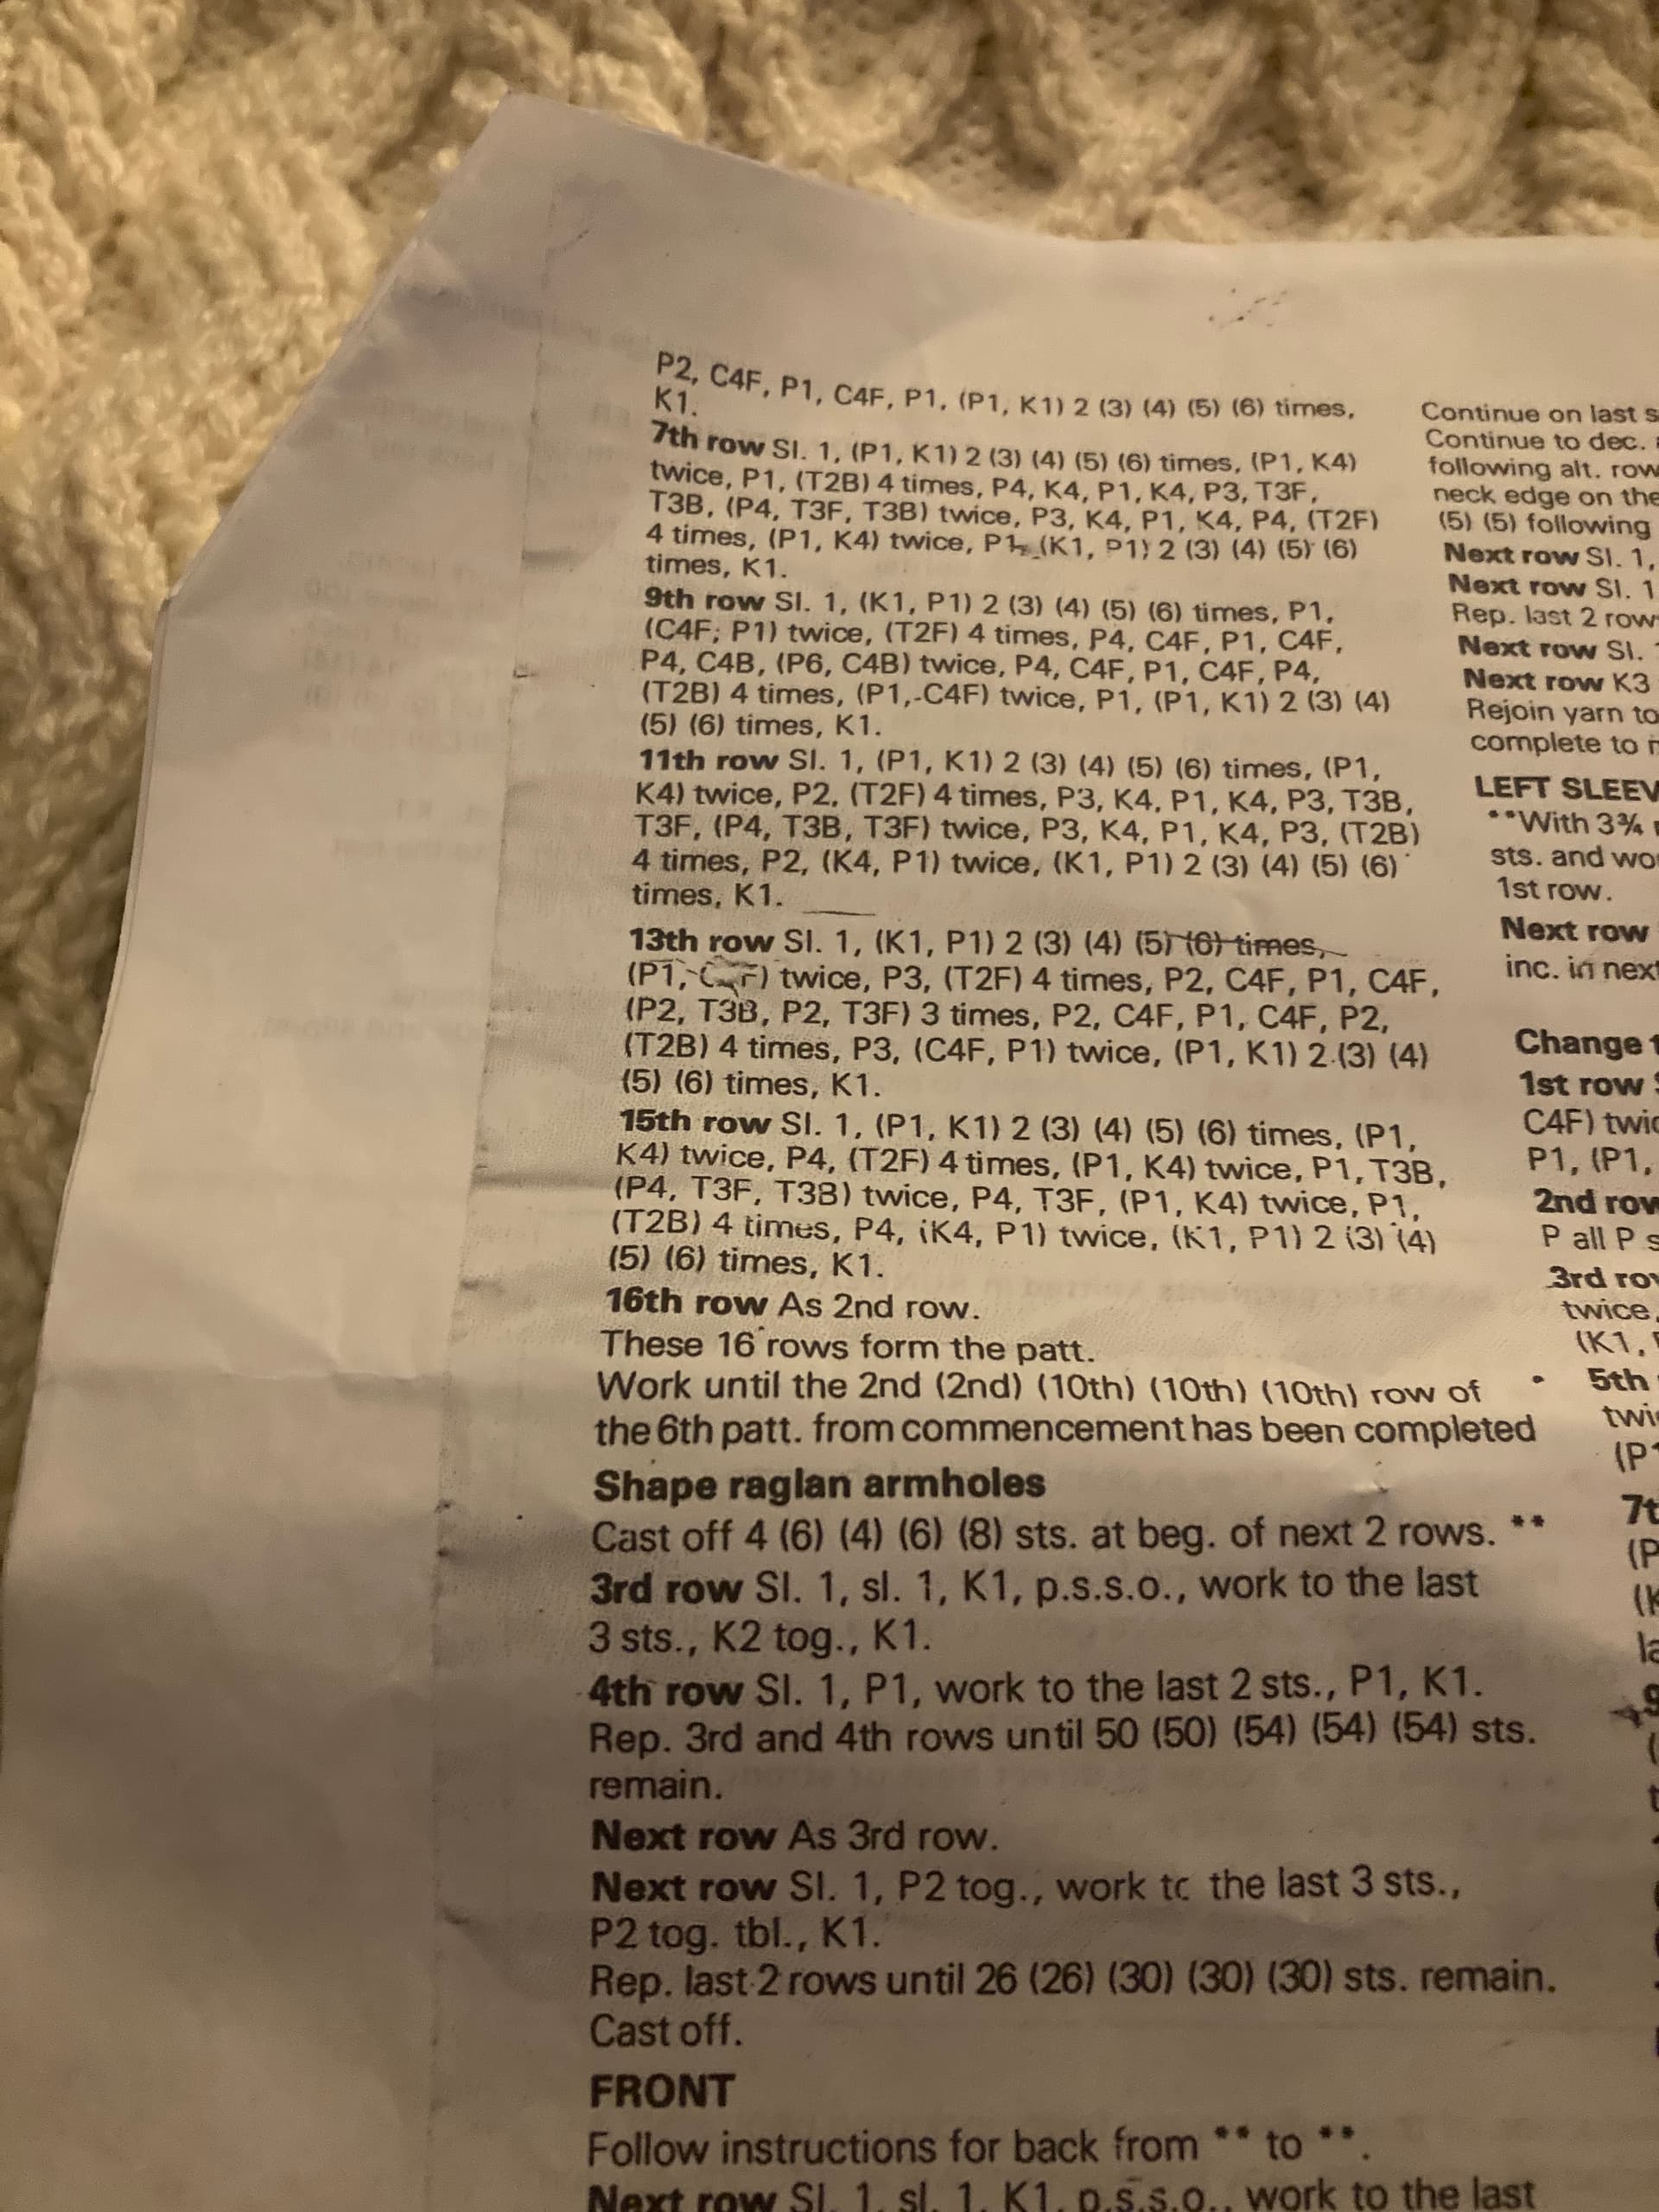
For the raglan armhole shaping begin by casting off the given number of sts for your size at beginning of the next 2 rows. So cast off at the beginning of the RS and then the WS rows.
Row 3 begins with a slip stitch then a slip one, knit one, pass slipped stitch over and ends with a k2tog and k1.
Work the sts of Row 4 as given.
Repeat rows 3 and 4 until only 50-54sts remain depending on the size you’re making.
Repeat Row 3 then work a p2tog decrease at the second and third stitch and then on the last 3sts, p2tog, k1. Repeat these last 2 rows until the given number of sts for your size remains.
I’m not sure if that is your question but just reply and let us know if you need more help. It may also help to know which size you’re making, first, 2nd, 3rd…
Morning
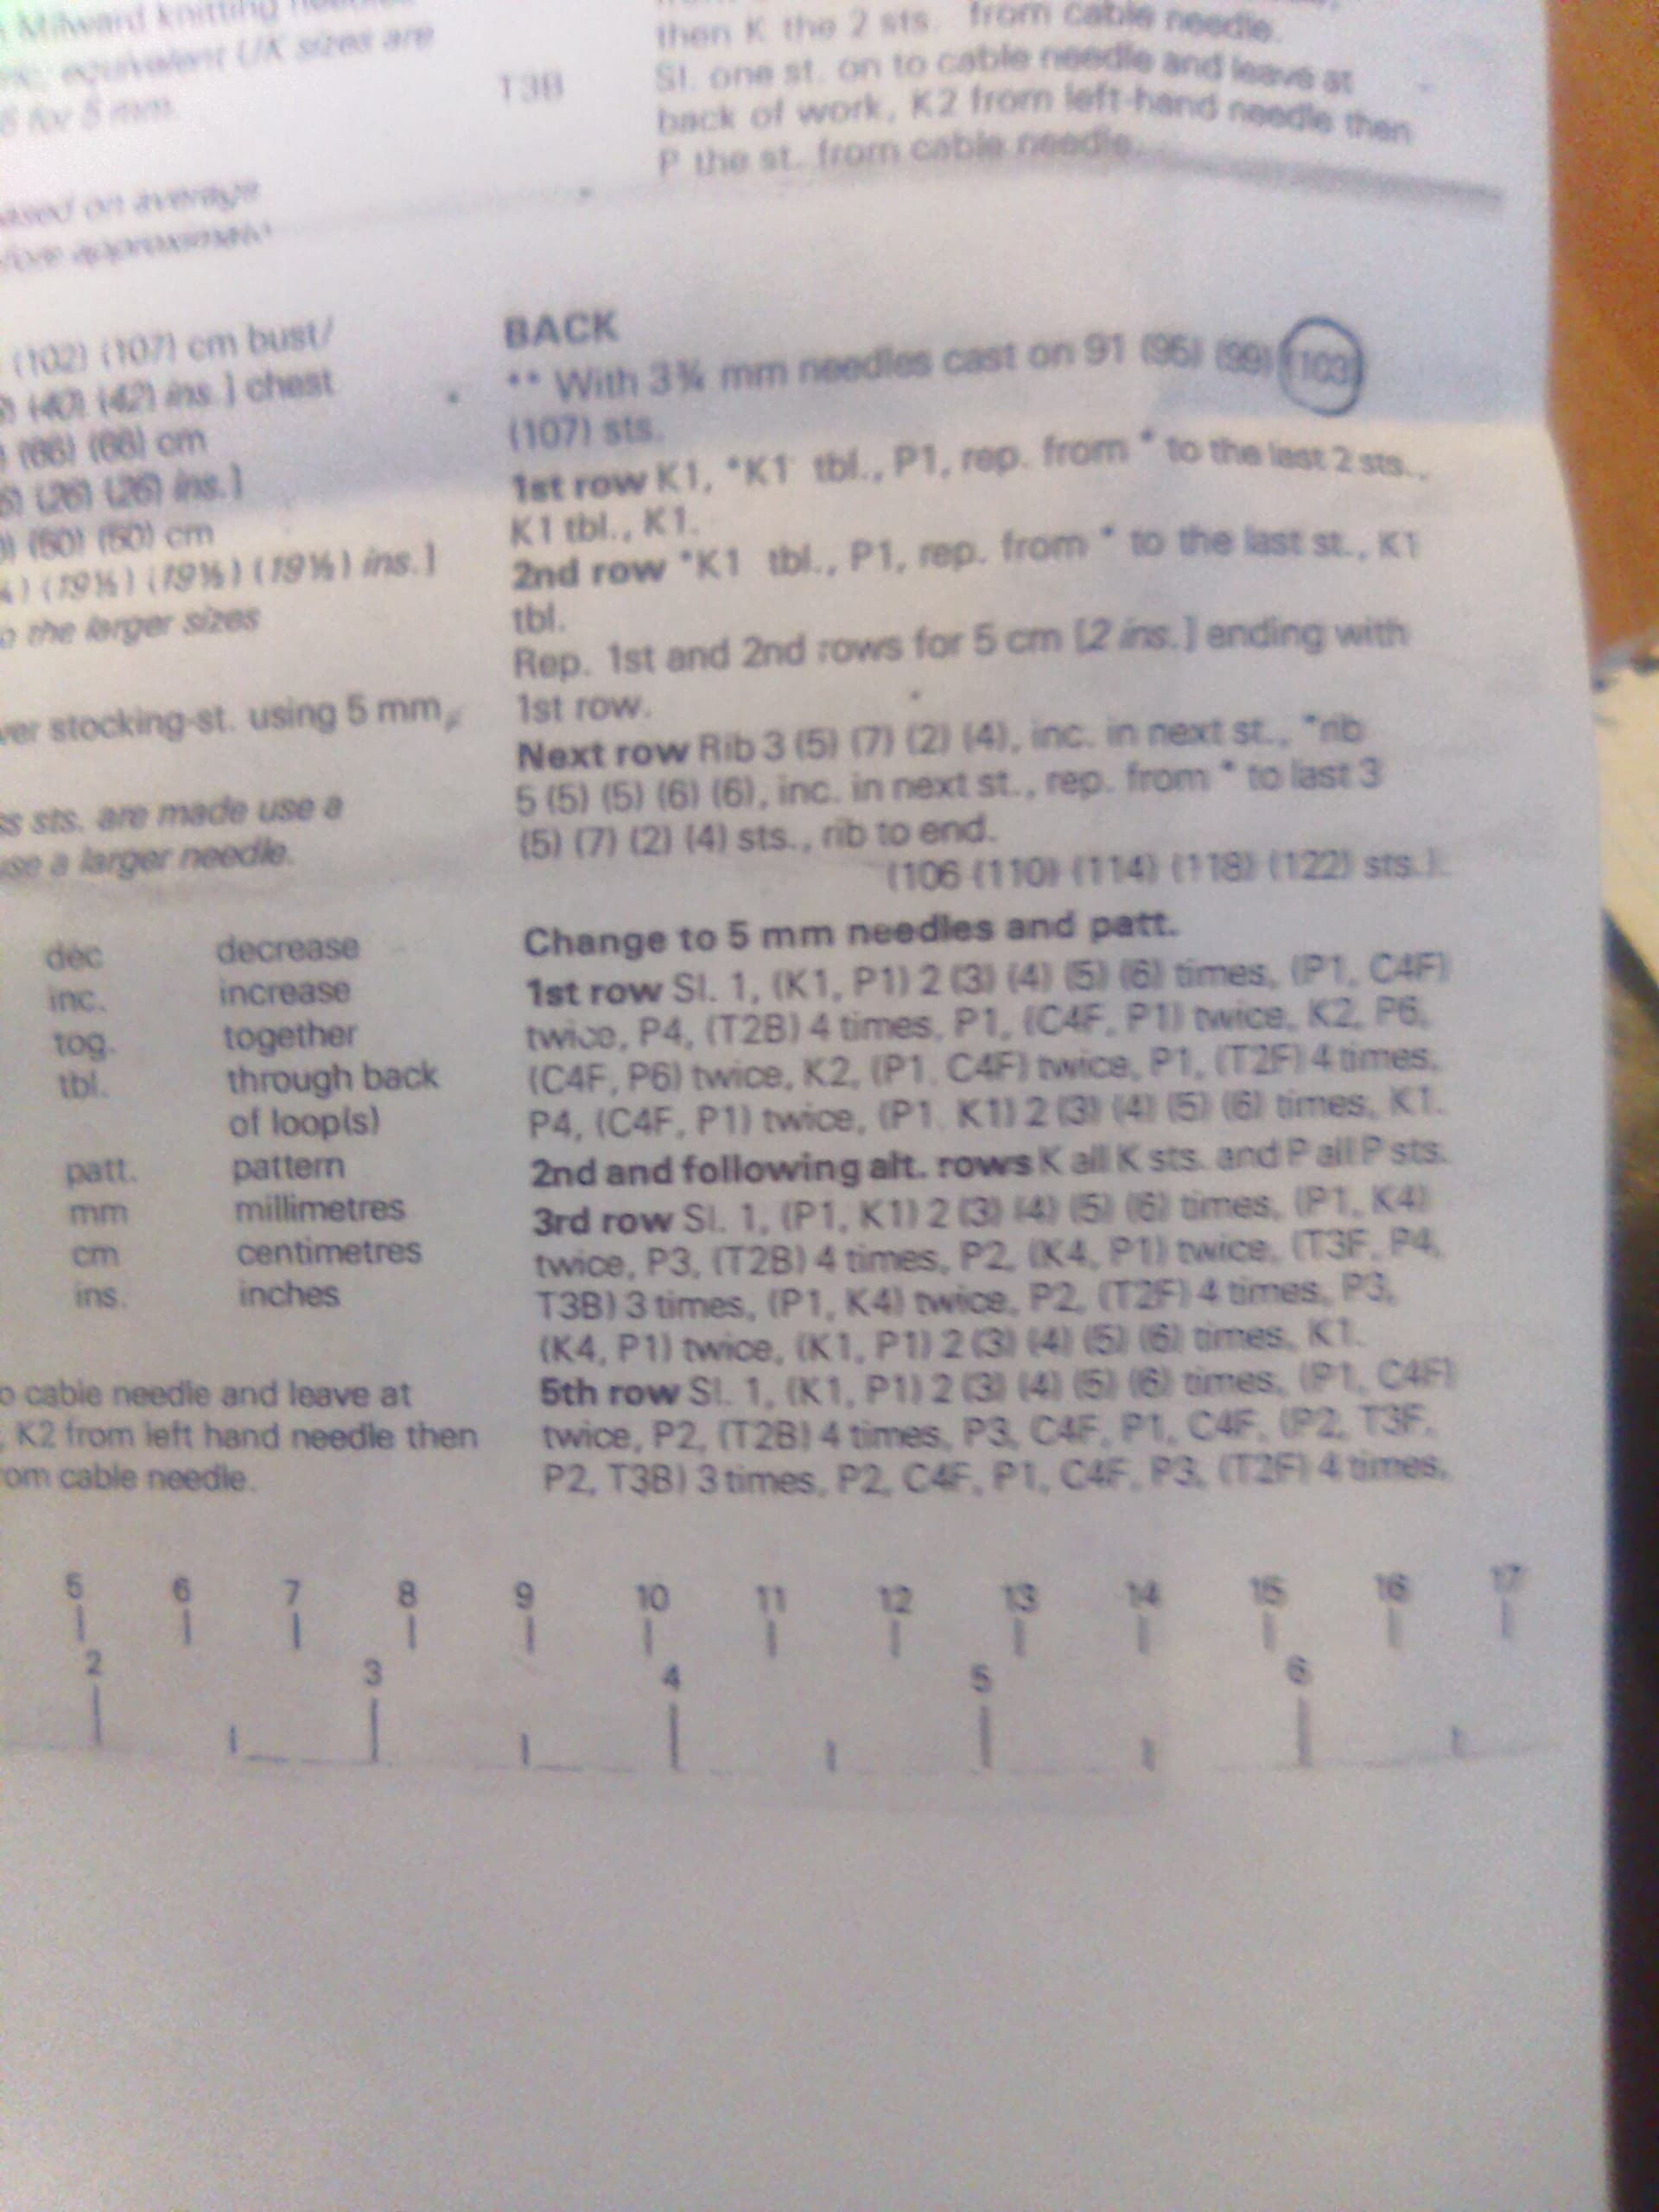
It is Sunbeam Aran 285, 2nd size. So I seem to be decreasing on edge stitches, do I continue pattern as normal. Your information is very helpful, thank you.
Yes, decreasing near the edges and maintaining the pattern across the body. The decreases actually happen one stitch in from the edge on each end.
You’ll have to account for those decreases as you work the body of the sweater so that the pattern stays aligned with previous rows. You can best do this by looking at the stitches in the row below and figuring out how to keep the current row in pattern or by deleting a stitch each end from the row directions.
https://www.etsy.com/listing/676665670/aran-sweater-vintage-1970s-lady-and-man?ls=s&ga_order=most_relevant&ga_search_type=all&ga_view_type=gallery&ga_search_query=sunbeam+aran+pattern&ref=sr_gallery-1-13&sr_prefetch=0&pf_from=market&dd=1&content_source=12d75464-9124-4f3c-bb3a-3dbdb02c4c7d%253ALTe8940341f0b55202c80342b92b0275828a252f63&organic_search_click=1&logging_key=12d75464-9124-4f3c-bb3a-3dbdb02c4c7d%3ALTe8940341f0b55202c80342b92b0275828a252f63
Ok so I need to decrease 6 stitches on rows 3 and 4, so would that be 2 at beg of each row and 1 at each end
Row 3 Slip. slip one, K1, psso. work to the last 3sts, k2tog, k1.
Row 4 Slip 1, P1, work to the last 2sts, P1, K1
For these directions there’s only the decrease at the beginning and one at end of row (bolded above). Are there decreases given in the body pattern for those rows? Can you quote the body pattern row that shows the decreases in the body (as opposed to the decreases at each end)? Just give us those 2 rows please due to designer copyright.
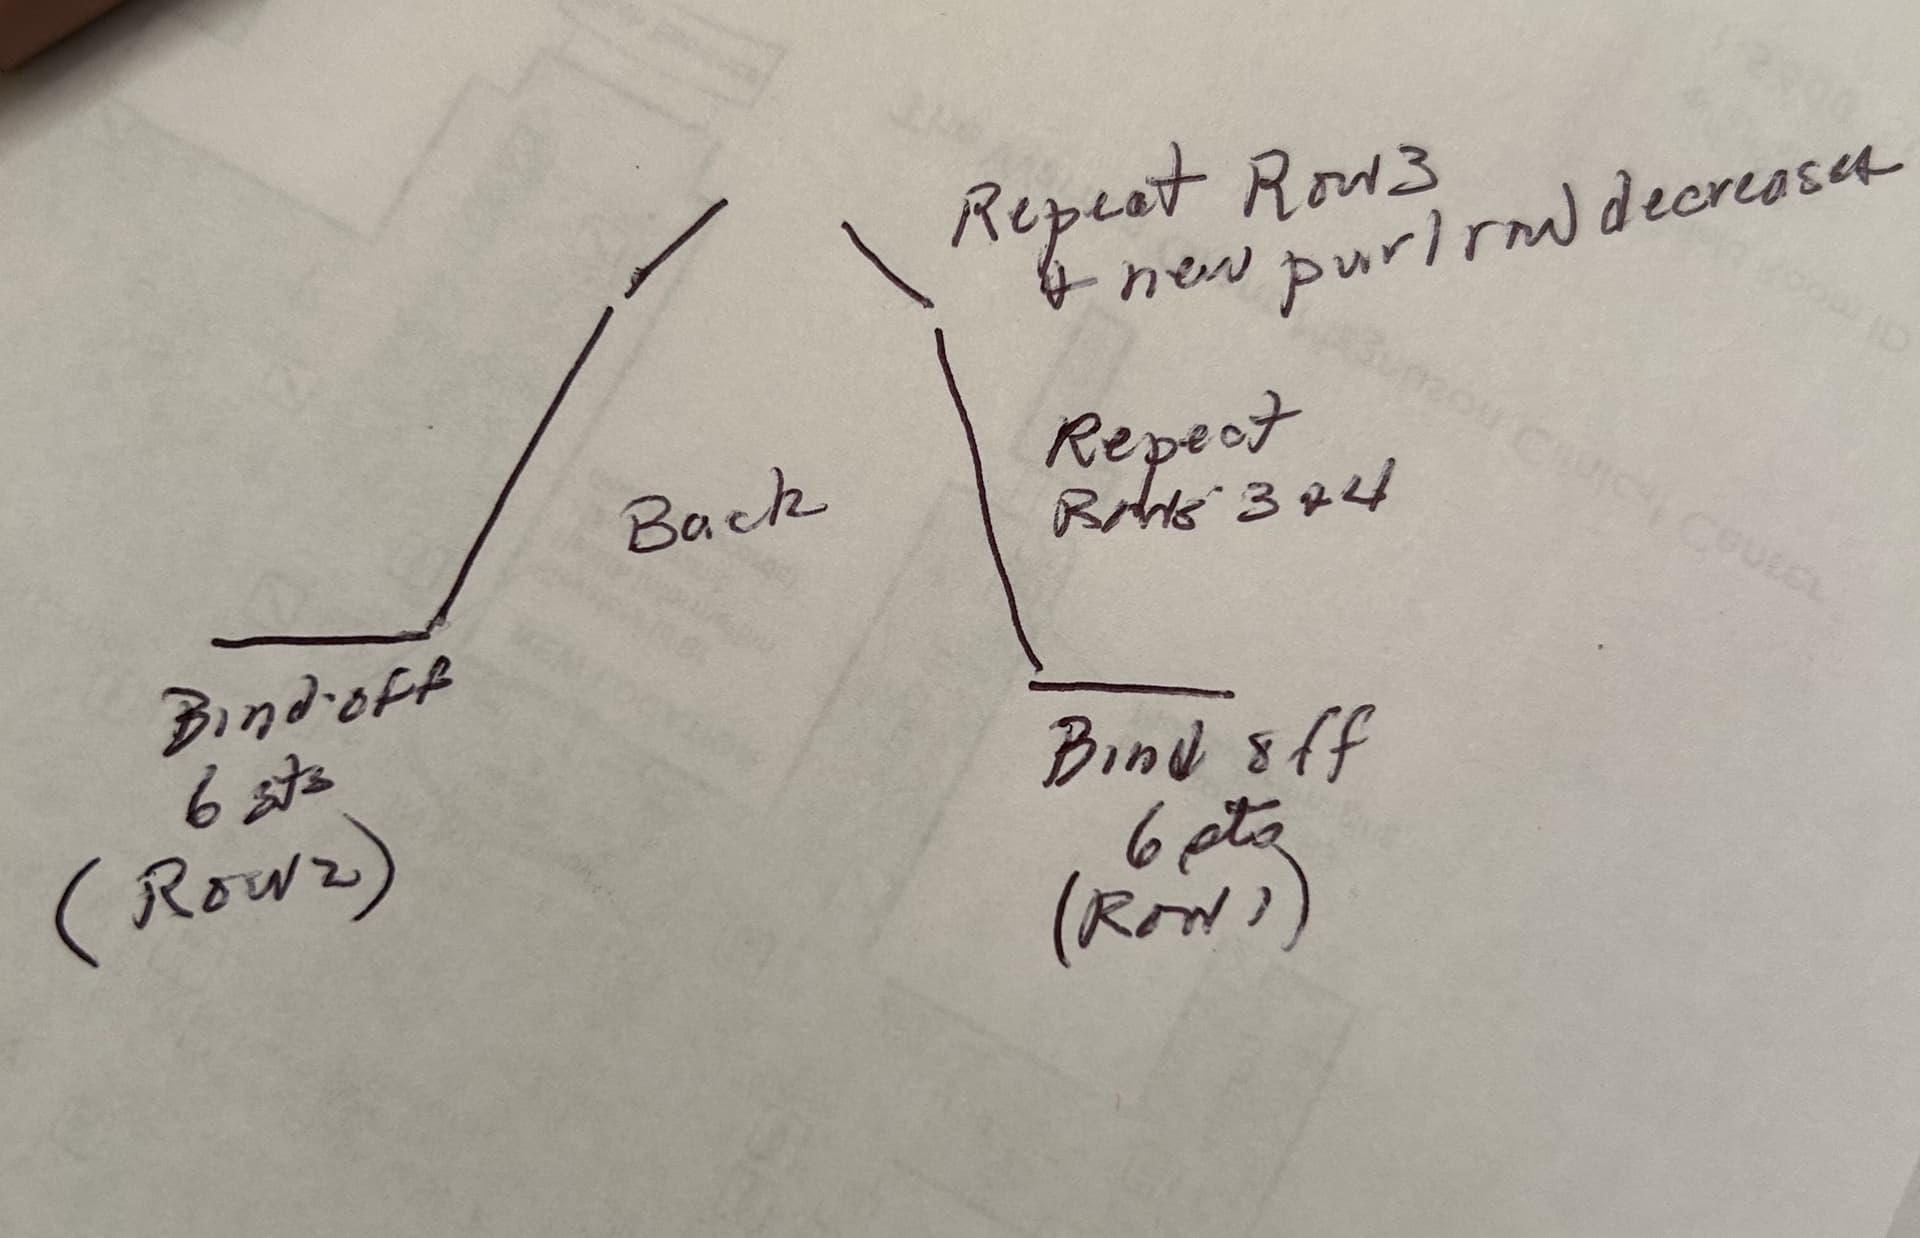
Cast off 6 STS at beginning of next two rows which are those you have listed, then it says next row as 3rd row and following row is a purl decrease- SL1 ,p2tog, work to last 3 STS, p2 tog. tbl, k1, rep last 2 rows until 26 STS remain
Ah, ok. So the second set of repeat rows are:
Row 5 (a repeat of Row 3) Slip. slip one, K1, psso . work to the last 3sts, k2tog , k1.
Row 6 Slip 1, P2tog, work to the last 3sts, P2tog tbl, K1.
There are 2 decreases in each row, one at the beginning and one at the end of row. There won’t be any other decreases in the body of the pattern.
Just to be clear, Rows 1 and 2 have the decrease of 6sts at the beginning of the row. Then repeat rows 3 and 4 until 50sts remain.
Once at 50sts, work rows 5 and 6 (called Next row) until 26sts remain.
Sorry for annoying you but how do I manage to decrease 6 STS at beginning of 2 rows when row 3 has only a decrease of 2 and row 4 has no dec’ do I keep decorating on row 3 for 3 rows
Not annoying at all. The decrease of 6sts at the beginning of rows 1 and 2 only occurs once in these two rows. It’s a bind off of 6sts each row. That’s the beginning of the underarm. Then proceed to rows 3 and 4 where there is a decrease at the beginning and end of row 3 and row 4 has no decrease.
Continue repeating rows 3 and 4 until 50sts.
Oh,are these two rows done before I start 3 and 4, 3 st decrease at beg of each row, I’m confused
Yes, exactly. The cast off of sts is separate and before you work Rows 3 and 4. It’s a cast off of 6sts at each row, that is, Row 1 and Row 2 only. Cast off 6sts, work to the end of Row 1, turn and cast off 6sts at the beginning of Row 2. Then work to the end of the row.
Now start Rows 3 and 4. Alternate Row 3, Row 4, Row 3, Row 4, etc until you reach 50sts remaining.
Keep asking until this is clear. We don’t have any limit on the number of quetions or clarifications needed, ever.
Hi
You are so helpful and clear with instructions. I misunderstood it because the 6th pattern ended on the 2nd row also.
I’ll try this now.
Thank you
Ann
See how it goes and if it’s still not making sense, don’t hesitate to come back and ask again. Good luck with this lovely sweater and have fun knitting it!
Hello
I am doing the row 3 decrease and when I sl1, sl1 , paso, I have only 3 sets of cable left, is it ok to c3f
Regards
Ann
C3F instead of C4F? Yes, that is a good way to continue the look of the cable near the edge for perhaps the last time. Hold 2sts to the front to maintain that left cross.
Patty Lyons agrees. See partway down this column.
Thank you so much for all your help, the link is very helpful. I am able to incorporate the decreases into the pattern and it looks good.
1 Like
Looking forward to a photo when you finish! Have fun with it.
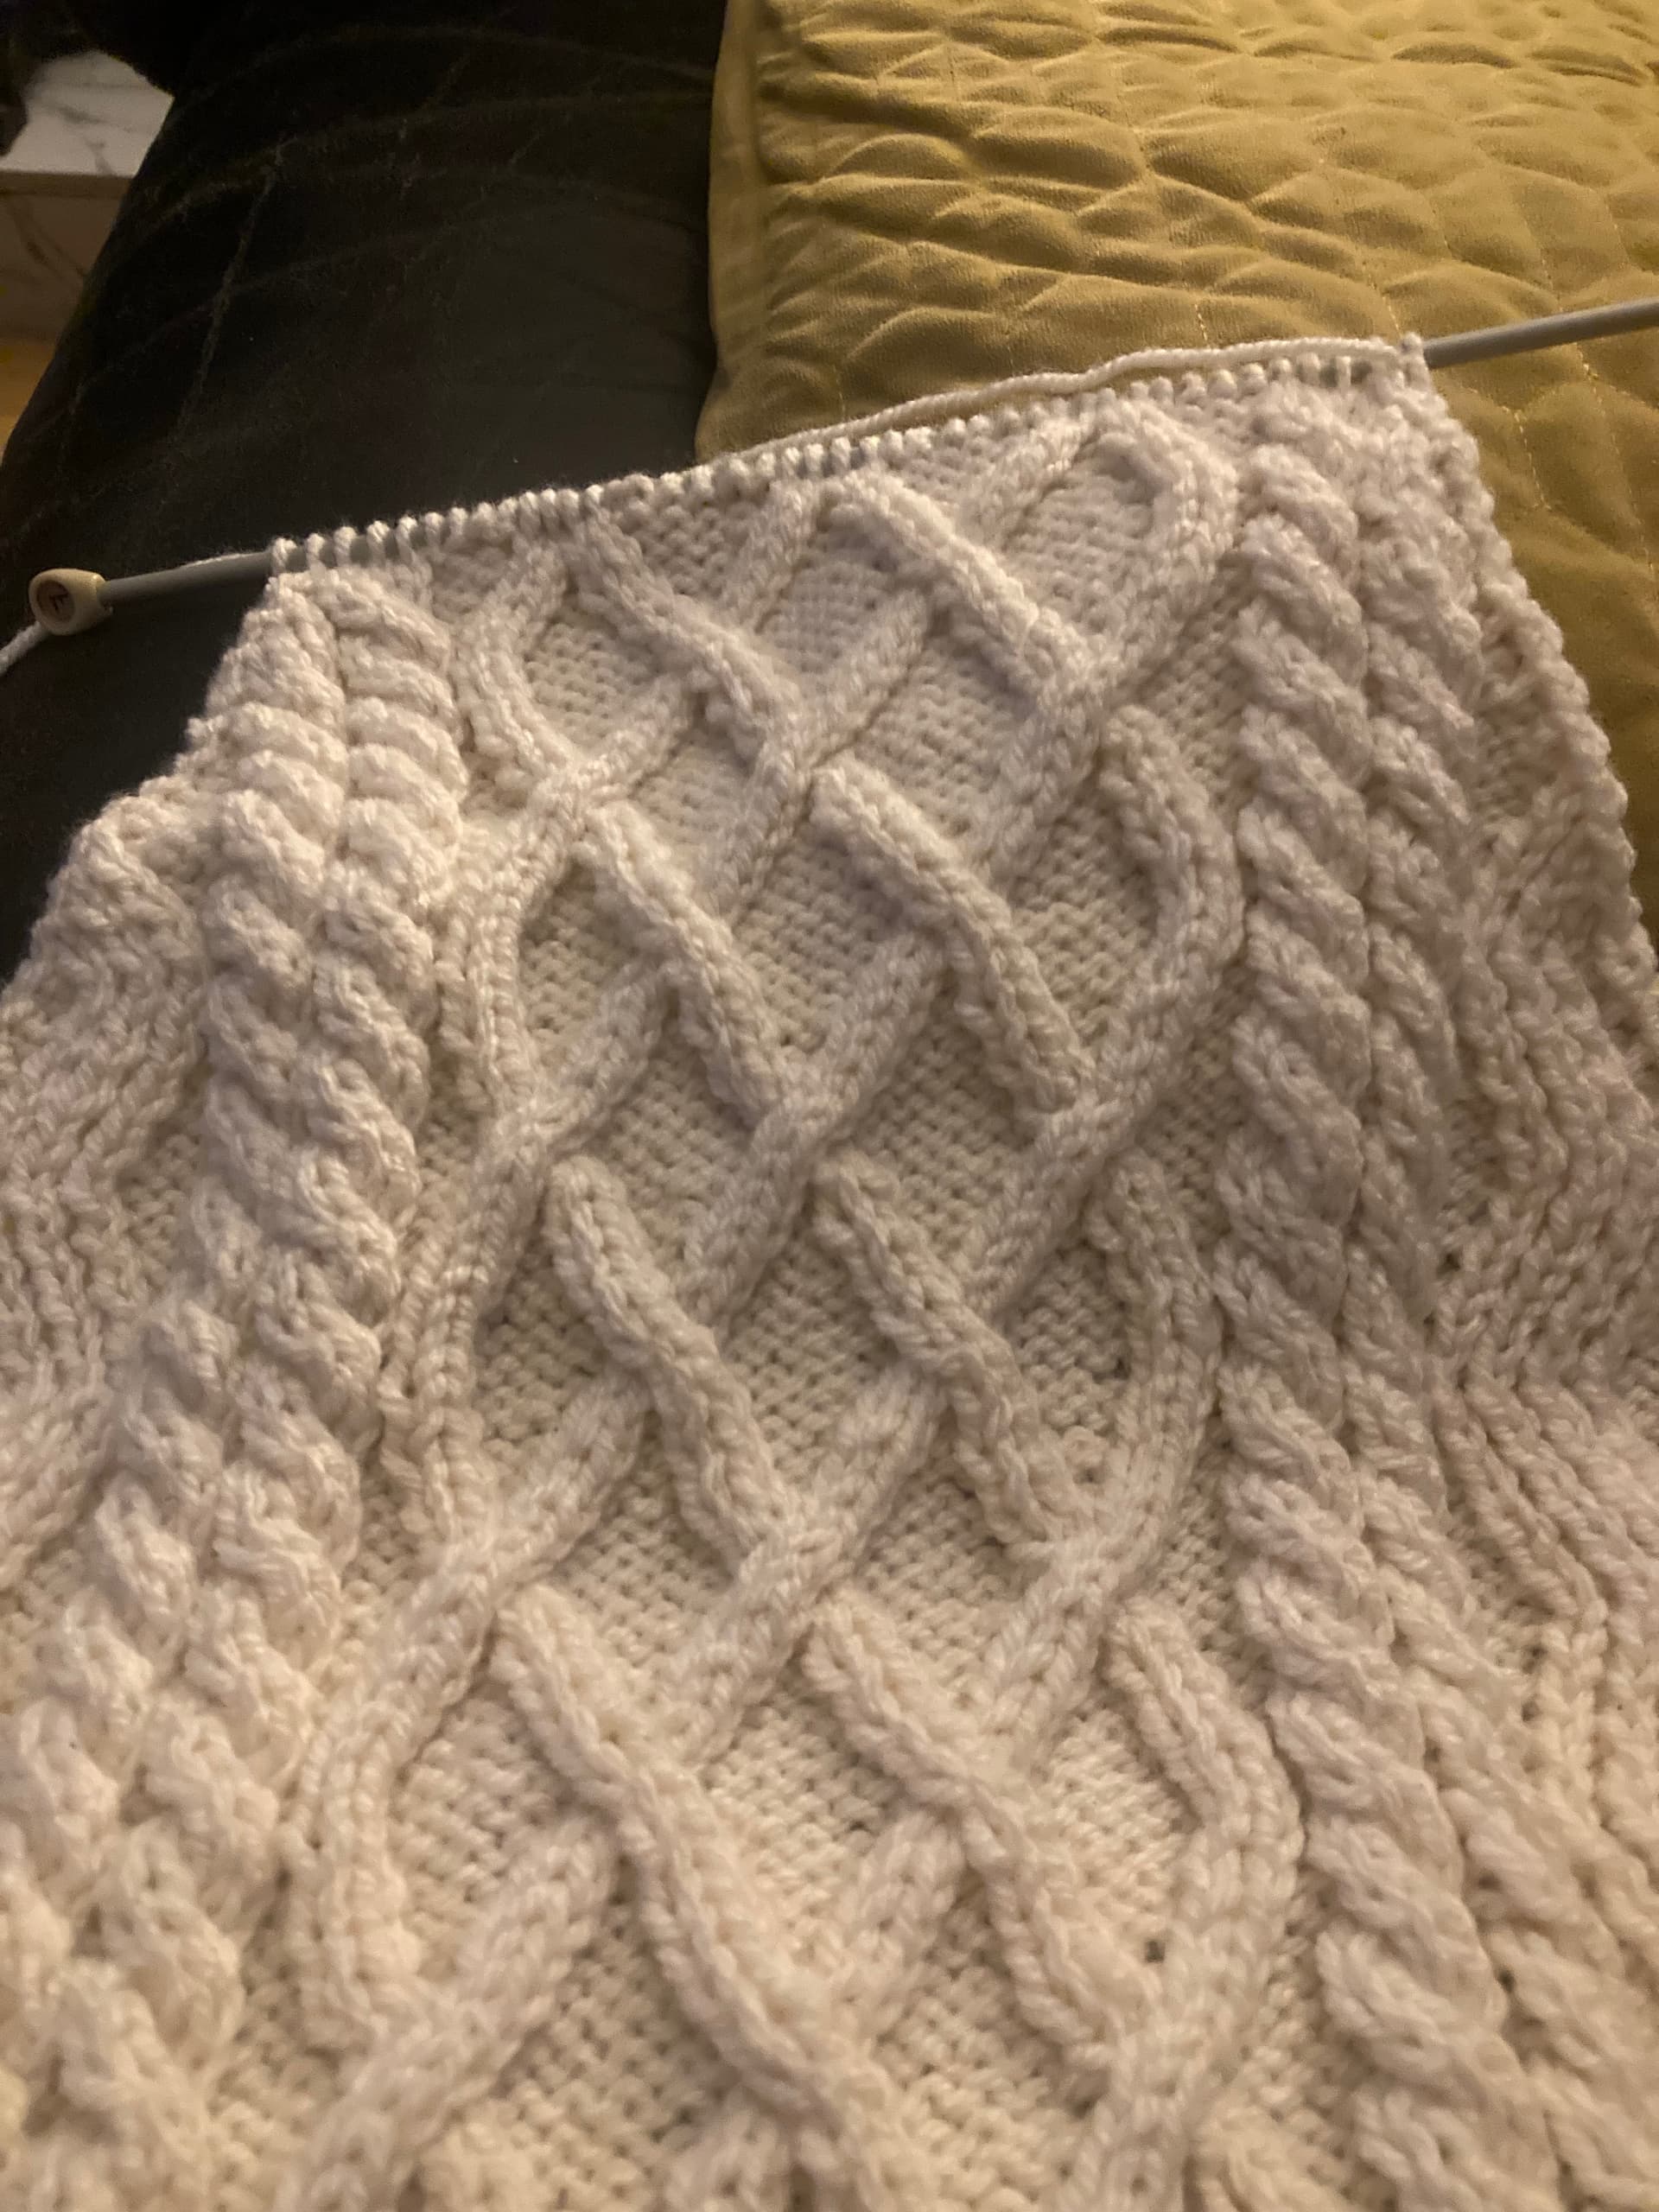
It looks like you’re up to crossing the 2sts over 2sts in the center panel, a C4B or right cross. The crosses of 2sts over 2sts (C4B) occurs in row 9. Is it possible that’s the row you’re up to?