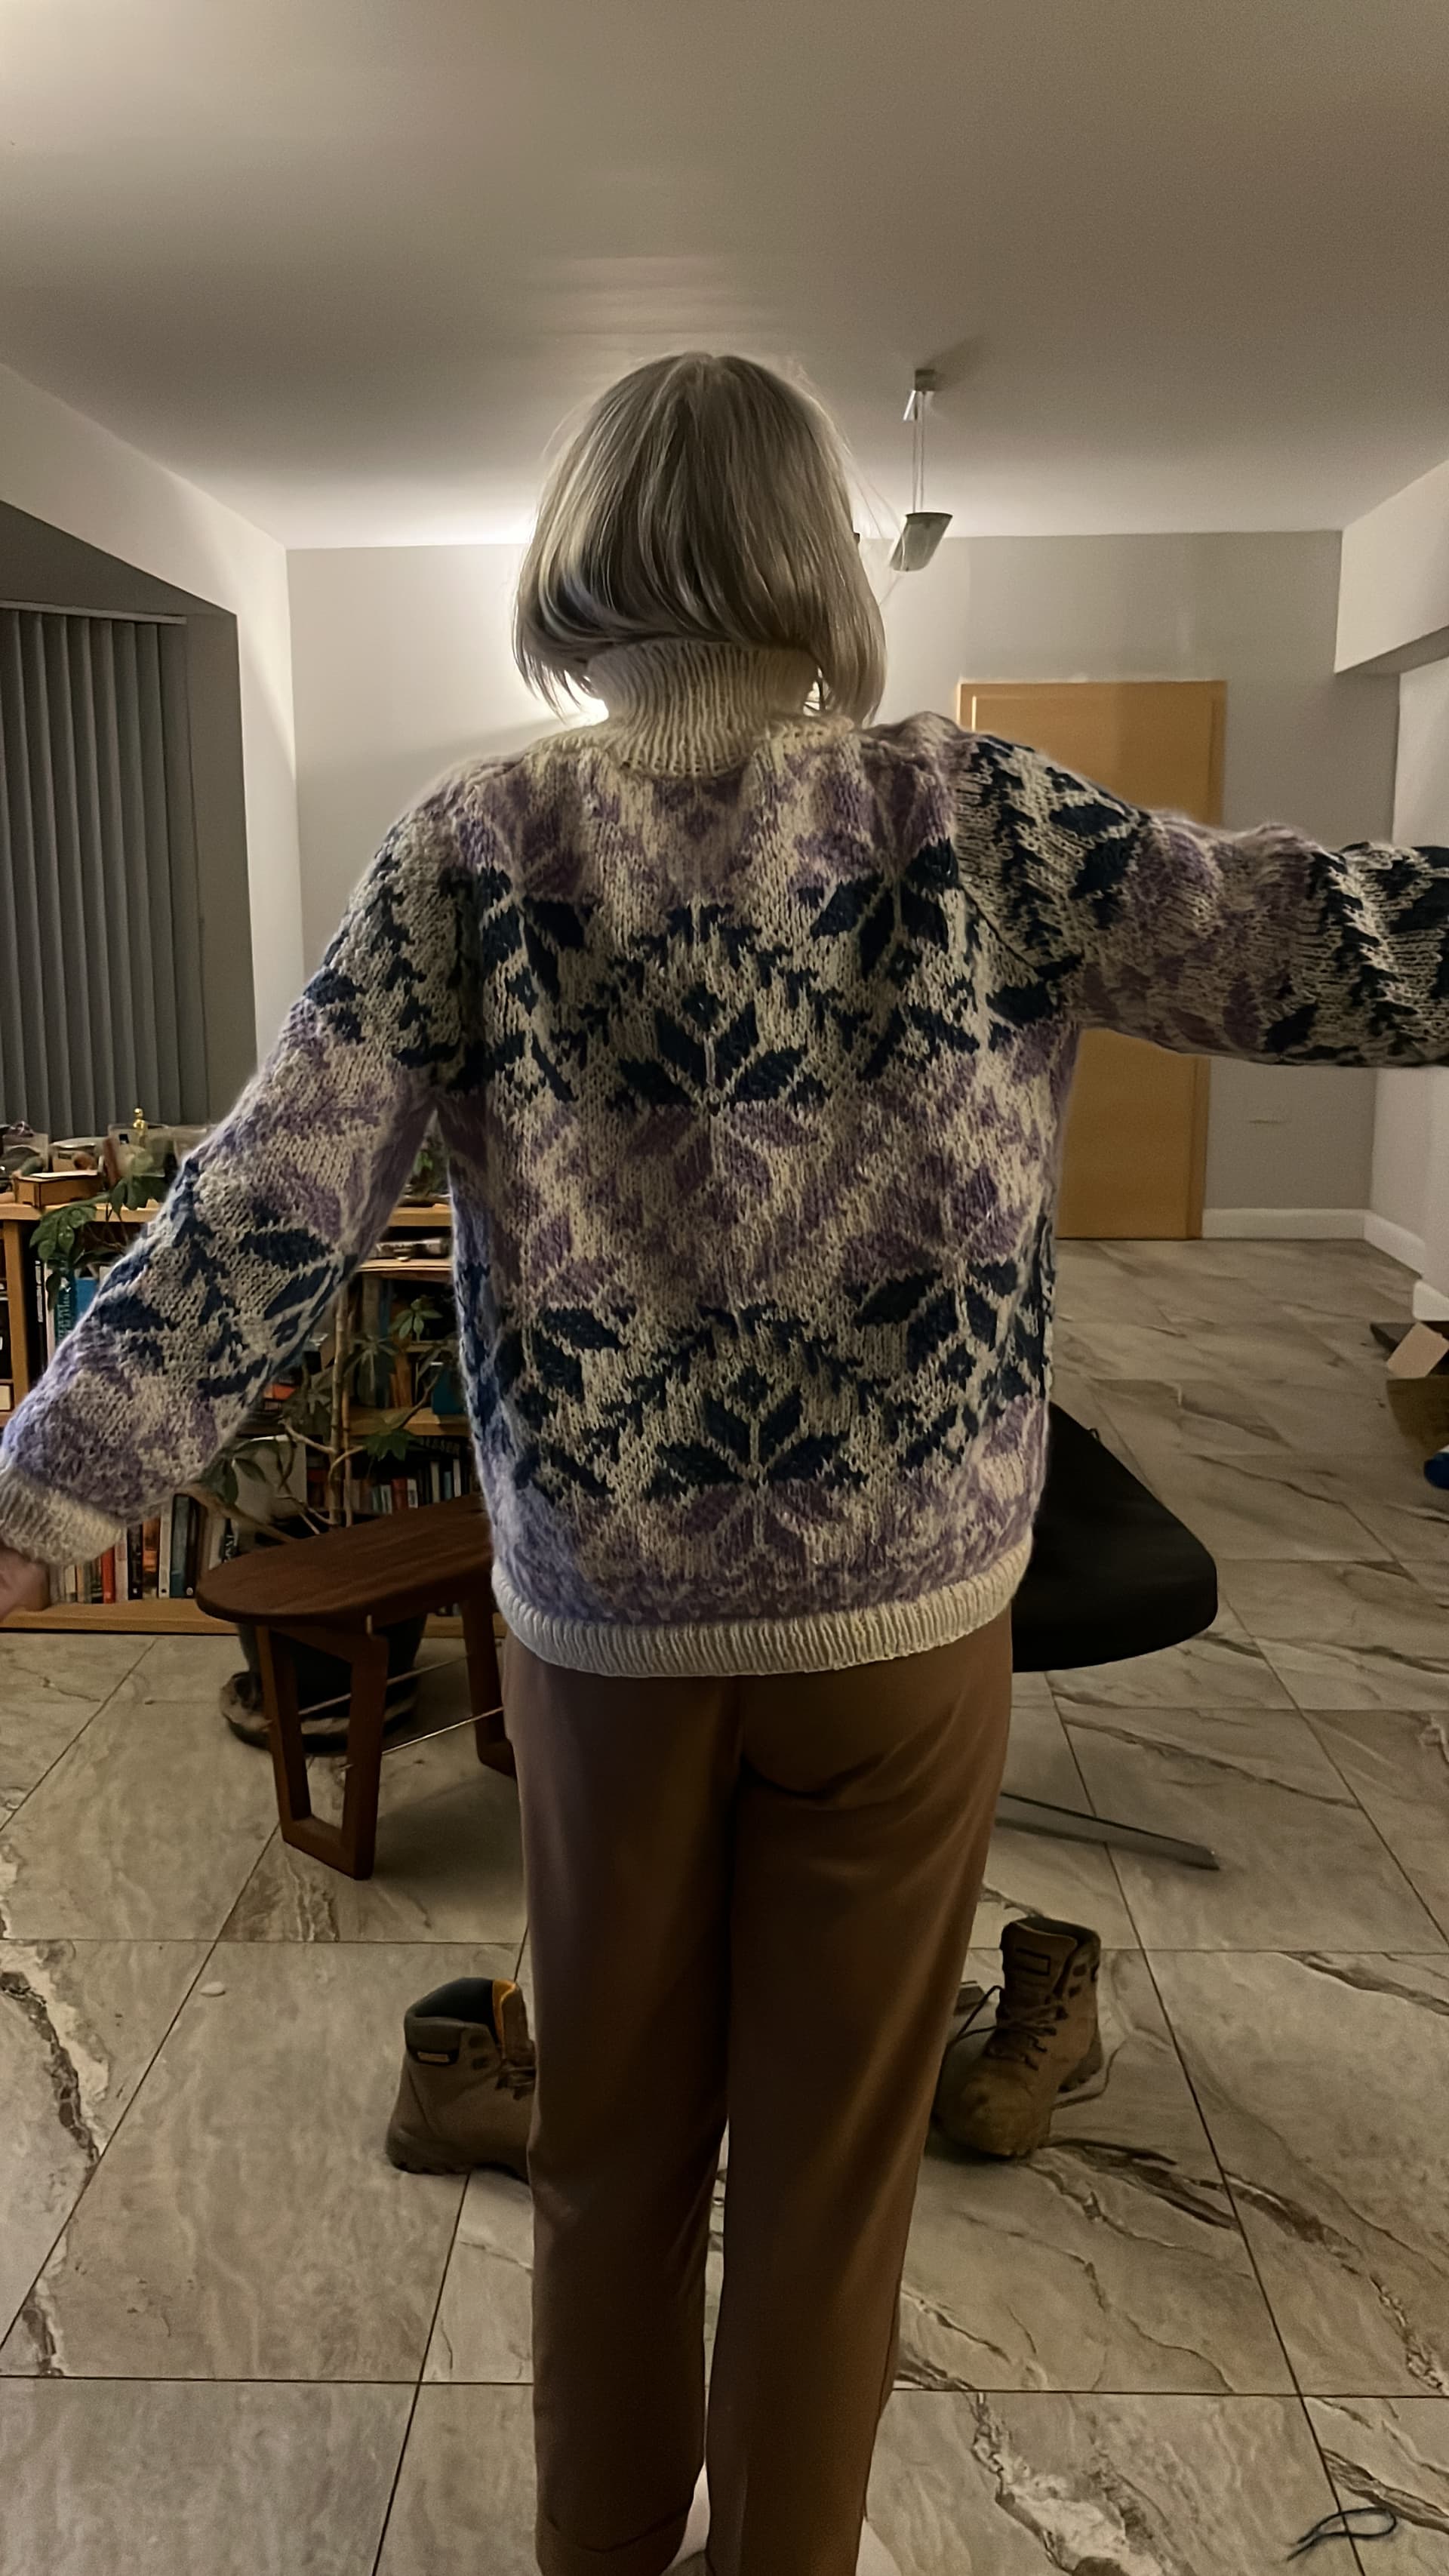
The sweater has very worked out very nicely and is a triumph over a cryptic pattern. It’s truly amazing work for a first sweater!
It helps to stretch out the recently knit sts on the right needle before you start the new color. That ensures that the float or carried yarn isn’t too tight to pucker the knitting. Sometimes it can also help to practice making the float a bit too loose just to get an idea of the tension needed. Practice with colorwork is invaluable.
Ah, the yarn flip. We’ve just been posting about that. There are good suggetions here: https://forum-new.knittinghelp.com/t/hem-flip/164129/6
Stockenette has a strong tendency to flip hems, buttonbands, whatever it comes in contact with. Gravity and blocking will likely help with the flip too.
Is the neck forming a funnel shape? If so, picking up fewer sts or decreasing after the initial pick up can help. As can knitting with a smaller needle. You’re not the only one who has been unhappy with the neck as the Ravelry posts show. There’s quite a variety of necklines as ColoCro noted.
Wow, you bit off a lot for your first sweater! It’s OK, a lot of us do it…my first one was a cabled cardigan with inset pockets! But I took a class…
Did you do your gauge swatch with the colorwork? It makes a big difference. Also, most people have different gauge when knitting flat vs. knitting in the round.
There are various tricks to help with colorwork–catching the floats every 4 stitches so you don’t have such long ones, being very careful to keep the floats loose, and even knitting it inside out so the floats are on the outside (if knitting in the round), which automatically makes them a bit longer. Mostly, it’s practice and awareness.
@salmonmac just posted a long discussion on this very topic.
I very much enjoyed doing the Campside Classic, which has a nice, relaxed fit:
This one has a closer fit:
And there’s a pullover:
They’re all worked top-down, which will give you another take on raglan shaping, and I promise it’s better-written than the Esther!
You have worked this sweater magnificently. You should be really pleased with it. It could as easily be your 10th sweater or 20th sweater. You’ve done a brilliant job of it and, regardless of how many sweaters you’ve made, learning to work with multiple colours is a massive leap from single colour items.
Your strands look almost perfect on the back and almost every stitch is of equal size on the front which is very impressive. Yes it’s a bit bumpy at the moment but when you wash or block the sweater the yarn will relax and give a smoother finish than you currently have.
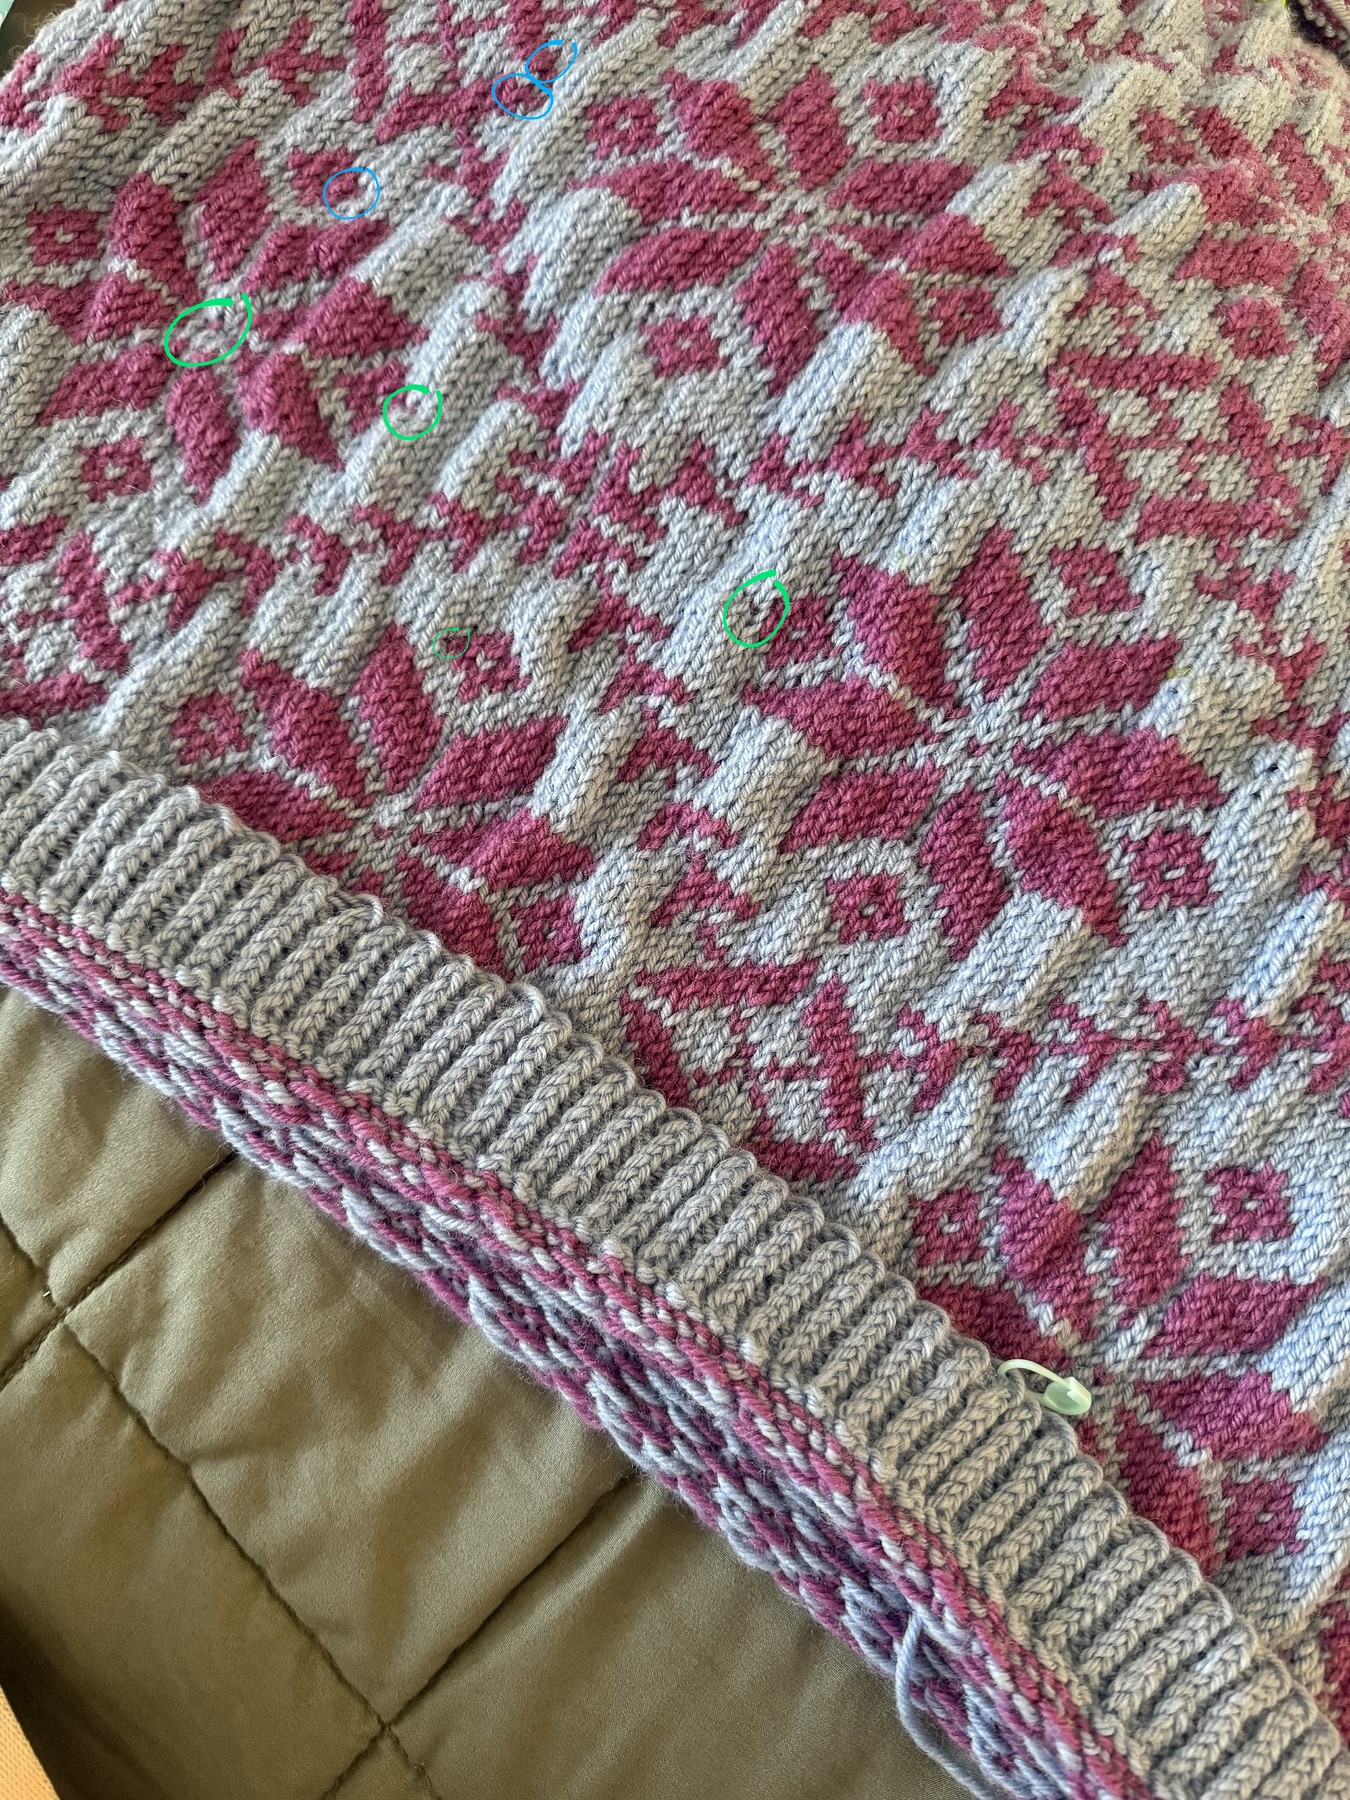
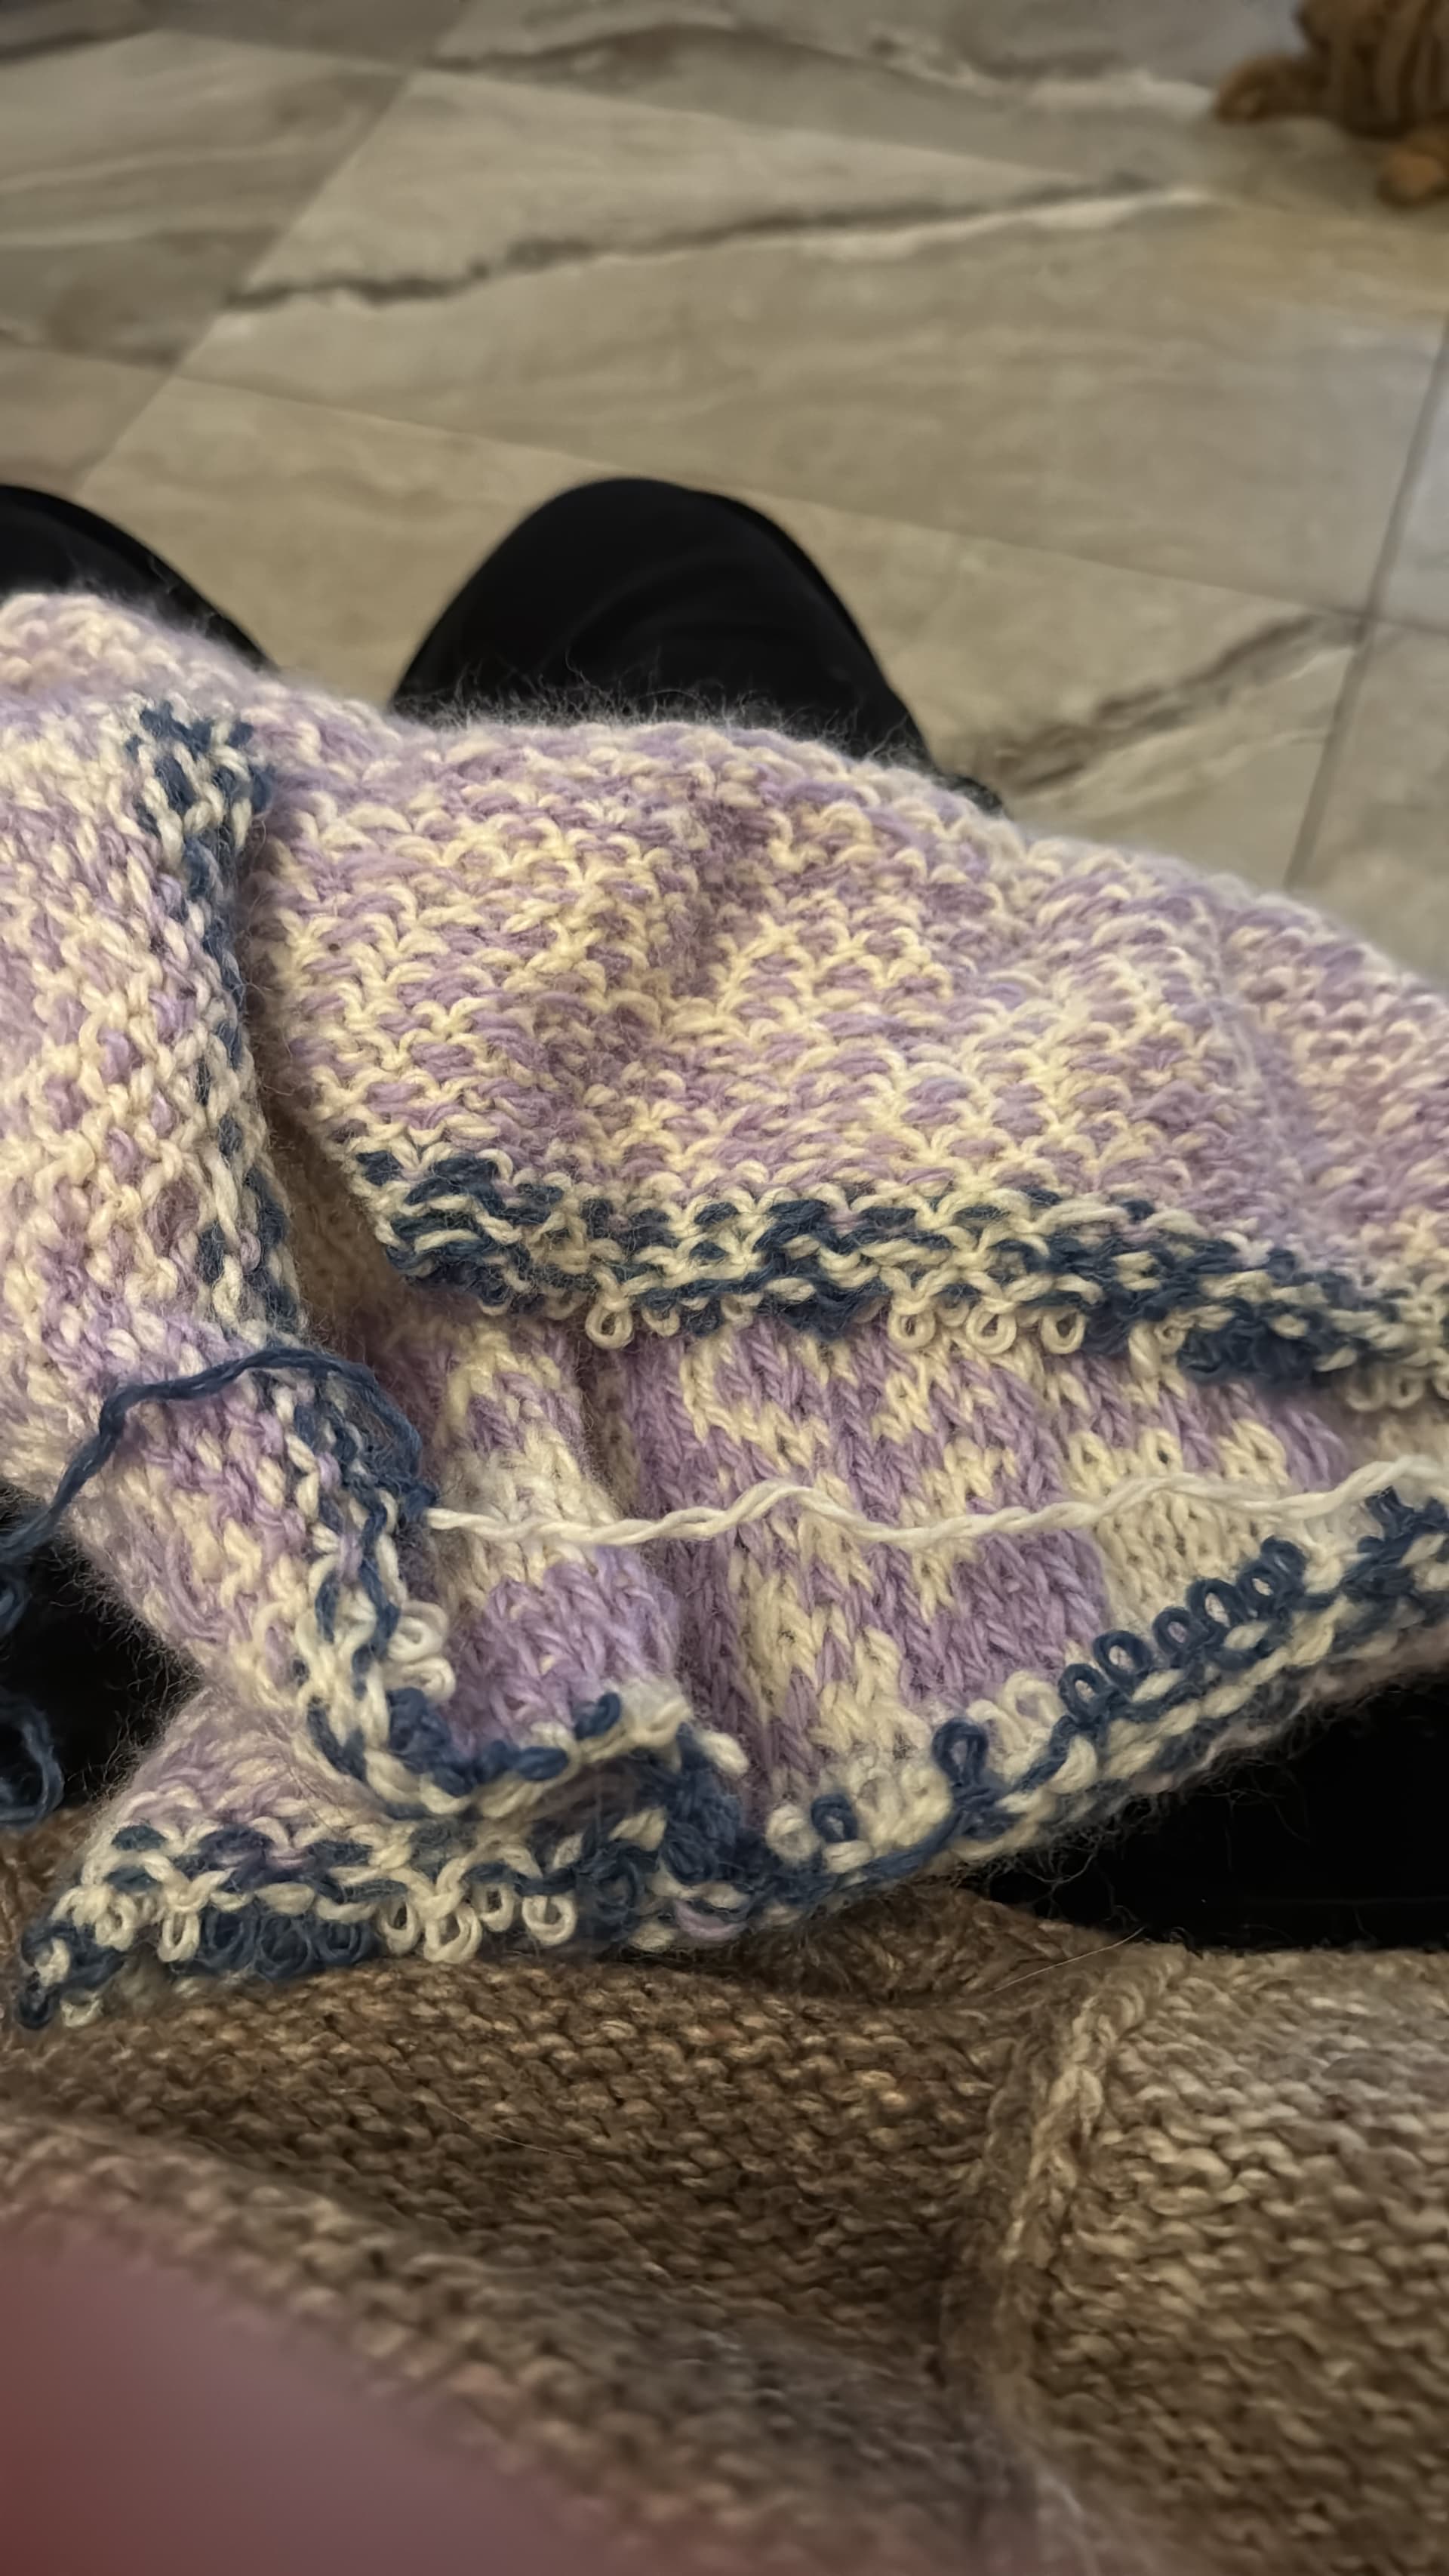
There are very very few stitches of unequal size (mine have loads of unequal size but it doesn’t stop me knitting) and really there is just lovely as it is, but as you have asked questions and want to learn tricks, I have highlighted the very few places I can see a different size stitch. These can most likely be manipulated a little to even them out (I’m being super picky zooming in to find those stitches which honestly no one in real life would ever spot if you just wore it).
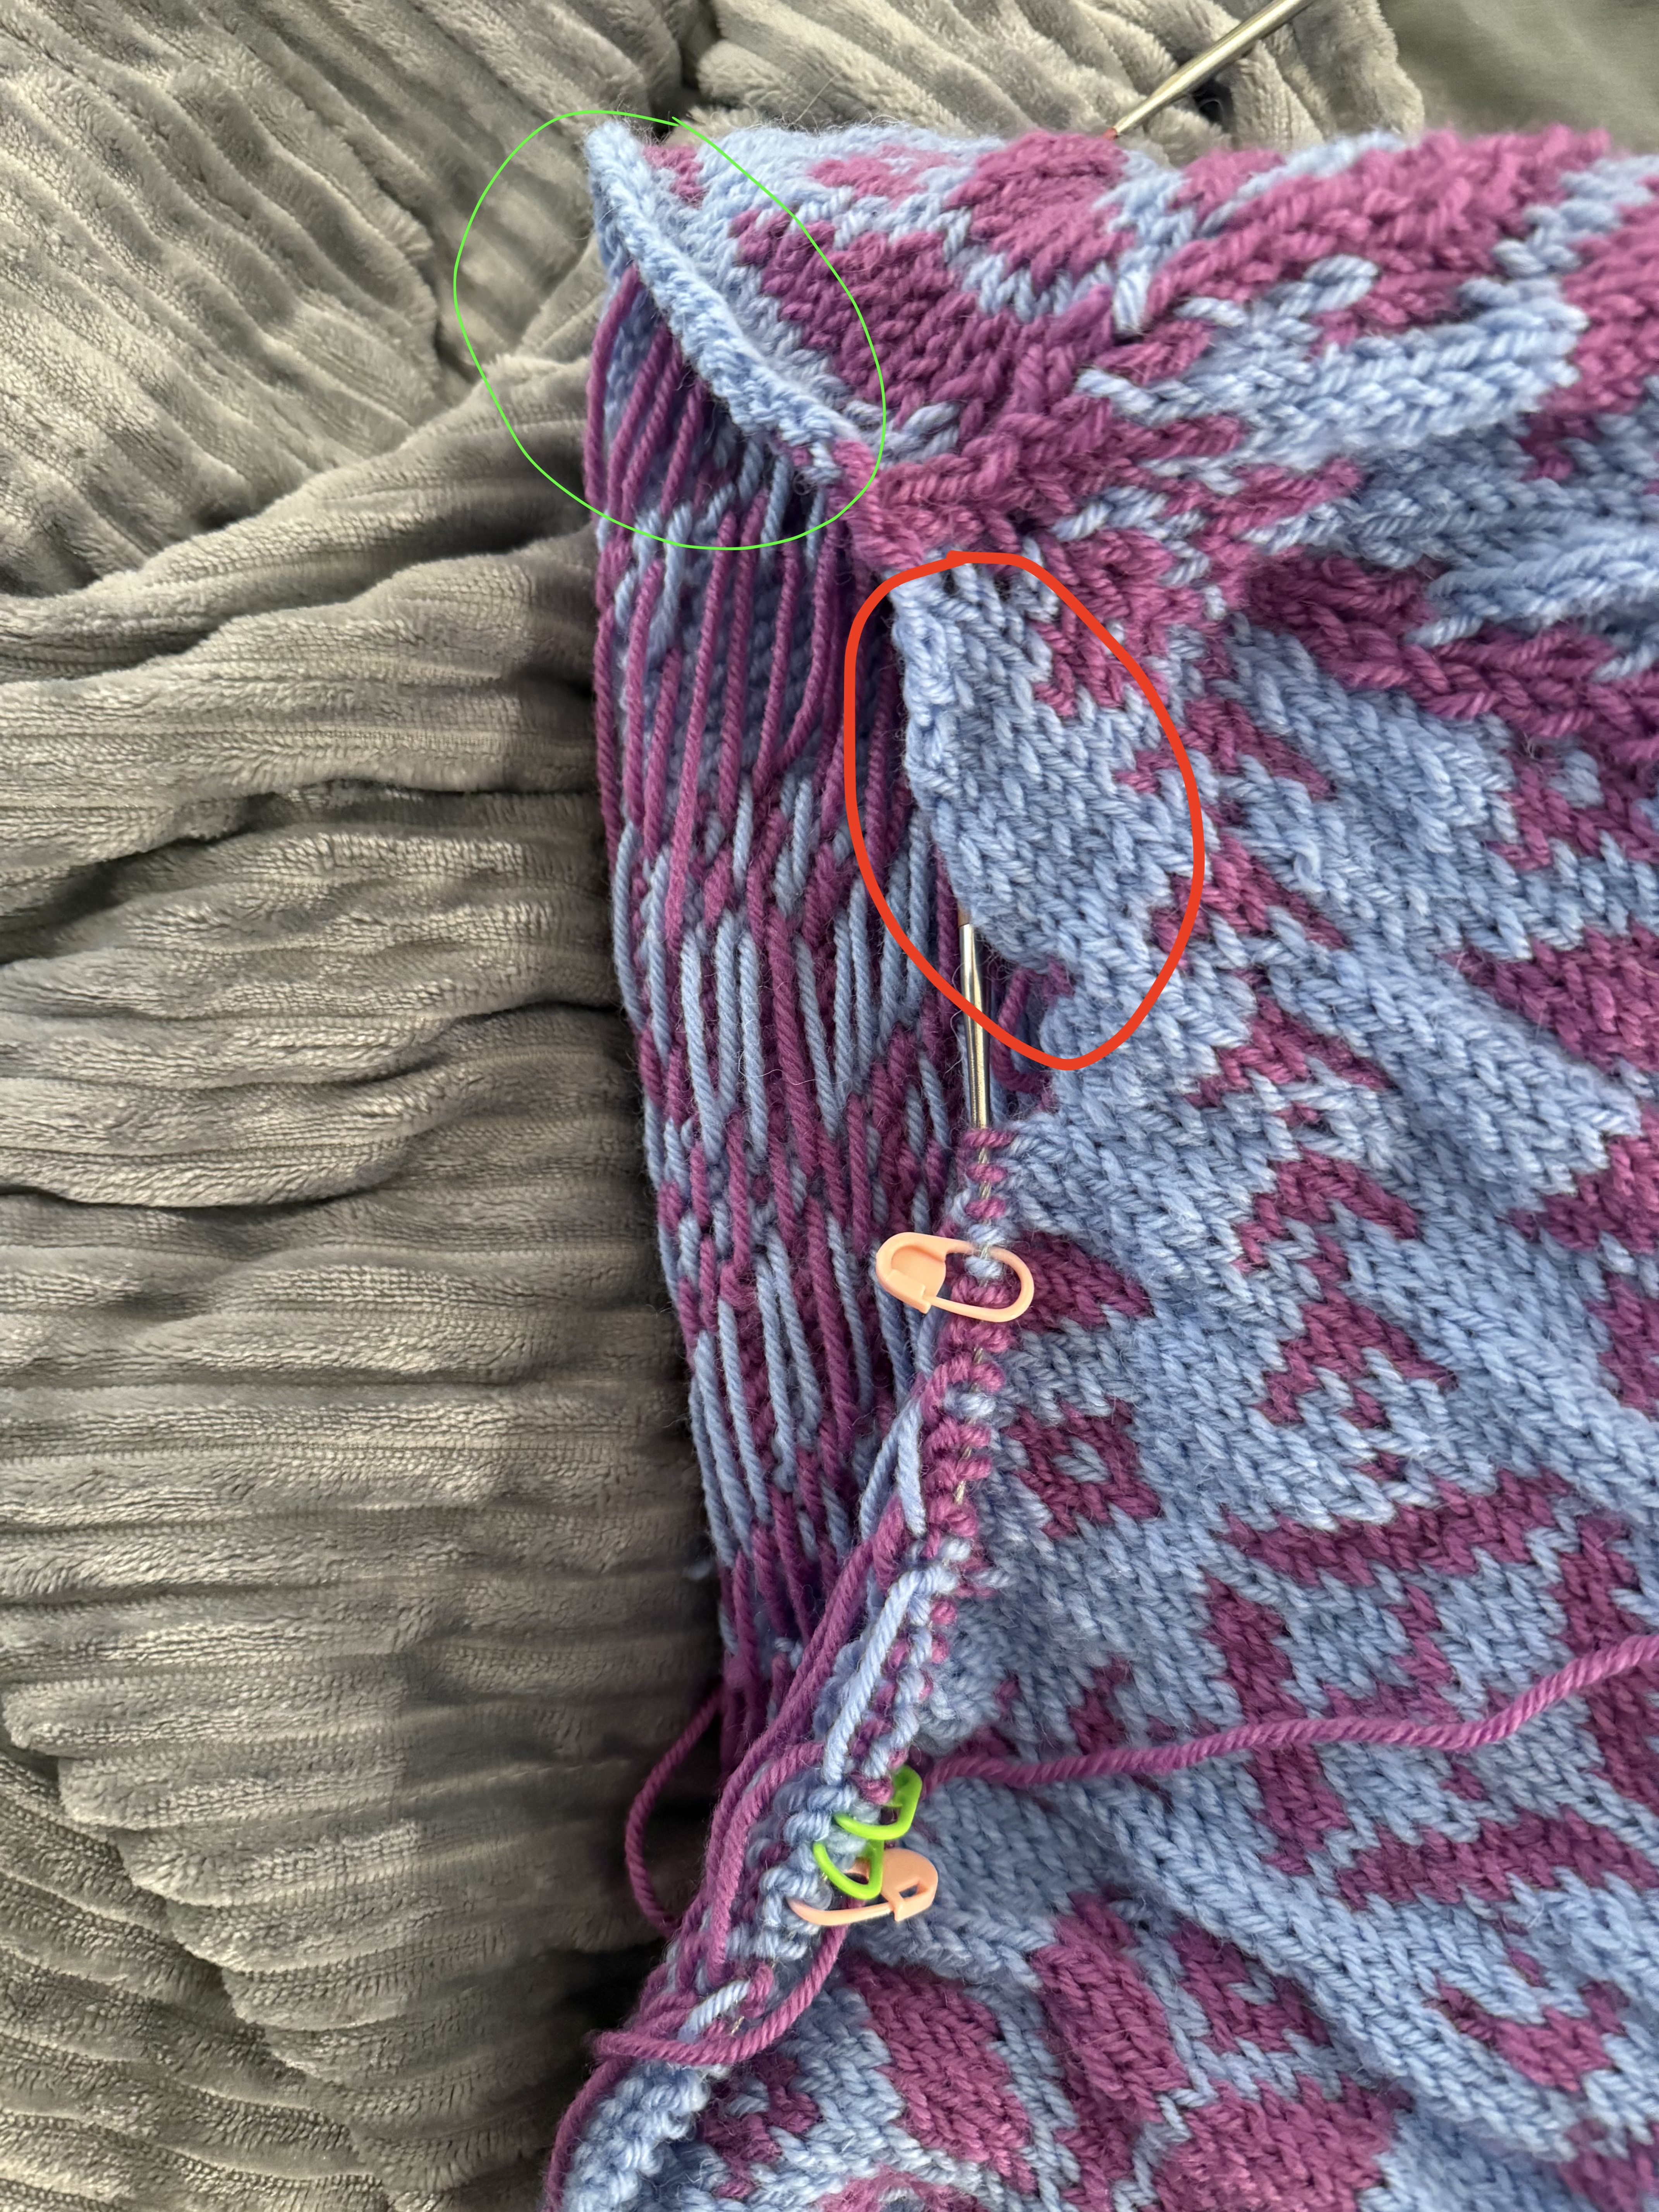
The couple I circled in green are very small and are pulling below the surrounding stitches (sort of sinking jn and disappearing). You can use a small knitting needle or blunt tapestry needle (or I use a small cable needle, just something thinner than the needle you knitted with) to place under that stitch and just draw it forward a bit. You can probably pull a little of the yarn strand that is floating behind I to the stitch by gently pulling in one stitch leg, then the other. Even it up by putting the needle behind nothing legs at once and doing a little up down jiggle. If you draw too much yarn into it you can just snug up the yarn strand behind again.
The couple I circled in blue are slightly enlarged stitches, they have stolen a little yarn from a stitch nearby. In this case it seems the stitch next to the larger stitch would be quite happy to have a little more yarn so you can draw the yarn through a little with a needle, follow the direction of travel of the yarn and bring it into the next stitch, if there is too much yarn to share then it can be drawn a little more snug in the floating strand on the wrong side. Enlarged stitches can frequently have their extra yarn distributed more evenly across 6 or 7 nearby stitches, each one taking up a little slack and evening out a row. With stranded work the stitch may be some distance away due to the floats.
Like I said, I’m being picky but I’m using it as an example of a trick lots of knitters use when they spot an odd stitch, too small or too big, redistribution of yarn.
In terms of other patterns and your level, you accomplished this so this IS your level. Every new pattern is a new challenge.
When choosing patterns it is helpful to look on ravelry to see if other people made it, how does their version look compared to the fabulous modelled photos (i get seduced by fashion shots then look at the real versions and think oh it’s not all that interesting after all), did they comment on the pattern, on errors, on sizing… it’s very useful.
And finally sizing. In knitting patterns the size and measurements are the finished size of the garment, not the size of the person wearing it. Sweaters in shops are labelled with the size of the person wearing it, not the size of the garment. If you usually wear let’s say chest 36" a sweater in a shop might have a 40" chest but labelled 36". If a style is intended to be over sized it could be significantly larger than this, 44" or even bigger… dependent on the style.
Some people find it helpful to get a sweater they own which fits in the way they want for a pattern and measure the sweater rather than the body.
So I did the decreases to the best of my ability and then cast off as it said in the pattern. I still have the front 43 stitches on hold, and now have to pick up 98 stitches which I am assuming means the 43 I have plus pick up 55. I’ve watched the video on how to pick up stitches , but I am still stuck on how I am only supposed to total 98 - I bound off more than 55 (green) plus combined with the stitches that formed the neck shaping (red), I’d be picking up somewhere in the hundreds. What is the best method here… Was I supposed to end my neck shaping with only 55? I can say straight away I messed it up and did not do that if that was the case.
Looking at a get other patterns, the number for your neck pick up doesn’t sound unusual. I would try and aim for close to the number in the pattern initially, but it is possible to alter the neck stitch count if a few more is going to look better.
Following ColoCro suggestion other neck pick up you could try
11 in the red circled section, 43 which are on hold, 11 in the other neck shaping section, 33 across the back. Making 98.
This part is supposed to be smaller than the main body to bring it in and it is amazing how large a neck hole can look before a neck band and then smaller and more fitted.
Do you know how to place a life line?
I would put one in now into your live stitches so that if you need to rip out the neck band to redo it you will not lose those stitches and can put them back on a needle quite easily.
See if you can plan where to put the pick up stitches across the back, roughly 16 in each half back and 1 in the centre. If that looks impossible you can go up a few in the stitch count (always increase by 2) which can either be kept in the neck band or decreased evenly on the next round.
One tutorial I followed once was to pick up in every stitch other neck, then dec on the next round, it does make a neat pick up edge but can be tricky to decrease evenly. It’s just another method and personal preference.
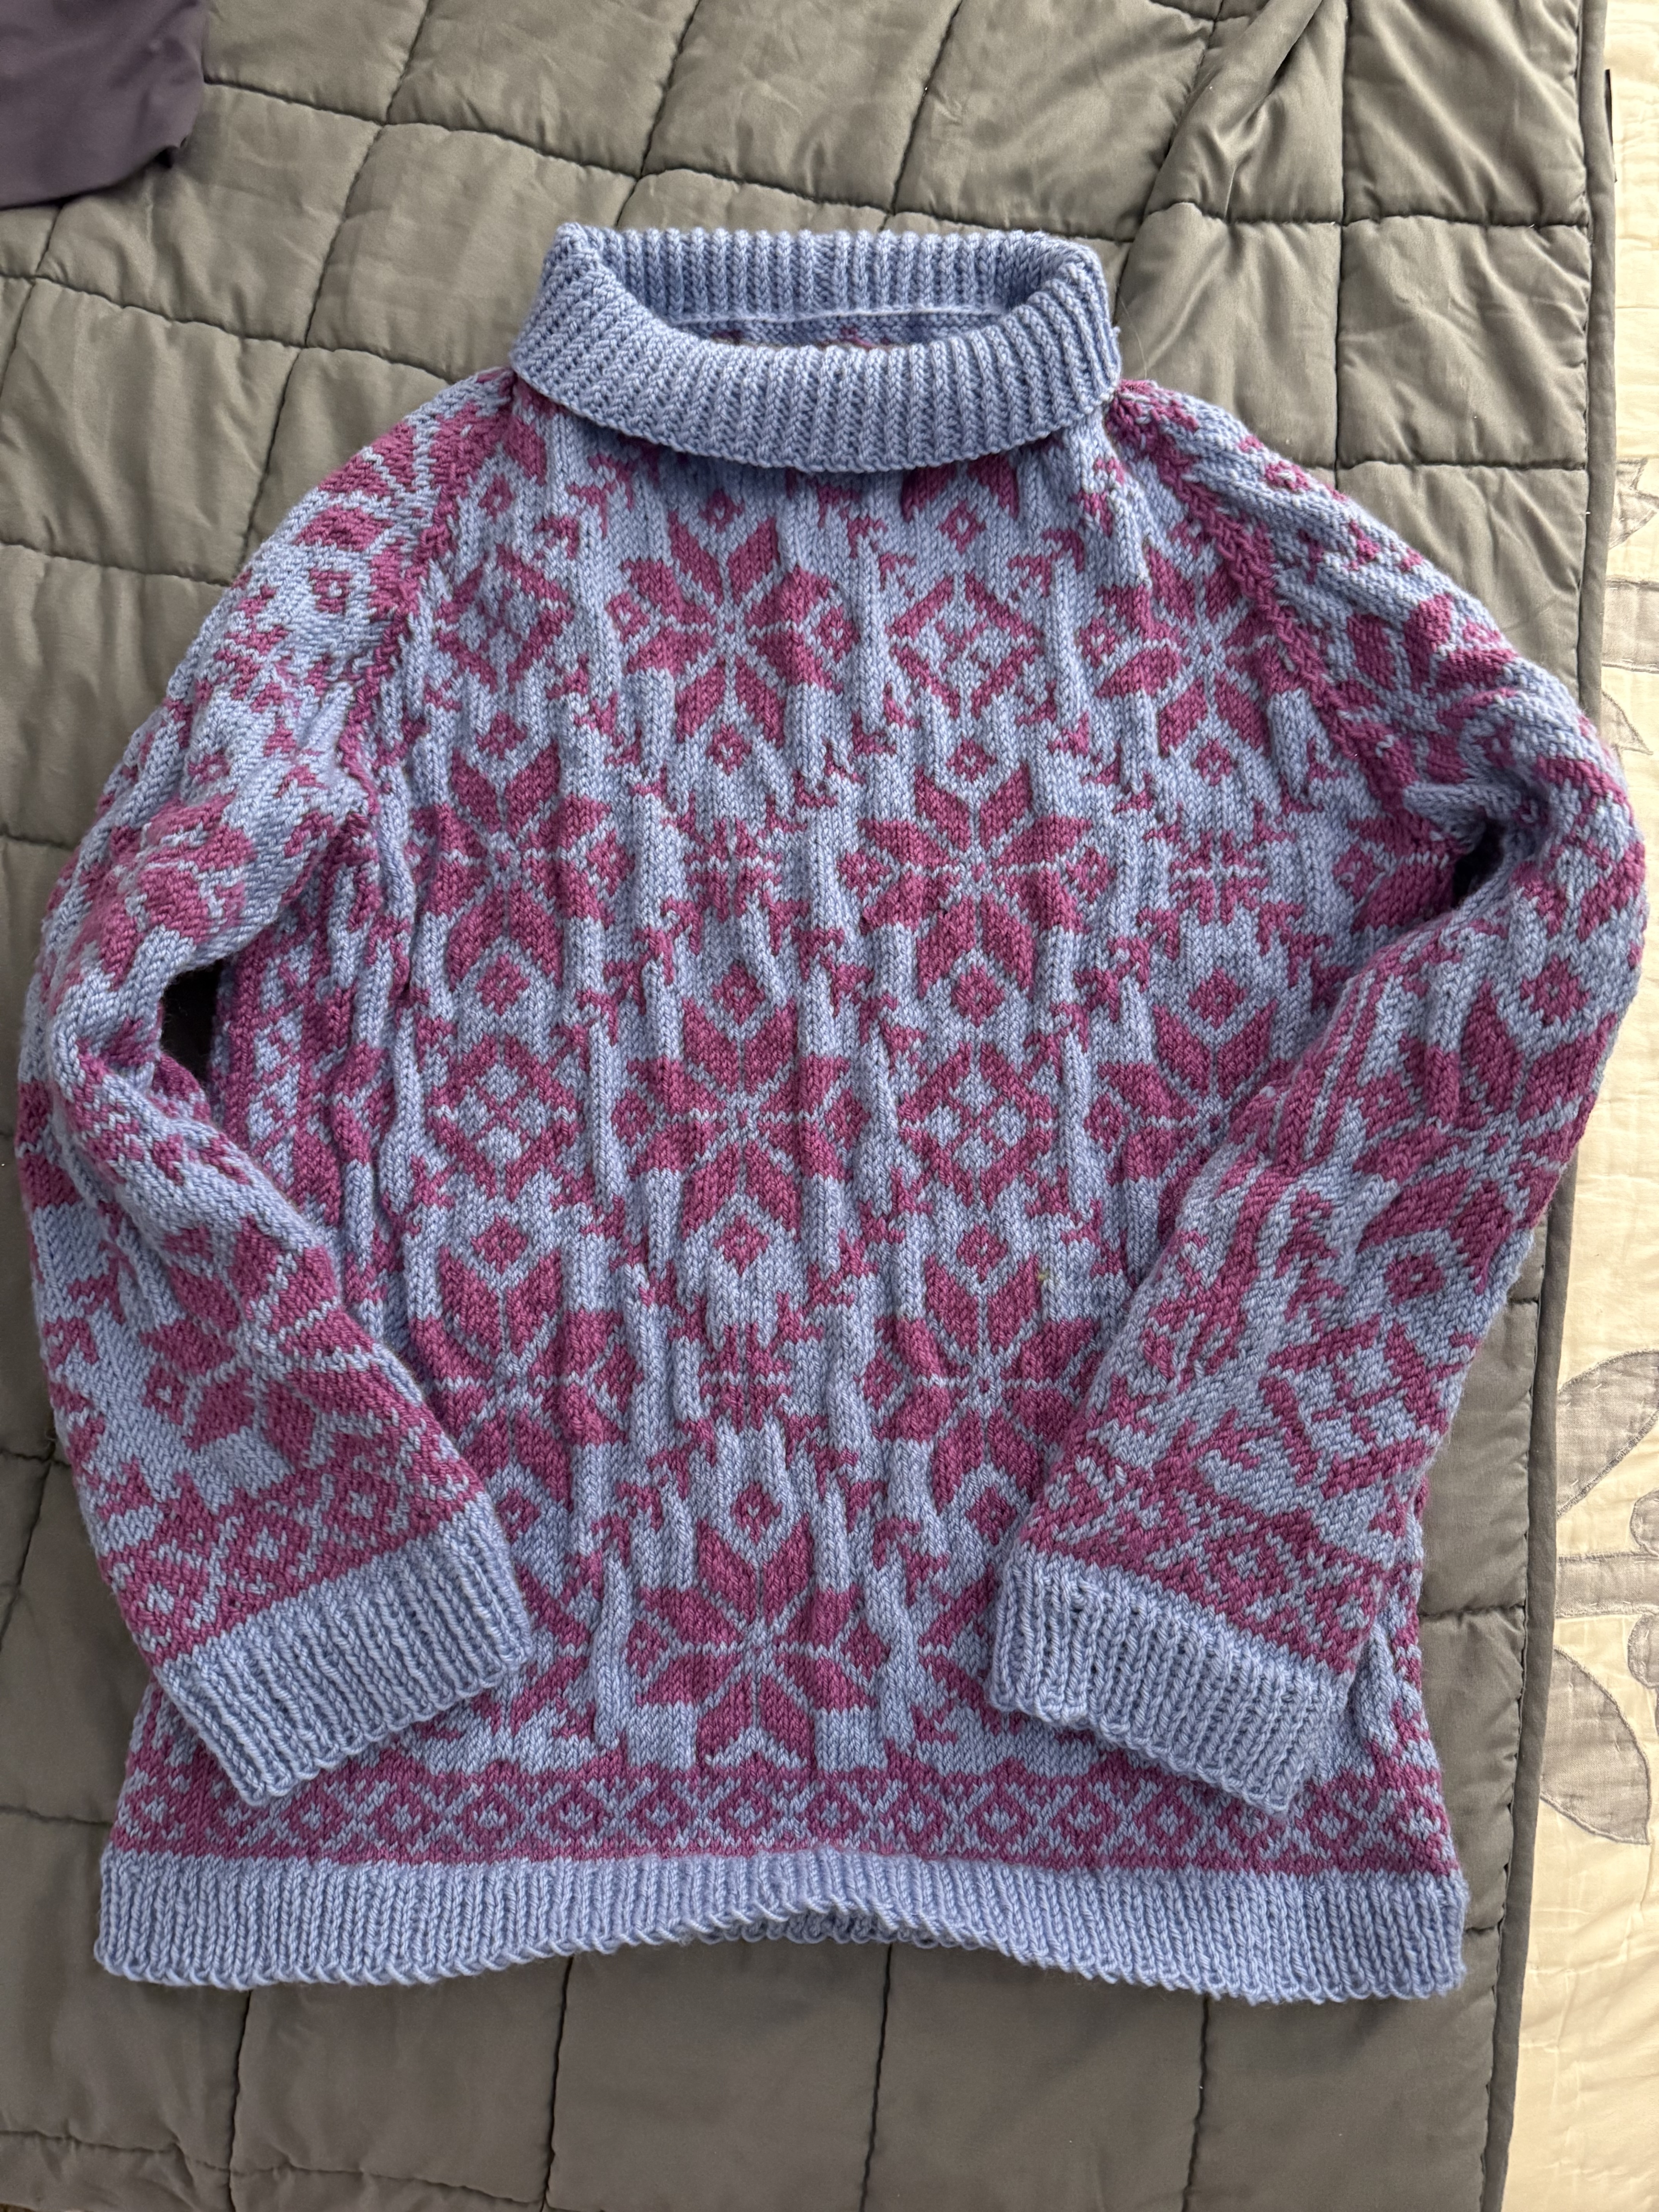
Thank you to everyone for all of your help! I made the neck longer than the pattern suggested because I liked the folded over look. It is quite lumpy and the fit it weird, so I probably won’t be wearing it. But I got new, better sized needles and I am ready to tackle the next one with everything I learned!
You did an awesome job with this poorly-written pattern! They didn’t even center the pattern, which is just a crime. I know I saw others with the off-center design, so it’s all in the way it was charted / written.
Have you tried blocking it? The tight floats might relax a little.
I’d suggest a smaller colorwork project until you learn to manage the floats across the back, without such a huge time investment. Slippers? Mittens? A cowl? It takes a while to get used to how loose to make them without having such long runs that you catch your fingers in them.
You’ve gotten some great tips here. Compile them all somewhere so you can find them again. And keep on knitting! You’ve done amazingly!
I agree washing and blocking may help with the bumpiness and also the fit. It’s a shame the fit isn’t great for you, when wet the fabric can be maneuvered to a certain degree to shape it a bit, you might give it a go. It may also be the construction style that you feel doesn’t work for you. I don’t wear raglan sweaters but didn’t realise this until after id started knitting. I prefer a set in sleeve or modified drop shoulder so I look for patterns in that style. Have a look at what you lalready have in your wardrobe, it may help with pattern choices.
I noticed some of your floats are very long and perhaps you would be happier with the result if you were to catch the floats more frequently. When a colour isn’t needed for say 10 stitches you can trap it behind the other colour to make floats shorter. Some people prefer to catch a float every inch (the number of stitches depends on gauge but say 5 for instance). The general rule is not to leave floats too long and not to trap them too frequently but my best stranded piece I didn’t go more then 3 stitches between catching a float and felt this had a better result for me (probably too frequently asked in most knitting info but I like it).
Your sweater is magnificent despite the bits you are not all that happy with.
I try to catch the floating thread every 1-2 stitches. It makes taking it on/off easier - ie threads don’t get pulled and the tension stays more or less the same, but the woven floating thread colour shows through.
This pattern was confusingly written. I got to the arms and realised it was not symmetrical - this pattern definitely needs several re-reads before starting. Imagine you’re knitting it as you read through. Then re read again.
I ended up unravelling to welt and restarting, then it was so much easier as I knew what to do.
Not a fan of the neck - if I did this again I would fold it over to give it some structure.
You could change the neck if you aren’t keen on how it is. I’ve got a bit of history with changing necks and doing 6 necks on one sweater before I’m happy.
I usually catch floats the same way, frequently to keep very short strands and like to work with a larger gauge to give the colourwork more drape. It can show the yarn strand behind but that doesn’t bother me if it’s reasonably consistent, which catching the float at 2 sts does, what I dislike more is rare catches and occassional blips of colour showing through. The consistent colour behind is something I rather like.
Beautiful sweater and lovely color work!
Catching the floats every inch or so usually works well. I find that this method is the most successful for hiding the carried strand. It takes a little practice but is worth it. But maybe you’re using this method already?
You can work this two handed as in the video or with both yarns in one hand.
This is the method I use but I trap much more frequently as I find the knitting easier and faster. I can maintain tension without stopping to spread stitches out for every float so I can just do a lot more stitches in a more fluid way, they actually start and end pretty bunched up on the needles, a bit like fairisle lever knitters who bunch the stitches but change colour every 3 sts so floats are small. I also like the fabric more, it’s stretcher and softer. I think there are quite a lot of knitters working floats this way now, maybe it’s a trend? I started trapping this frequently some time back just from experimenting and disliking going slow to spread stitches before catching a float but since then I have seen other knitters (online) working like this.
Yes thats exactly how my late grandma taught me many many decades ago. That is using the working thread to trap the floating thread, but doing it frequently.