Hey all, so happy to have just found this community! I am a fairly new knitter (just over a year) but have fallen in love. Thus far knitted 2 scarves, a jumper and a summer top. I am currently working on a jumper and have hit a point of confusion and after hours on google and watching YouTube vids, I’m still unsure of what to do. So, I was very happy to come across this community
So, the project I’m working on is the ‘272-56 Lang Yarns Regina’ jumper and I have already come to a few points of confusion and wondering if there are mistakes in the pattern (the ribbing for the back panel (which I am currently working) I have crossed out in blue - just because this doesn’t match the front panel - it shows just ribbing as is without decreases for the front) - would love some insight into this, but also hope I didn’t mess up by leaving this out
I’ve attached a picture of the pattern - the blue numbers are my attempt at adjusting the sizing (this may have set me up for more trouble than I anticipated but am trusting the process ).
My question is around the shoulder and neck shaping:
Unsure of what it means when it says ‘Bind off alternately (3 sts once & 2 sts once)’ - I am not sure if this means one row bind off 3 sts, and then the next row 2 sts? Logically I don’t understand how this would make each side even
I guess then moving to the neck shaping portion - this whole thing I am still yet to wrap my head around - reading through it, it doesn’t quite make sense yet but hoping it will once I start knitting that portion. Would also appreciate any clarity around how to do this
The jumper I knitted last year was done in the round, so this is new for me knitting in panels.
Hello
There are lovely cables on the sweater youve chosen
These cables are the reason for the difference between front and back stitch count where the back has decreases at the transition between rib and stockinette and the front does not.
Stockinette will work up wider than cables which pull in and make the overall fabric narrower. The pattern is written to allow for this so that both pieces result in the same width even though one is plain and the other cabled, I’d suggest working the decreases.
The alternate 3 sts and 2 sts is each side. Starting with “3 sts at beginning of each row”:
RS bind off 3, work to end of row turn
WS bind off 3, work to end of row turn
RS bind off 2, work to end
WS bind off 2 work to end
And so on. On each side it will be 3, 2, 3, 2, 3, 2 and so on for the correct count.
It’s a good idea to draw this out and cross them off as you do them.
When you bind off for the centre neck you will finish each side separately so you need to know where you are up to on those decreases as you are expected to keep track and continue.
When one side is complete you will rejoin yarn to the other side and finish working it. An alternative is to use 2 balls of yarn, one each side, after binding off centre neck and work each side at the same time. Your choice.
If you are still struggling to understand this let us know. Lots of help here.
Please could you delete the second pic as we can’t post large portions of patterns due to coouright. Its ok to post a small section or a few lines to get help. There is a little pencil icon for editing.
It’s going to be a lovely sweater. Not the easiest shaping directions but Creations has nicely laid it out for you.
Here’s a good technique for avoiding a stair step at the bind off edges. If you’re not ready to try it here you can tuck it away for some future project.
I’m sad to say that I have knitted to the shoulder decrease seciton already and I did not do the decreases in the first row as the pattern said. I didn’t realise cables make the fabric narrow Is there a way to adjust the sts for the front panel to save me frogging what I have done so far?
Are you happy with the width of the back? It may be wider than expected if you didn’t decrease.
I can understand the reluctance to frog the entire back but it may be the best option to get the size and fit you were after.
What you could do is place this piece on hold (slide all stitches onto a piece of waste yarn using a tapestry needle, knot the ends together so the yarn won’t slip out) just leave the yarn attached and put the whole thing aside. Get a fresh ball of yarn and make the front up to the same length (or even just 10 or 20 cm of the front would give you an idea of its size). At that point you will be able to see the difference in size and will either be more prepared to frog the back, or decide you don’t mind the extra width on the back (it might be very drapey and hang nicely) and decide to continue, in which case nothing lost.
Another option would be to add stitches to the front to make it just as wide as the back, you’d need to add however many you ‘should’ have decreased on the back to make both pieces equally wide. If you don’t like the width of the back though there’s not much point going wider on the front.
Frogging rarely feels good just before doing it but it usually feels ok a few minutes later. No need to rush into it though if you feel unsure.
You took on the challenge of changing the size and stitch count which is admirable, you’ll be learning lot with every different project and this is part of the process.
I am happy with the width of the back (about 60cm). So I think I’ll just add those extra sts to the front panel
Another question with the neck - I feel like this is too small now with my sizing adjustments? I’m not sure if this will be the width of the neck hole (where I’ve placed the two markers, about 13cm wide)?
The neck begins with the initial bind off of 28 sts (13 cm) then has some shaping on the following rows, each side, adding up to a total of 8 sts each side, 16 total. 28 + 16 = 44 sts (approx 20 to 21 cm).
As you have decided to keep the back at the larger size, this is only 2 sts different from the original small size pattern (you cast on 154, omitted the decreases so have 154 sts. The pattern at this stage has 156 sts) so you can choose to continue with your modified calclations or can switch to the stitch count give for small, just omitting 1 stitch each end at the shoulder. Your choice. It would make the neck some sts wider, 32 sts initial bind off plus shaping. If you are petite this may risk falling off your shoulders.
Modifying the front. You will prob need the cast on and rib equal to the back. Then increase where each cable will be, up to the correct stitch count.
Rather than RS and WS it’s right and left. Each shoulder needs to be counted individually because at some point you will have neck bind offs in the middle too.
Information given out side a bracket means do everything inside the bracket this number of times, the maths in the pattern help with this too
(3 sts once, 2 sts once) 9 times each side. 5 × 9 = 45
then another 3 sts 3 times each side. 3 × 3 = 9
(= 54 sts per shoulder) 45 + 9 = 54
Or with the modified size 5 × 8 + 9 = 49
Many people find it helpful to draw it out and mark the bind off numbers for shoulders and neck so they can be crossed off as they are worked and so that each side can be checked for the stitch count.
So I’m a bit confused with when the neck shaping comes in. At this point in the photo my shoulder shaping is about 5cm and patterns says at about 10cm from beginning shoulder shaping is when neck shaping starts. Below is where I’m at with my bind off count.
Does neck shaping start at the markers then? Or at 10cm? If at 10cm, what are the markers for then?
Also, reading through “shoulder and neck: next row(RS)” part of the pattern, I’m very confused as to how this actually looks. So I think that’s also throwing me out with not having an understanding of the actual process having never done it before.
Here’s an example of the kind of drawing that I find helpful for keeping track of these decreases. I don’t know when the 10cm point will be reached so it’s just drawn in there as a guess. You’ll probably get to 10cm somewhat later in the bind offs at the shoulder. I’ve only shown one shoulder as an example.
The markers are showing you the center neck sts which will be bound off just before you begin the neck shaping. You’ll begin the neck shaping after those 28 marked sts are bound off. The shoulder shaping continues as the center sts are bound off and as the neck shaping is worked.
Looks like you haven’t got enough decreases for the shoulder shaping written in your list. Each side will have these decreases
You need to decrease 54 each side for the pattern size
Or
You need to decrease 49 each side for the modified size.
It looks like you have decreased about 15 on the shoulder in the pic so still have another 34 or so to go before this side is complete.
Based on the row gauge of the pattern 32 rows per 10cm you would reach the neck bind offs after 32 rows of shoulder shaping then shape neck and shoulder at the same time. If your row gauge is different to the pattern you may have more or fewer rows. It looks like you have done around 12 rows so far, if so then your row gauge may be different to the pattern, maybe 24 row to 10cm.
Salmonmac’s drawing is really useful, if you draw out like this for both shoulders you can track each side by crossing off as you go.
Notice on @salmonmac’s drawing how you measure the 10cm you need before starting the neck shaping. It’s not along the shoulder, but vertically from the row on which you started the shaping. I don’t think you’re at 5cm where you are now, so you still have a ways to go before you begin the neck shaping.
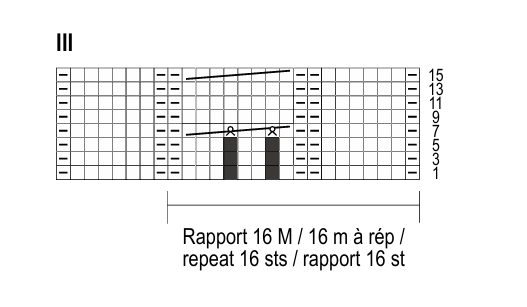
Up to the front panel of cabling and would love some help with understanding this cable pattern. I have watched a bunch of YouTube vids on cabling, but this pattern feels different to me in the sense of ignoring stitches and making stitches. Any insights much appreciated
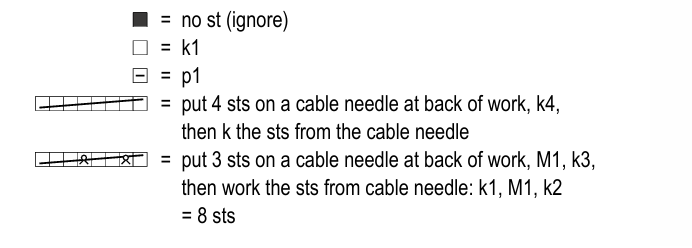
There’s a cable in the chart that leans to the right using 3sts held to the back while working the next 3sts. It varies from the usual cable in that you’ll also be increasing as you work the cable twist. The pattern uses a M1 where the strand between two sts is picked up and knit.
All 6sts of the previous row are used for the cable so no sts are ignored. There are two increases so that you end the cable with 8sts in that cable column.
In the video, a knit front and back is used instead of a M1. You could do that if that’s easier than the M1.
Often cables, especially wider ones, need a stitch or 2 added at/near the beginning of the cable and then again at/near the end (for example at a transition between cables and then a rib hem or cables and then a bind off for a shoulder seam or neck band), the change in number of sts is to prevent cable flare. Cables pull the sts together and make the fabric narrower so to make them the same width as the non-cable fabric they need more sts.
If you look up cable flare you’ll see tutorials which increase sts at the cable or dec at the end of a cable. It sounds like the cable tutorials you’ve looked at haven’t covered this, most would focus on how to move sts to a cable needle and how to work them.
I can’t say for certain because I don’t know the rest of the pattern, but to me it looks like this is the reason for the increases in the first cable.
Rather than “ignoring stitches” it is a chart square which is ignored, not a stitch. The black squares in the chart are just used as a holding position for stitches you will make later in order to keep the chart neat and aligned. You won’t actually ignore a stitch.
So, the pictures I shared above show the whole pattern in regard to the cabling. Still trying to wrap my head around it, few questions - the pattern is showing only odd rows (which I am assuming is the right side of the work), so what do I do on the wrong side of the work? Second question, I don’t quite understand what the black square in the chart is, what do you mean a holding position?
I have been trying to find a YouTube vid to show a visual on how I would work this pattern, but have not found anything as yet - can you share any which would show how this pattern is worked please?
On the even row, work the stitches as they appear. If the next stitch on the left needle shows a V, knit it. If it shows a bump, purl it.
The black or greyed out squares on a chart represent “no stitch.” That means there is no corresponding stitch on the needle. The black square is holding a place in order to keep the chart evened up or squared. On row 7 for example the black square disappears because you work two increases. The black square is no longer needed to hold the space because there are stitches filling in those spaces.
Work each stitch (knit or purl) or operation (an increase or cable) as you come to it across the row. The odd numbered RS rows are worked right to left. The even number rows are worked left to right and in the case of your pattern aren’t shown. You’ll always be working the chart rows shown from right to left.
Here are some videos that may help. They’re not exactly like your chart but similar ideas.
In addition to what salmonmac has said (to work the stitches as they present, knit the knits and purl the purls) there might be a note somewhere in the pattern which tells you how to work the wrong side rows. Most patterns I have seen have a brief note somewhere on this.
Perfect thanks for all that - I am slowly getting my head around it
I am just knitting a swatch now to practice, and I am still confused with the M1 - is the M1 only at the start of the pattern or does it continue throughout? There is no mention of a decrease in the pattern. I feel if it continues through the patterns the cables will progressively get wider and wider?
I am also assuming the WS will be knitting opposite to the RS (knits become purls, vise versa) - there is no mention of the WS for the cable anywhere in the whole pattern, so just based on doing that in my swatch it seems to be working.