Hi. Im knitting my first ever jumper for my grandson. I bought a vintage pattern and after a bit of confusion following the pattern I’ve managed to knit the front and back panels, but I’m having an absolute nightmare with the sleeves. I’m now on my 8th attempt and am close to giving up.
I can do up to “2nd row purl”, then I lose it where it says “to last 4”.
I’ll try to explain what’s happening. The last two stitches before “last 4” are purl. So does that mean I should continue for another 2 stitches with the purl, increase a stitch and knit it, then purl the last stitch? Therefore effectively doing p4, k1, p1?
The second part I’m having trouble with is where it says “keeping continuity”. Does it mean I should alternate from third to fourth row to increase the stitches?
I’ve added screenshots of the part of the pattern I’m stuck on, and a photo of the pattern I’m trying to achieve. I just hope someone understands what I’m asking!
Thank you in advance.
Hello
Don’t give up! Your knitting is beautiful and this is going to be a fantastic sweater for your grandson.
You can do the sleeves, one stitch at a time, there’s plenty of help and support here to get you past this tricky bit.
Which size are you making, 1st, 2nd, 3rd?
I think you have misread the instruction as none of these result in a p2 before the last stitches.
It will be easier to explain if we knew the size you need, but for example the “last 4” works with some of the sizes whilst others read as “last 3” and if by mistake you have misread it as last 4 then this may be the problem.
Similarly the beginning of the row has the increase then k1 [1 1 0 0 1] a zero for your chosen size means miss this out, no knit stitch. My guess is you are making the 4th or 5th sizes as these are the easiest to misread and mess up the repeat.
The increase rows will be easier to explain if we know the size, 5th?
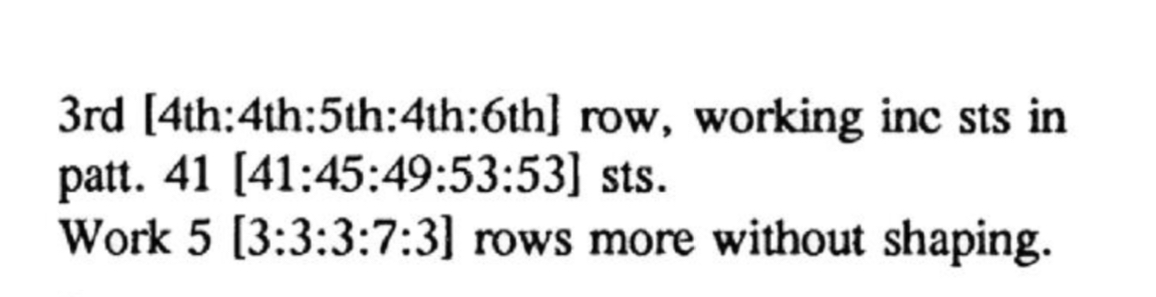
When the initial 4 rows are done the increases are then on, (for 5th size for instance) each end of the next 3rd row and then “every foll 4th” is row 7, 11, 15, 19 and so on until the correct number of stitches is reached.
As you have a 4 row repeat you might like to make a small chart or write on your pattern the row numbers.
I hope this helps some.
If not please do keep asking until you fully understand and can finish the sweater.
I’m doing the 3rd size (2nd in brackets).
Thank you for the compliment on my knitting! I’ve only knitted scarves, a very basic cardigan and a hat before, so this feels really advanced lol.
So every foll 4th just means if I increase on row 3 it’s every 4 rows after that? So 7, 11 etc? That makes obvious sense now.
It’s just the increase at the end of the 3rd row I’m still stuck on.
If I increase on the first stitch, do I then knit that stitch and then p2, k1? It’s that last 4 that are throwing me completely.
OK, thanks for the info.
3rd size
The first stitch is worked as an increase, this could be a kfb (knit into the front AND the back of the same stitch) that’s one stitch used up and produces two stitches on the right needle.
Next k1.
Total 2 sts used and 3 made on right needle.
The repeat uses 3 stitches each repeat
You will end up finishing a full repeat 7 times = 21 stitches
2 used before the rep plus 21 used in the repeat = 23
You began with 27, worked 23, 4 left.
P2
Inc 1st (1 used up, making 2 on right needle)
P1
That’s 4 worked.
Total on right needle is now 29
You’ve missed the k1 out. This is not the increase stitch.
As you continue with the increases there will inevitably be a line near the seam where the pattern is not exactly the same due to the increases. I suggest placing a stitch marker after the first stitch and before last 2 sts , this way you ignore any stitches temporarily out of pattern along the seam and focus on maintaining the main pattern between the markers by looking to see what should be there, reading the knitting.
Is this clearer?
1 Like
Thank you, that really helps. I’ll use stitch markers this time, I didn’t for the front and back panels and was working it out in my head for each row!
I was increasing by making a new stitch and placing it on the left needle, so that’ll be where I was going wrong I’d imagine.
I’ve worked to the end of row two and put a lifeline in (thanks to reading posts on here), so at least if I go wrong again I won’t be starting right from the beginning  I’ll have another go after looking up that increase method as I’ve read about it but not done it before.
Thank you so much for the help. I’ll let you know how I get on.
1 Like
It worked! Thank you so much  I now have 29 stitches and no p4 in sight lol.
1 Like
I’m so p,eased you’ve got past that tricky row! Brilliant.
With the increase, if you were using g a M1 (make 1, lifting the bar from between the stitches onto the left needle and working it) that is perfectly fine to use if you prefer it, just remember this is not counted in the instructions of what to knit/work, a M1 or a kfb or another type of increase does not use up an additional stitch.
So, k1, m1 (all counted as that first stitch), then still k1, then the 3 stitch repeat.
It’s up to you which increase to use based on what you know and what you like, they can often be swapped.
With the stitch markers, I should have said that after each increase row you will need to move the marker otherwise the markers will move closer to the centre each time you increase and because i have said to work in pattern between the markers, you’ll miss some of the stitches out which can be taken into the pattern. This was perhaps obvious to you, perhaps not.
Removable markers, safety pins, or pieces of scrap yarn can be used for this.
Also, now you have inc by 2 stitches the increase row and repeat will work a little differently, a full repeat won’t be worked as its a 3 stitch repeat and you only have 2 new stitches. Don’t worry about that, just work them in the same place as given on the pattern, don’t worry about the edge stitches matching the pattern immediately but work the stitches into pattern in the next row, between the markers.
Let us know how you get on with the next part and working up this sleeve. Don’t hesitate to ask again if you get stuck.
2 Likes
I did think that about the markers, but I actually found it less confusing to leave them where they were and count the pattern back from the marker to the beginning of the next row.
I wasn’t even making the stitch that way. I should have said I was casting on a new stitch to increase, so I didn’t have any stitches on the right hand needle when I was doing the k1. Hence my confusion.
It took me all night but I actually finished the sleeve!
Thank you again for your help, it was really clear and I was able to understand easily (I’m autistic so sometimes my brain doesn’t understand things in the same way as most people’s lol). Most appreciated 
(ETA: there’s a couple of wonky bits, but overall I’m really pleased it it!)
4 Likes
This is fabulous!
The pattern looks perfect, you’ve worked it so well, all the new stitches worked into the pattern in the right place, and the knitting is all neat and even.
Just one more sleeve to go!
Whilst increases can often be swapped out for one you prefer, I would probably not do a cast on for this, notnunless a pattern actually says cast on (CO), but I think you’ve realised this now because the sleeve is lovely.
I’m glad to be able to help here and there where I can and glad it was clear for you. My brain doesn’t always work right either, I’m on pain medication which makes everything harder and in fact I had to read your pattern many times before I could work out what might be happening.
Enjoy a good rest after your long night! And enjoy making this next sleeve We’d all love to see a photo when you’re finished.
1 Like
There’s a tiny bit of ribbing on the left that’s slightly off. And I think my M1 in the new sleeve is looking sharper, but that’s what practice does for you lol.
You’ve been great.
I’ll post a pic of the next sleeve when it’s done
2 Likes
Lovely knitting. Keep going it’s looking great. I’ve been struggling with raglan but this forum has been such a great help and so encouraging.
3 Likes
This forum is brilliant isn’t it? Had to take a break over the weekend, but I’m going to be back on it this evening.
I thought I’d done too many rows, so like an eejit I painstakingly un-knit two of them, before realising I hadn’t gone over  But there we go lol.
2 Likes
There’s a benefit to tinking (unknitting, knit backwards is tink) which is the more you do it the better you get at it so it feels less and less frightening.
This jumper is going to be great.
1 Like
Even expert knitters have to ‘tink’ once in a while (knit spelled backwards - a nicer way is saying ripping it out). Your persistence will serve you well! Please do rely of those of us who’ve ‘been there.’
2 Likes
I finished it!!! You can only begin to imagine how thrilled I am, I always start things and rarely finish them, so this is a huge achievement for me, and I’m super chuffed with the end result too
Never have I ever done M1, KFB, used circular needles (albeit just knitting back and forth this time), swapped needle sizes, picked up stitches to knit, made button holes, or made anything with an actual real texture to it. The most complex thing I’ve knit before was a cardigan that consisted of panels of garter stitch, so was really just knitting lots of scarves lol.
Thank you so much all, for your help and support, I’ve learned so much in the last few days. It’s not perfect, but it’s pretty flippin good, and I’ll take that.
I actually feel like I could conquer anything now
3 Likes
It’s perfect and the buttons couldn’t be better!
1 Like
Thank you so much. He loves dinosaurs lol.
1 Like
Oh my goodness! This is perfect and adorable!
Your grandson’s going to be the talk of the town. If someone had made a sweater like this for my boy I would have been thrilled.
You can conquer anything!
1 Like