Positive and negative ease

Hi @salmonmac and @Creations,

I got a a kind reply from Valley Yarn. Apparently there was another errata issued in 2021 and they shared the updated pattern with me.

For the pattern error that we spotted, turns out that there is no mistake, although there is a high risk of misreading the pattern the way it is written.

It is my mistake that I missed out the beginning bracket in the row. The pattern reads as below :

Row 2: P1, [work Row 2 of Lattice patt to m, work row 2 of Cable column patt to m] 2 times, …….
A bracket at the beginning !!

That obviously immediately puts everything correctly, although Valley Yarns also say they don’t understand why only the first instruction was chosen to be reflected as above. The rest is written out as

Work row 2 of lattice till marker,
Work row 2 of cable column till marker
And so on ……

Please accept my apologies for wasting your time and sending us all in a spin.

The one benefit from this is getting the updated pattern with the other errata incorporated (don’t know which this is)

The other benefit is I have started to read my knitting, thanks to the inputs you provided, and have little need to refer to the elaborate notes that
I write down before knitting.

Thanks a lot and sorry to have created a noise where there was no need.

3 Likes

No need to apologise.
It was written in a confusing way and the information about the errata should really be noted on their website for people who obtained the pattern prior to it being changed. I looked for a note on errata online and didn’t find any.

It’s great you got a response and a new copy of the pattern.

1 Like

Not a problem at all. This was useful for us and as you say, you now have the updated pattern and the benefit of reading your knitting (such a useful ability). Glad you heard back from Valley Yarn too. It’s all good experience.

1 Like

I see you got the important answer, but I think the reason for the “Choose a size with upto 5” negative ease and 1-2" positive ease" is because different people like different fit. Some people like their sweaters to hug them gently, others want extra room. So it’s a way of saying “choose the size that will give you the fit you prefer”. I think…

2 Likes

@salmonmac, @Creations, I finally finished it :-))))))) 2 months …

Here is a write up and the photos !! Yet again, Thanks a TON !

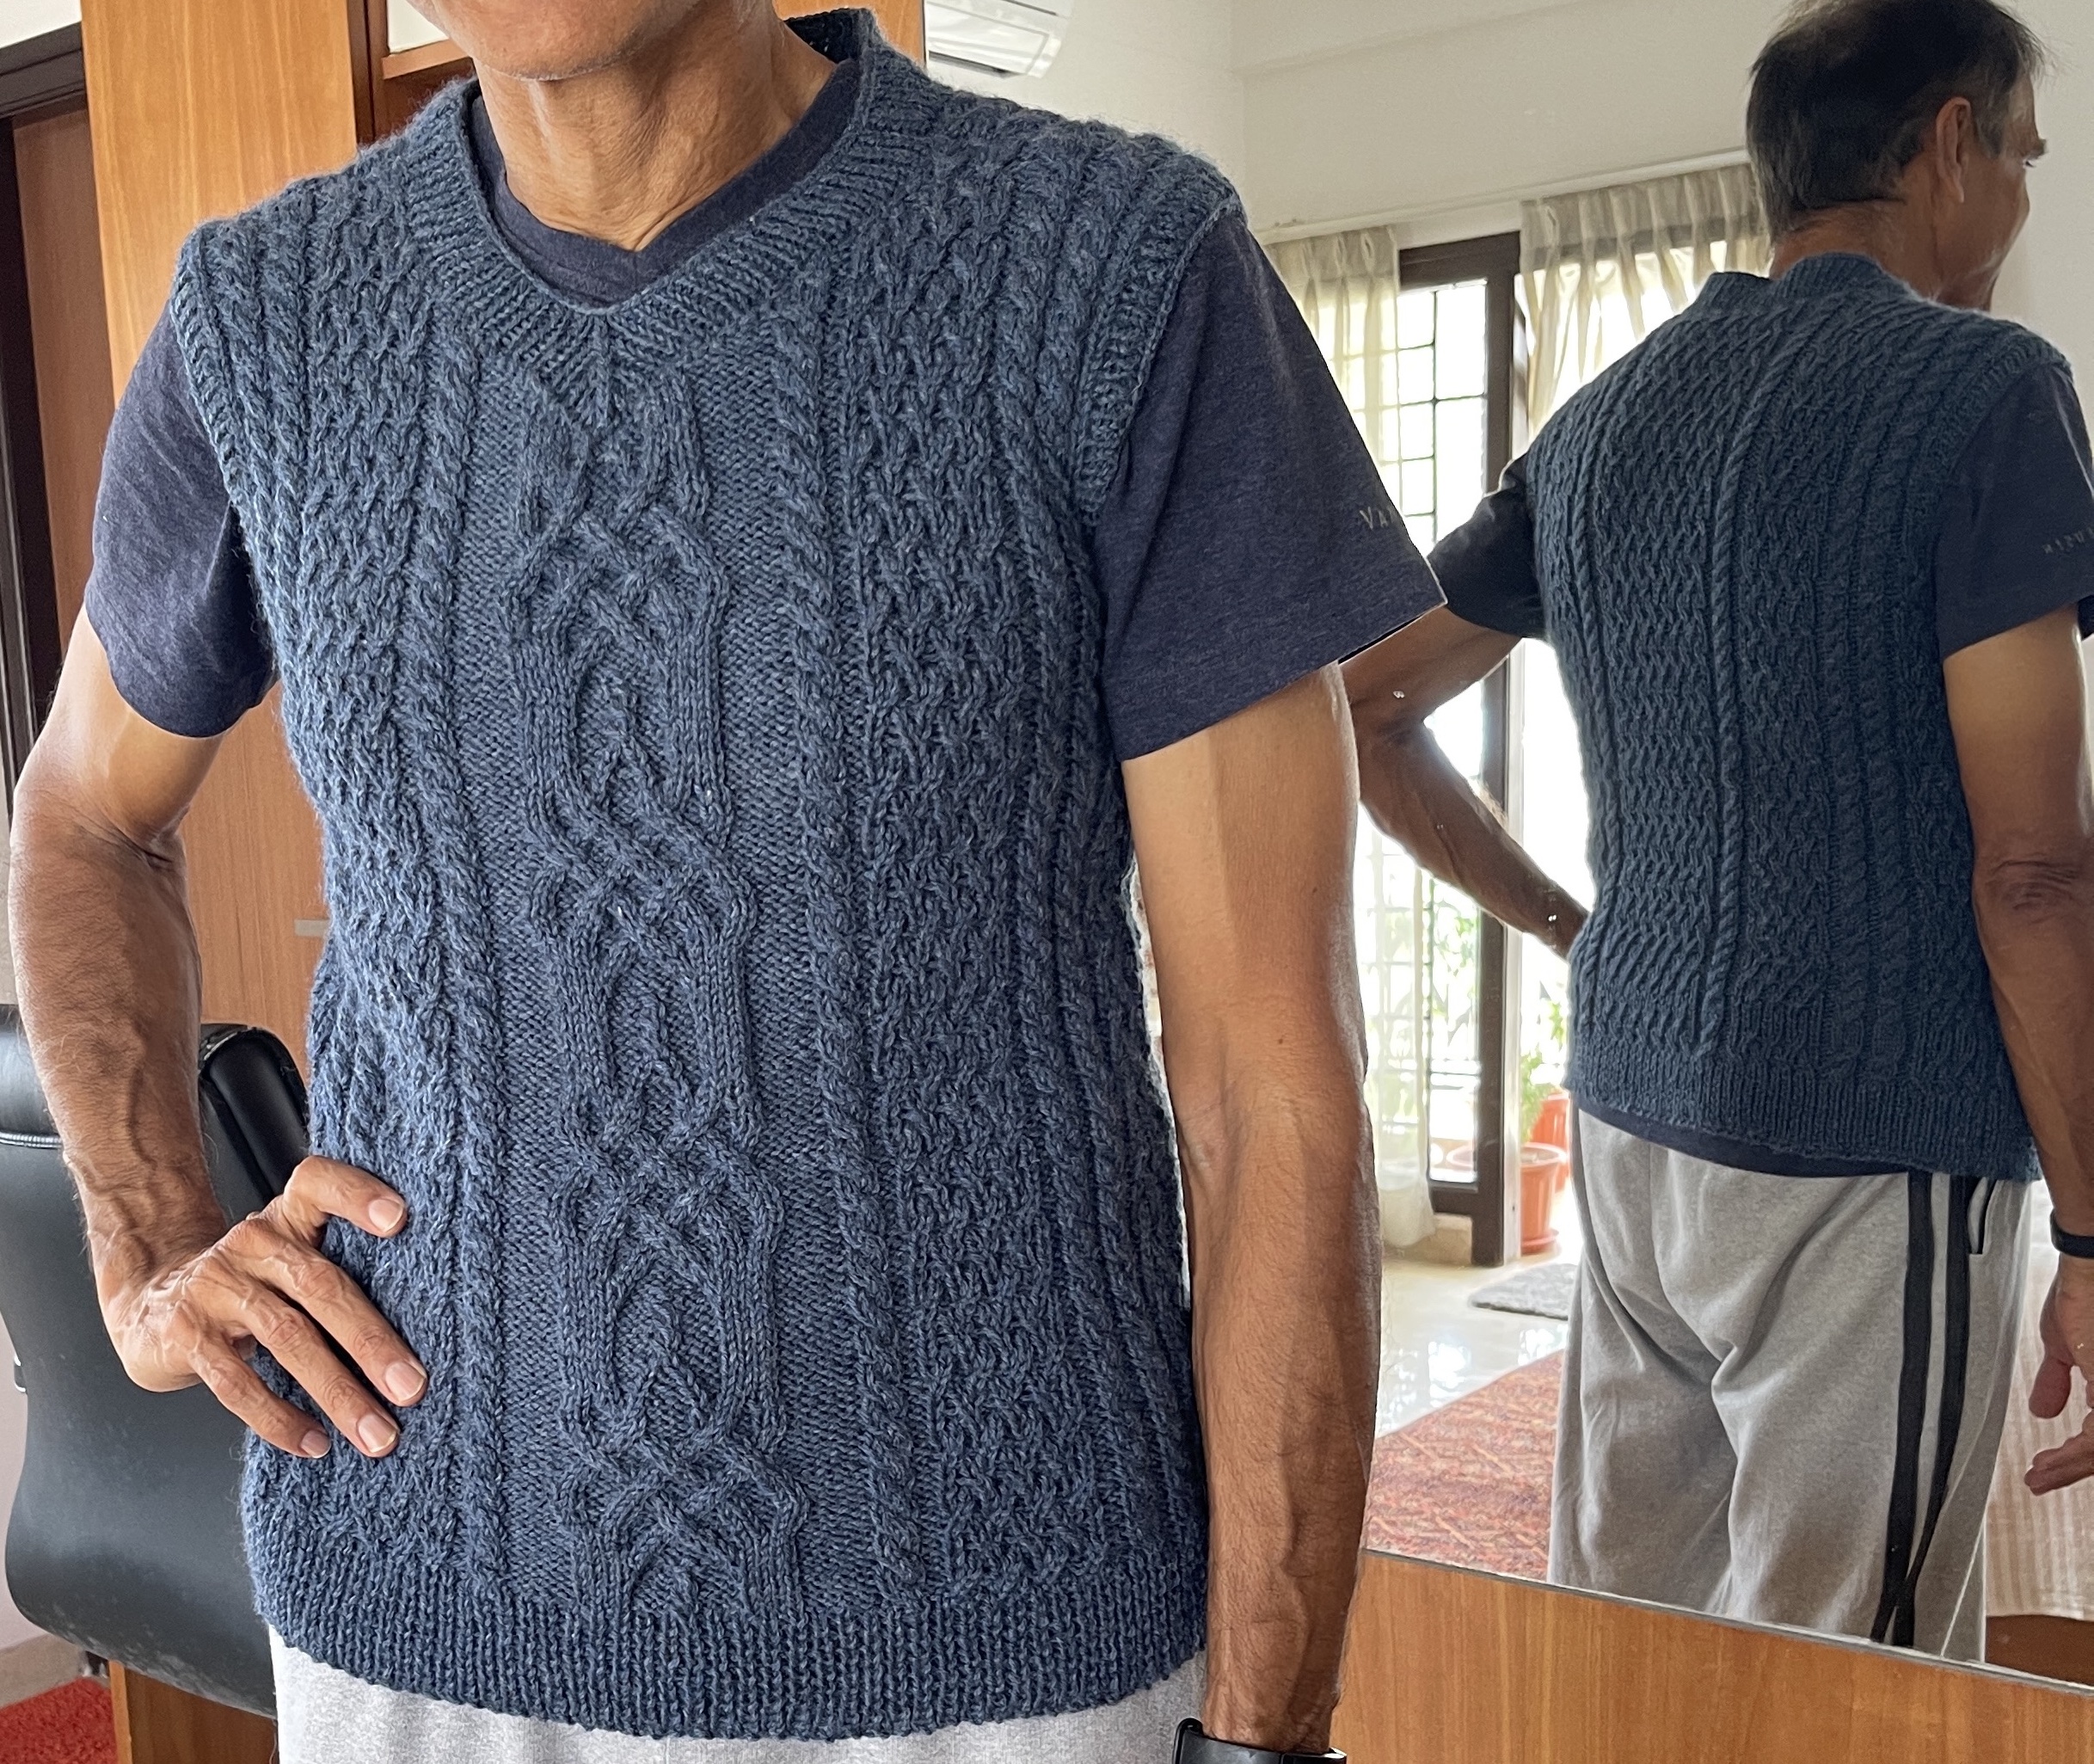
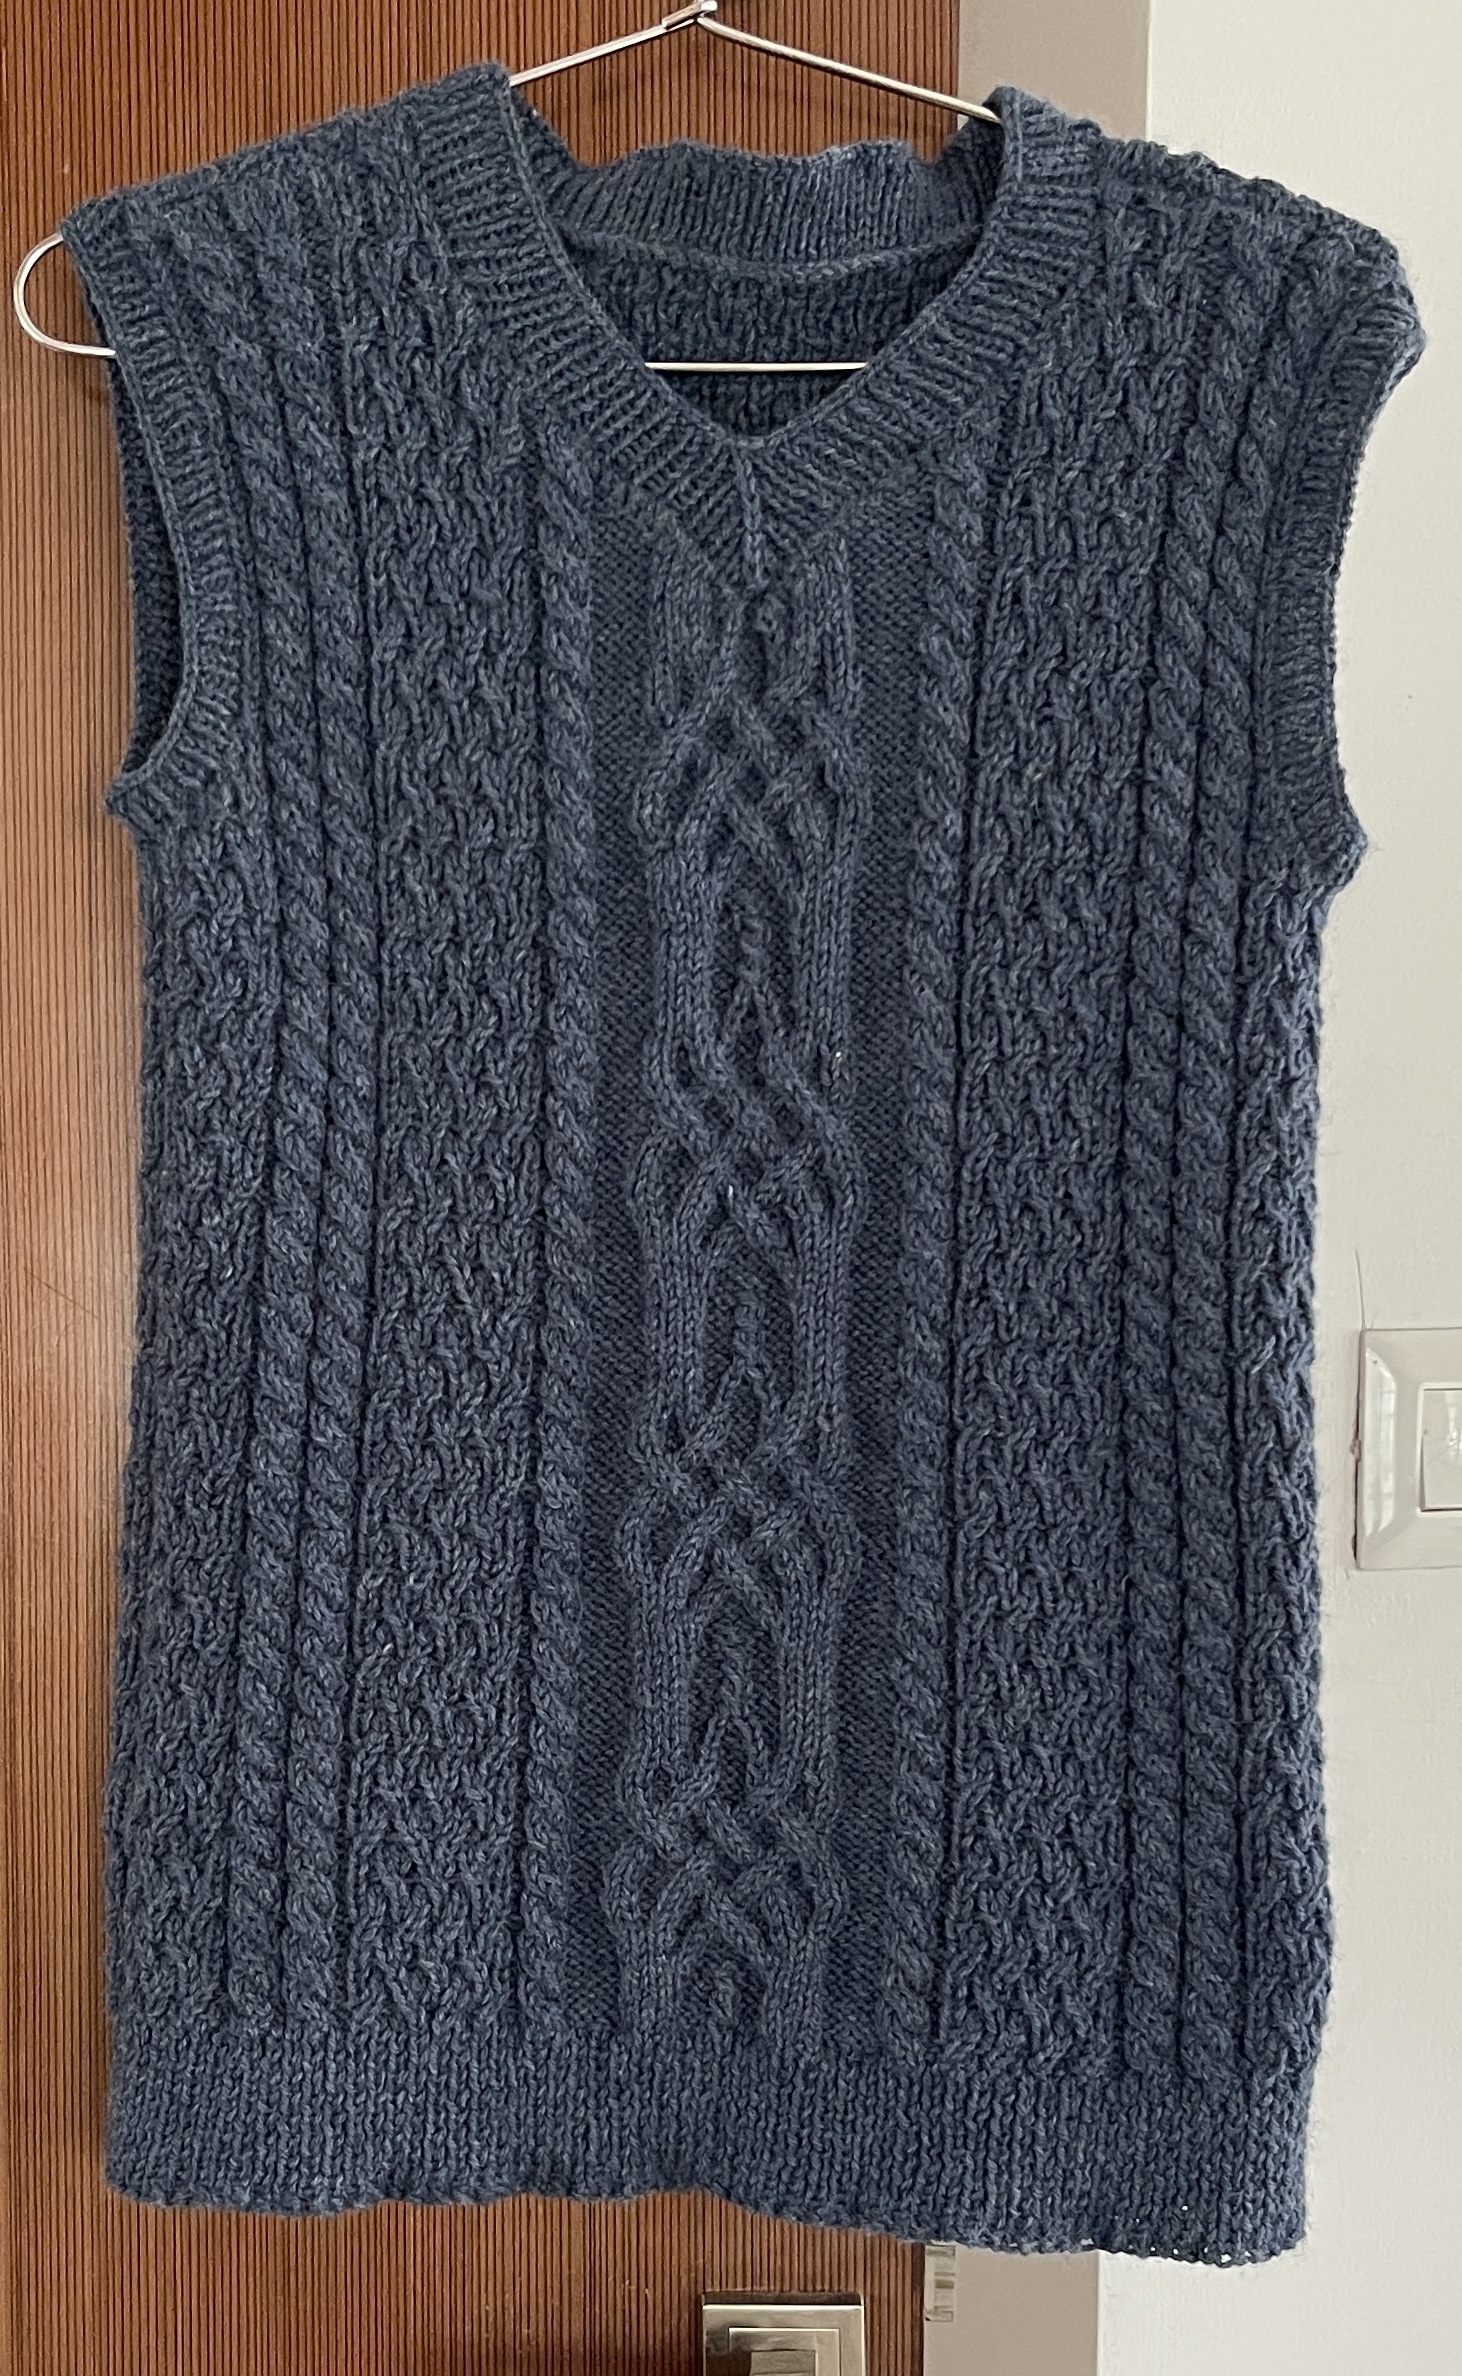
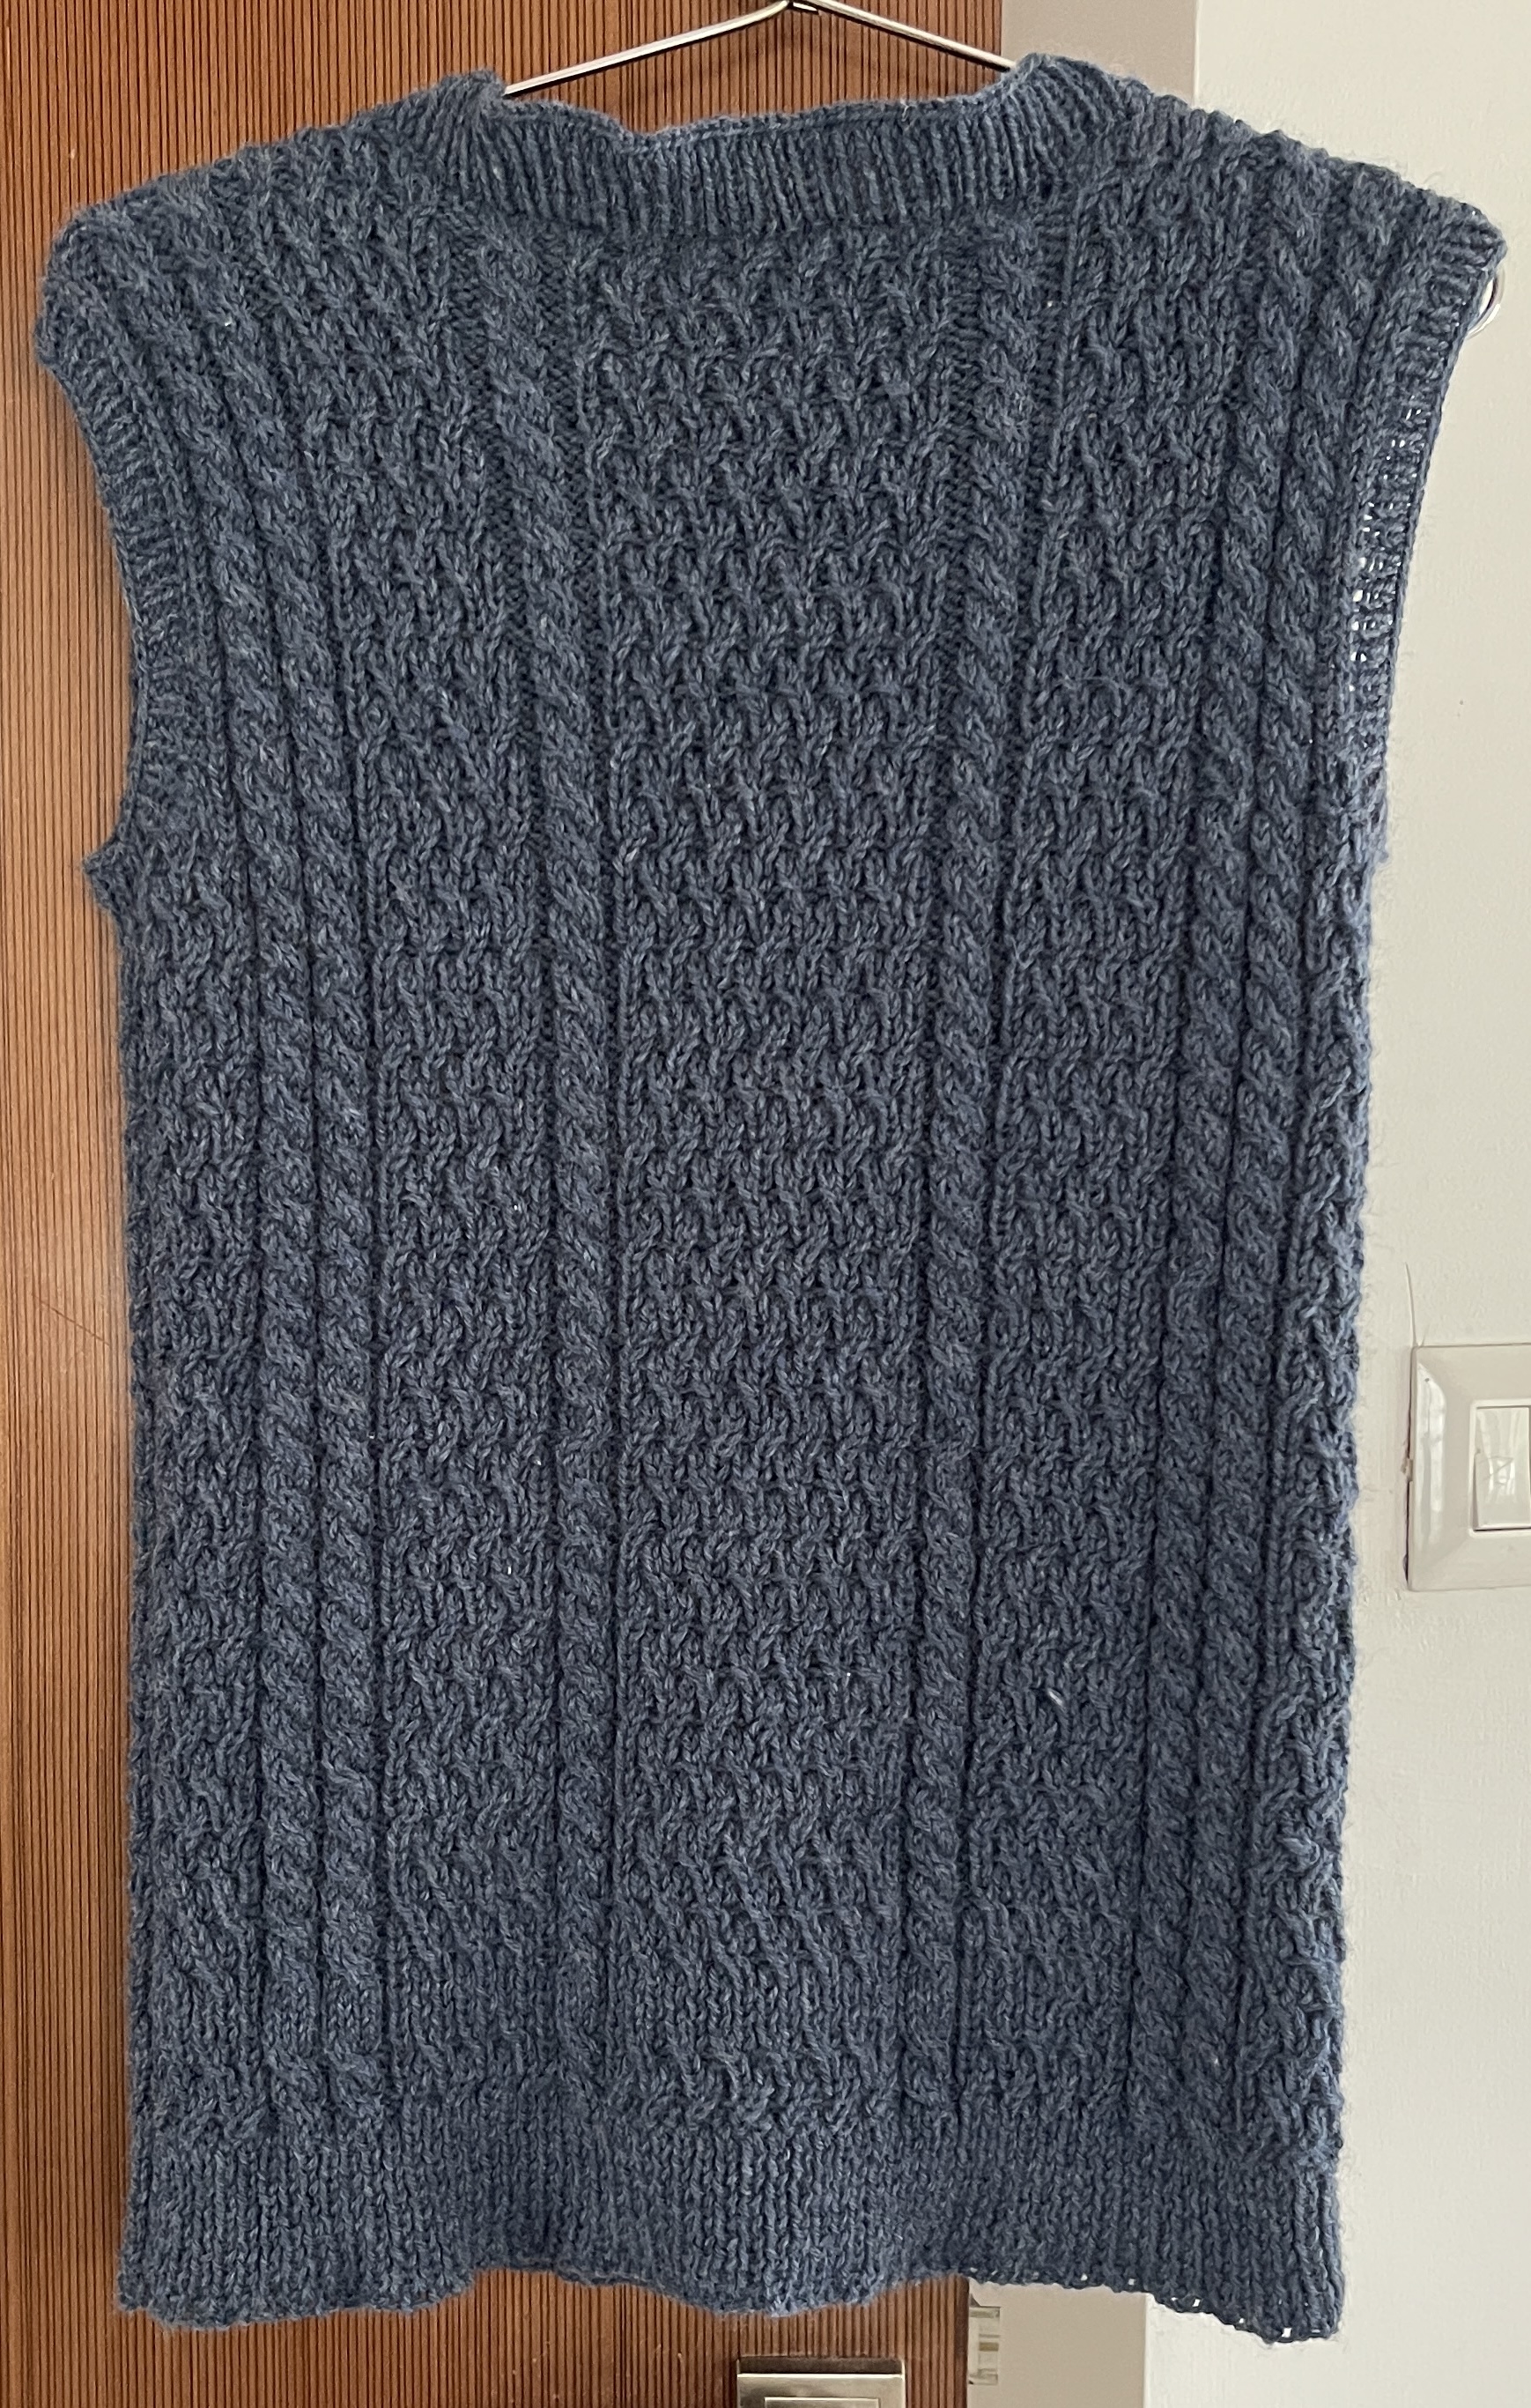
10th Project - Chapel Hill for Kumar

Hitting a milestone of 10 projects feels awesome - considering that my meditative journey with Knitting started precisely 1 year and 8 months ago. Am glad to have picked up knitting this lovely vest for my husband, Kumar, to celebrate this milestone - not something that was thought through frankly, but coincidentally, so appropriate.

The Chapel Hill Vest recommends Universal Yarn Deluxe worsted with a gauge of 18Stx24 rows for the StSt and 26stx24 rows for the Lattice part. I chose the Valley Yarns Northampton 100% wool that I got on Lovecrafts in an excellent 5-ball deal with gauge 4.5 St = 1” on 5 mm or 5 St = 1” on 4.5mm. With my knitting tension, it just about worked well. Loved the intense centre cable pattern in the front and the alternating cable and lattice on both front and back, which was pleasurable, as there was no monotony at any point.

The Denim Heather color and the texture of the wool both pleasing to knit with, this project took about 2 months to complete, with a 2 week break from knitting while on an active holiday in Japan (where I picked up some beautiful yarn, but more about that when I find a pattern for that yarn).

As always, ever grateful for the help from two dear fellow knitters (really, Gurus) on the Knitting community - @salmonmac and @Creations that gave me the confidence to plough through, as also the updated pattern (a free pattern that was still updated with corrections - that is so cool and empathetic) by Aubrey Busek from Universal Yarn.

Having the eventual recipient of this project watch me through the journey, at close quarters, also joining in the excitement of the progress being made - as against seeing pictures of the progress (as was the case for all my earlier projects), does add that extra zing to the excitement.

Finally, here is one project where I didn’t make an elaborate row by row instruction for myself prior to starting, and just used the detailed pattern instructions with calculations and notes as I went along. That is a clear first and a big one for someone who is constantly wondering whether I am making the right moves :slight_smile:

Havent blocked it (although the pattern asks to do so before sewing the front and back sides together.

Fits my husband very well - he claims it is one of his best fitting sweaters !


One thing I would have liked to avoid - the back neck of the sweater wrinkling like in the pic. The number of stitches I got to pick for both sleeves and neck were lesser than what the pattern suggested - for the sleeves, nearly 20 less, for the neck about 10 less (and I tried to sneak in a few extra stitches for the neck). Is that why the back of the neck is not sitting good enough, I wonder. Am also tempted to block - would the cables sit more snugly if I block ?

In any case, I feel happy (while looking for where to improve)

2 Likes

So well done! This is a beautiful, well-fitting vest which obviously pleases the recipient (lucky recipient).
Yes, washing and laying flat to block and dry will help finish off the cables and other stitches. I often use the stitch number to pick up for neckbands as a rough guide, sometimes picking up more than suggested, sometimes fewer stitches. In this case fewer sts would work and lessen the ripple at the back neck. Considering all the work on the vest, it would be worth re-knitting with fewer sts at the back. (Count how many you have now at the back and overall should you decide to do this.)
It’s an achievement and a milestone on your knitting journey. Good going!

2 Likes

Thank you @salmonmac salmonmac !

oooh ! re-knitting is indeed an option I didnt consider ! Will probably take that suggestion, thank you!
And will block

1 Like

Wow !
Amazing.
This is pretty much perfection!!

I agree that on such a fabulous top it would be worth the extra bit of time and effort to redo that neck. Especially if you have some yarn left over.
In addition to counting the number of stitches and reducing the number picked up across the back as salmonmac has already said, you could
Measure how many stitches per inch or 2 inch on the sleeve dge laying flat and use this as a guide as they don’t seem to be wrinkly
Bind off in pattern, that is a knit bind off the purl bind off around the whole neck. Binding off in rub makes the bind off a bit more stretchy a bit less visible and allows the rib to to lay in its natural up/down ribbyness. A knit bind off makes the last row all lay flat, less stretch and the distance travelled ends up longer (because no up down rib bumps) which can cause it to be a bit flared.
I would do a small swatch of 1 x 1 rib and try out the rub bind off and look at the difference. It’s a ten minute experiment.

You might be thinking you must bind off in knit because you did with the sleeve edge and they should all match, however I do not think they need to match. On the sleeve edge there is no wrinkle so nothing to fix and the knit bind off here is a rather nice design parallel to a knit row a little further in (just before the cable) so it looks very attractive and considered where as the neck knit bind off has no parallel knit row to give it the designed feel. I feel this is a case where the neck and sleeves can successfully have a different bind off.

These are very picky comments though! This is a truly superb vest, fits perfectly and brilliantly made. Much harder than anything I’ve ever made.

2 Likes

Thank you @Creations for the suggestion - I looked up a video and indeed the rib bind off appears so much cleaner (I wasnt convinced about the knit bind off really, but didnt know what else to do - should have looked it up before rushing into this). In fact, the matching sleeves and neck did look a bit out of place to me :slight_smile:

I want to start on the Emma pattern sweater for my daughter in law - too long pending and we may be traveling in couple of months to Toronto - and probably come back to redoing the neck for this vest.

My husband says - make another sweater for me with a better neck :laughing: and leave this as it is !

Thanks a lot to you and @salmonmac - I am so confident with the two of you helping out !

You’re very welcome. In fact it’s salmonmac who is the wise one here. I just chip in with little bits I’ve picked up along the way and cheer on from the sidelines.

1 Like

We’re all together in this. Thanks very much Creations for all your help.

2 Likes

I cant thank @salmonmac enough - she got me over the finishing line last year when I was royally - and absolutely royally - stuck on a cable decrease (which I was warned not to embark on, as a beginner). The way she explains it - I am stuck on that instruction for life :-))
Like she said in a line for this project - Just Knit the knits and Purl the purls - this one thing stood me in good stead, when in doubt.
And your suggestion to put cable markers helped me internalise the pattern and many times, just knit without having to look at the pattern !

I am now preparing to embark on Kim Hargreaves Emma - for my daughter in law :-))

2 Likes

More lovely cables. I’ll look forward to seeing your progress.

1 Like

I may be too late with this, if you’ve already re-knit the neck edge, but you could also go down a needle size, either immediately or halfway through the ribbing. And binding off in pattern will also reduce the rippling.
Quite an accomplishment for someone with less that 2 years of knitting! It looks great!

2 Likes

Thank you @ColoCro, I was encouraged by @salmonmac and @Creations to redo the neck, but that just gets me knotted up with tension, so letting it pass for now. I have learnt a hard lesson from this experience and will take it into my future knits !

1 Like

That’s a really good point about binding off in pattern for the rib, it makes such a difference.
Something I was thinking about recently (whilst knitting) too is that some patterns have you keep stitches on hold for the collar or for part of it, others have you bind off first, then pick up stitches for the collar.
I’m not saying there’s anything wrong with putting stitches on hold, nothing wrong with it at all, but there are advantages to binding off all the neck stitches before working a collar.
If the stitches are all bound off before picking up and knitting the rib collar the size and stretch of the neck hole can be checked before going any further. The hole can be altered if needed, some times by just using a bigger or smaller needle for the bind off or for the pick up row where it can be tightened.
Also because undoing a rib collar is fear inducing if unraveling it eventually unravels the rest of the sweater, life lines are great but afterthought life lines can be tricky especially near bind offs or cables. It’s much less scary to undo a rib collar when you know the unraveling stops in a safe place at the neck bind off and can’t go any further.

Just thought I’d share. I know often knitters are looking for fewer bind offs, and fewer seams and I’ve been admiring how useful they are.

1 Like

An afterthought correction would be to use a length of the yarn and work a chain stitch, like an embroidery chain stitch, around the inside of the back neck close to the edge. You’d pull each stitch a wee bit snug and it will tame that excess. Using chain stitch will still leave a bit of stretch/flexibility at that edge.

2 Likes