Hello all,
I am a knitting newbie and am facing difficulties with the following pattern:
Can somebody help and tell me when I need to repeat and when I need to turn? I am really lost…
Any help would be so great!!!
Hello all,
I am a knitting newbie and am facing difficulties with the following pattern:
Can somebody help and tell me when I need to repeat and when I need to turn? I am really lost…
Any help would be so great!!!
Welcome to the forum!
What is the name of your pattern and designer?
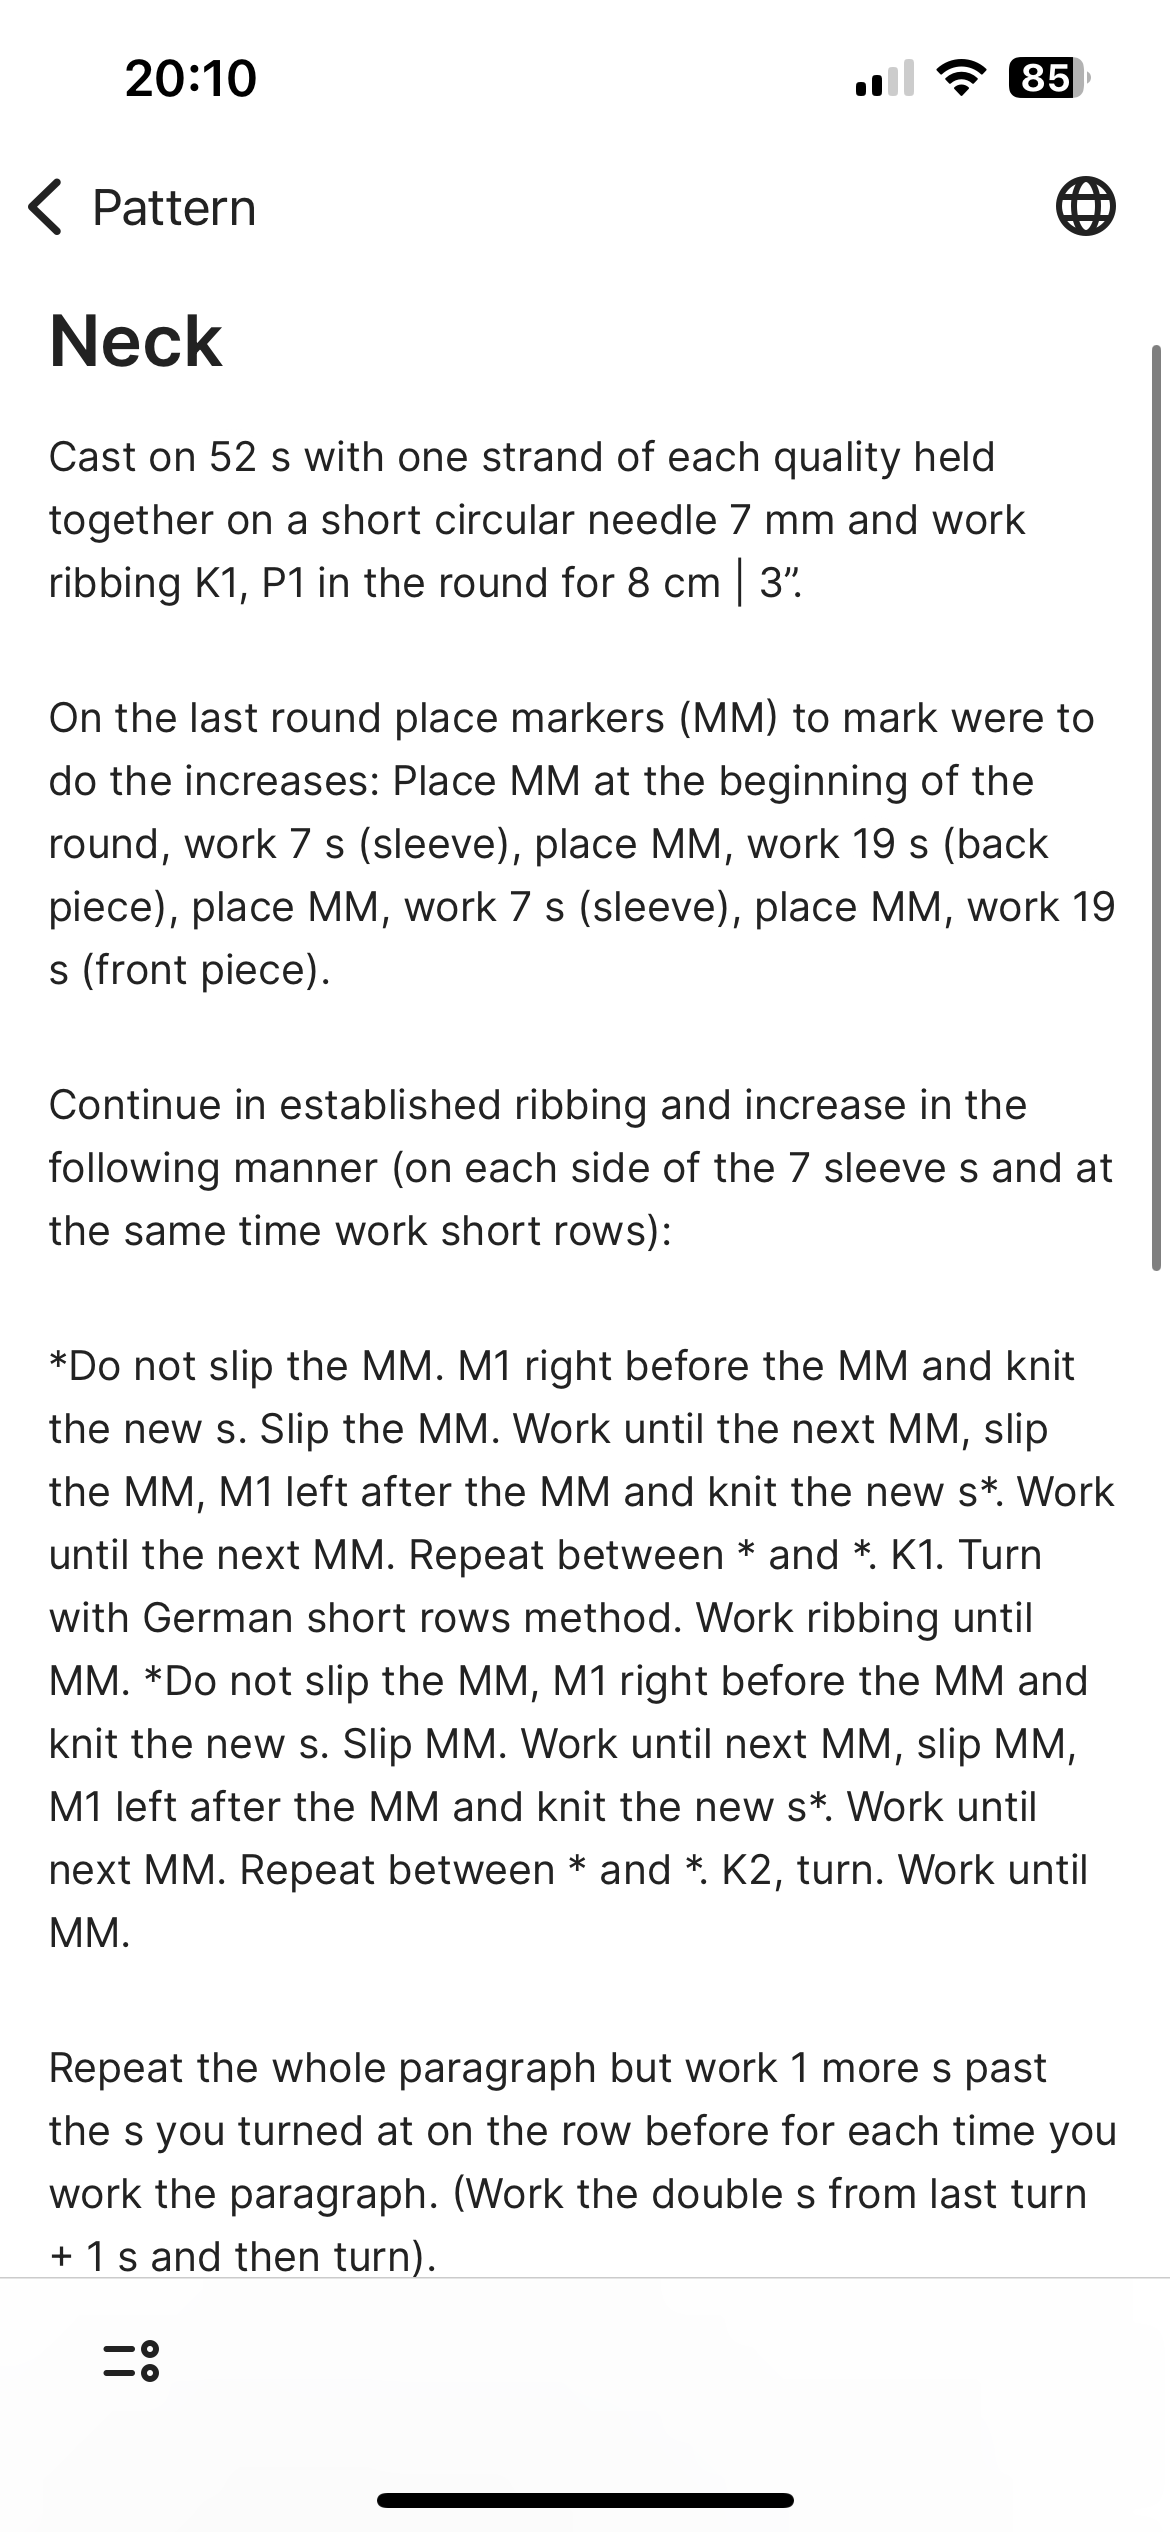
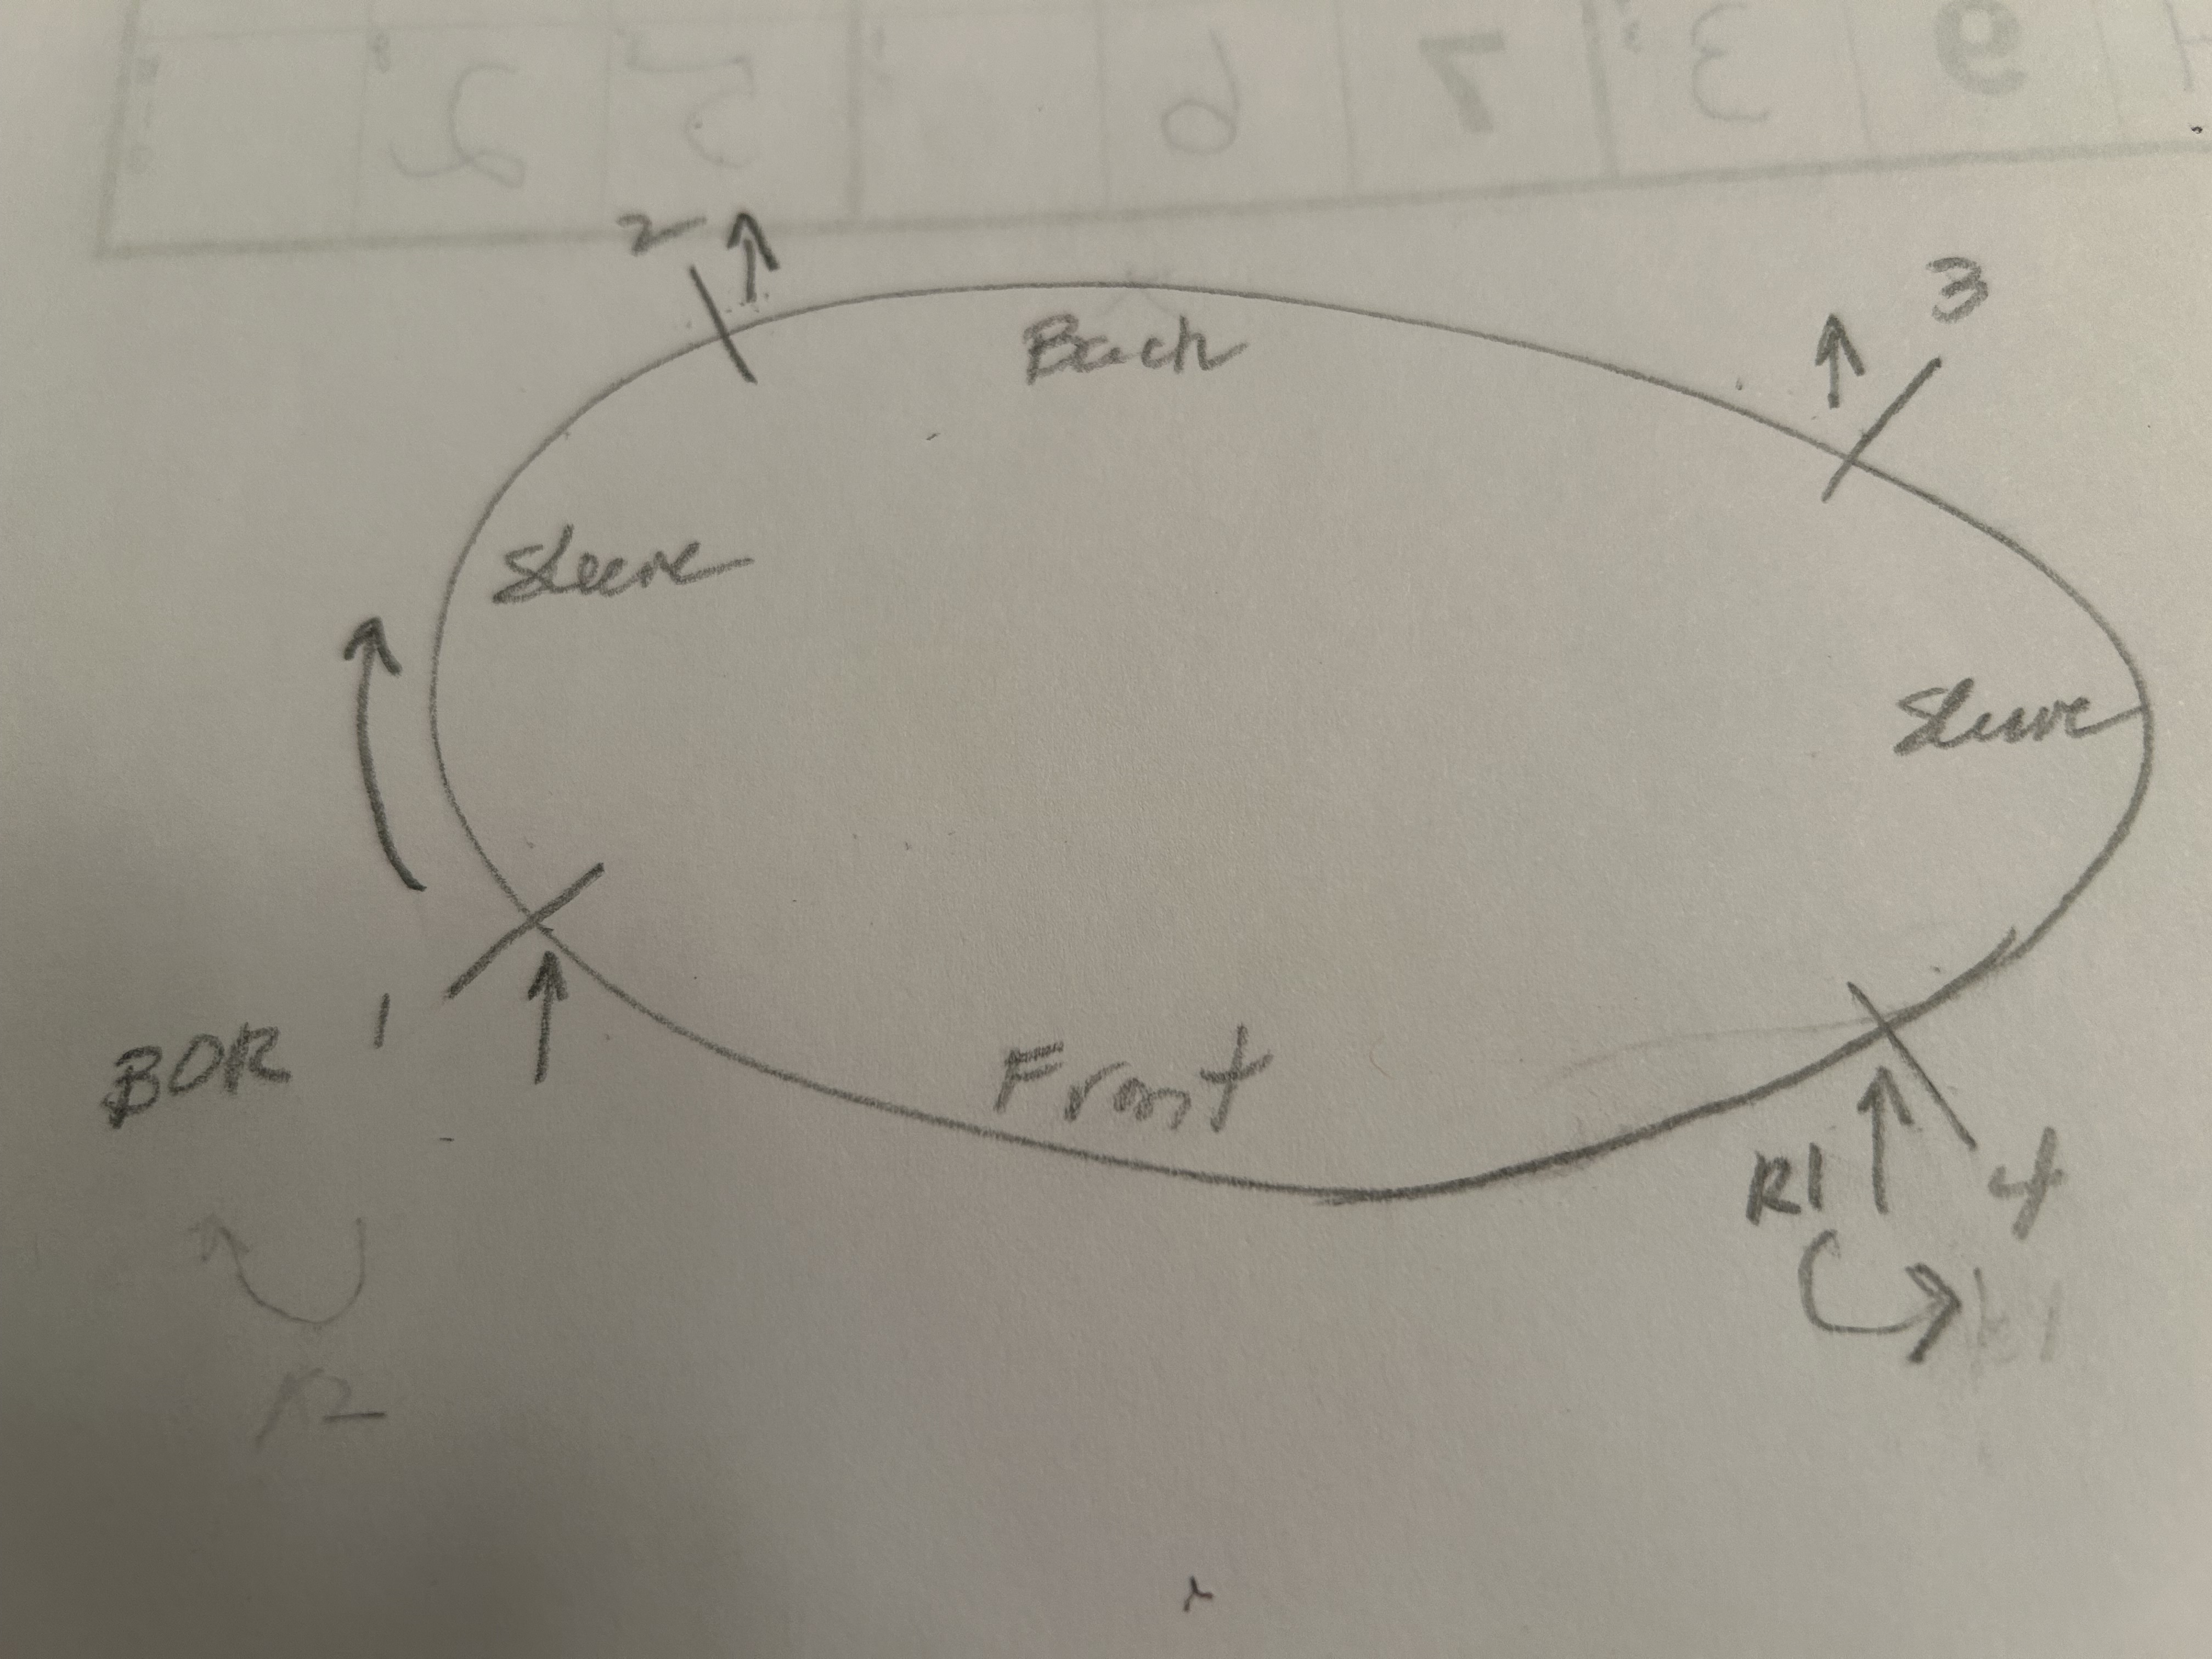
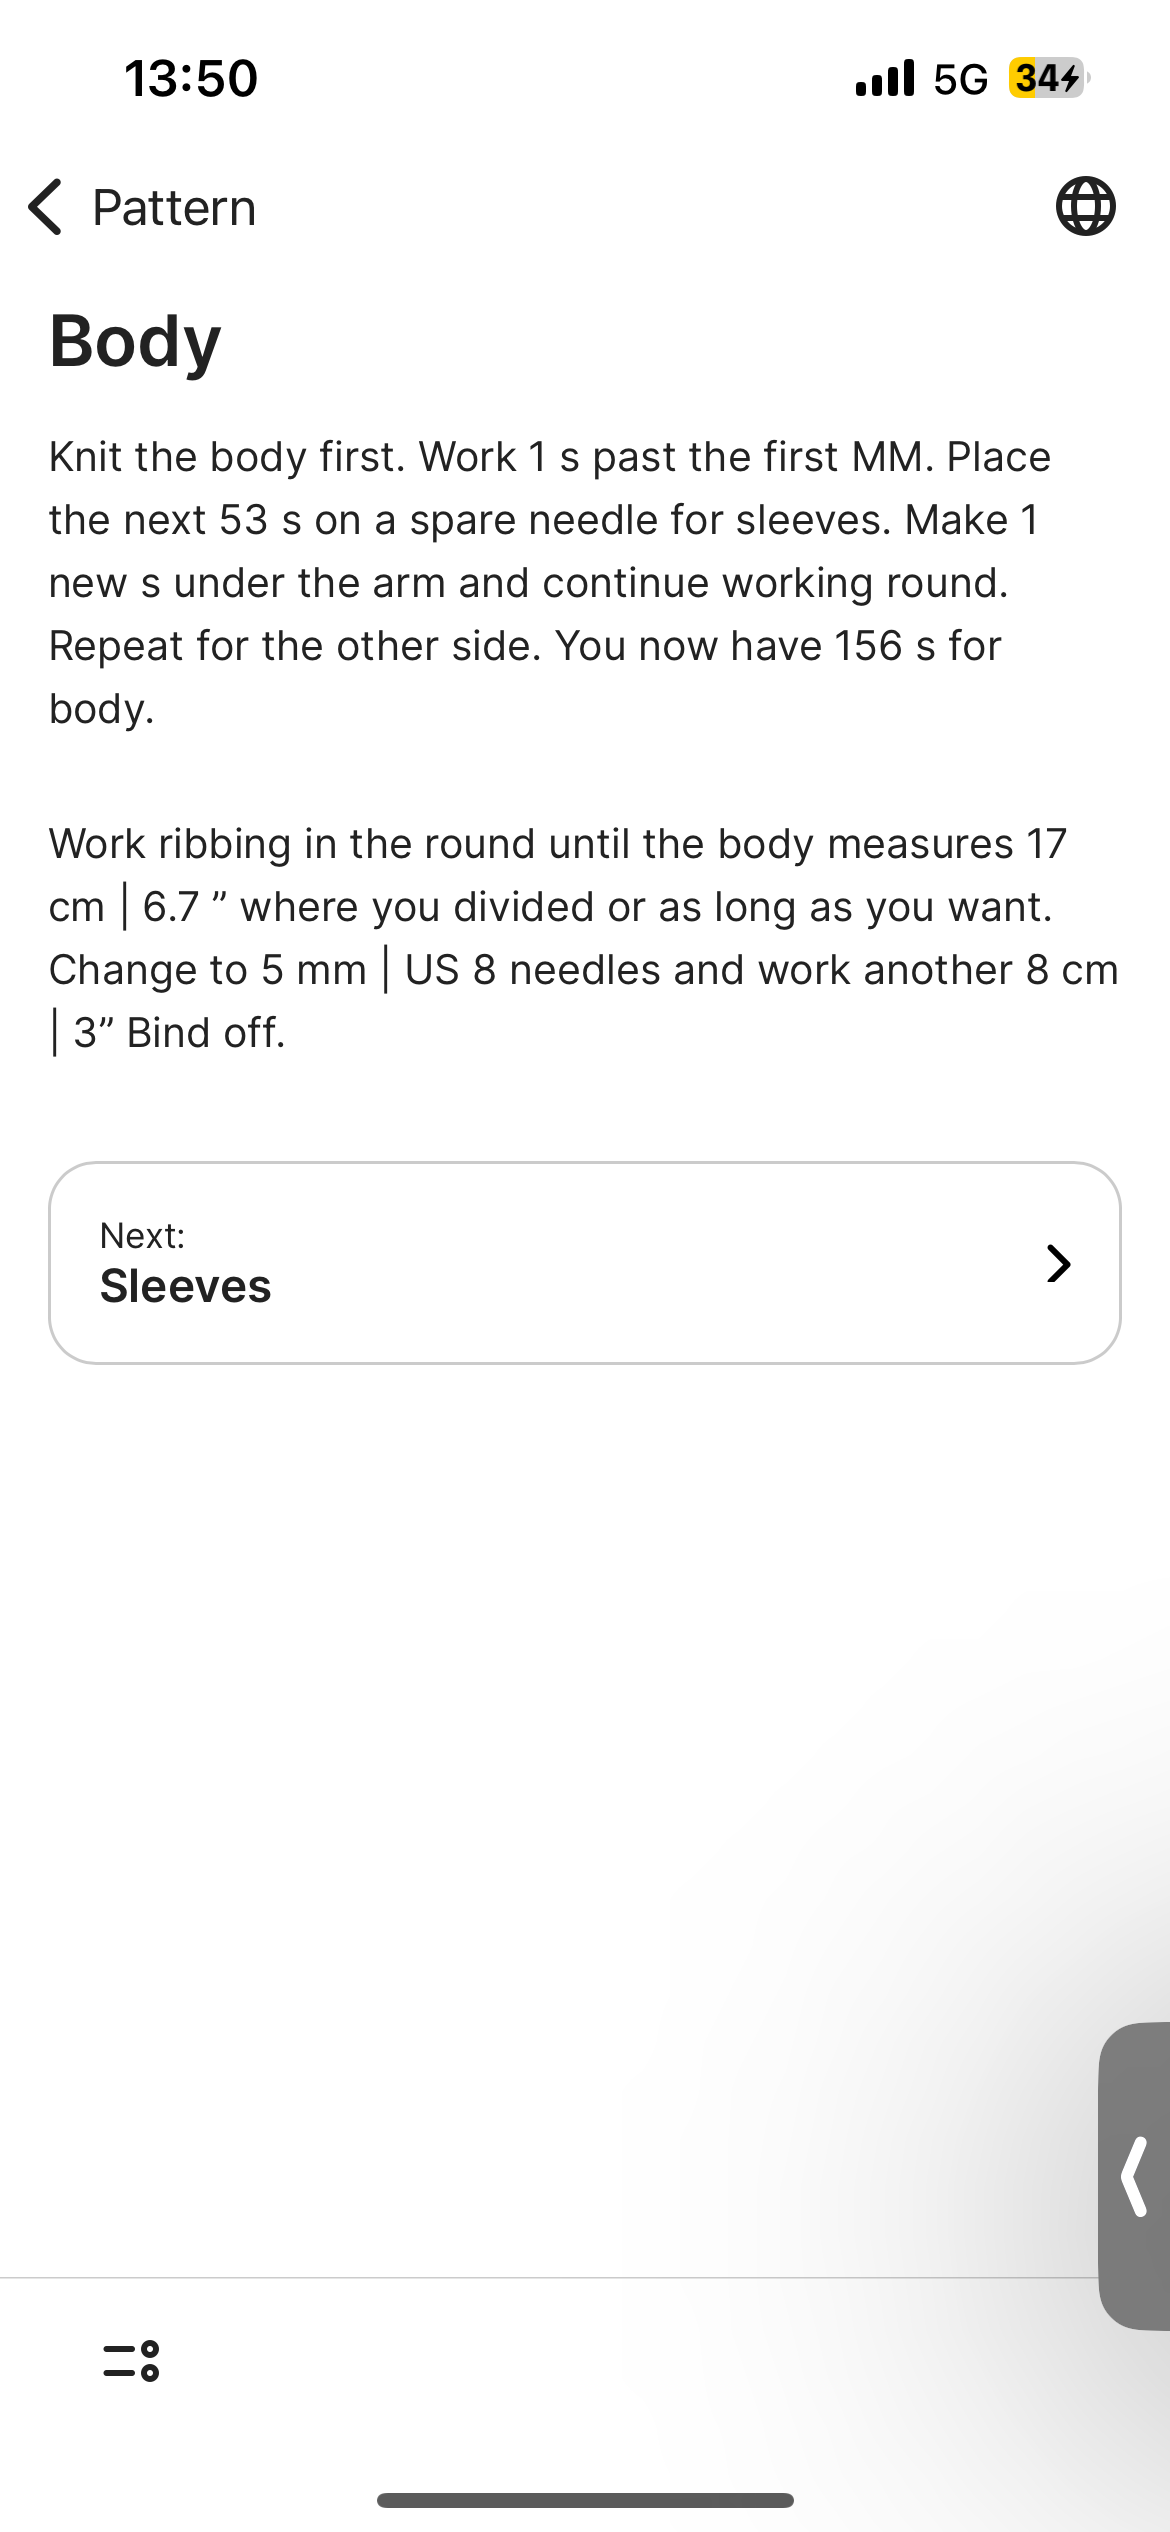
It helps to number the markers starting with 1 for the beginning of round marker which is between the front and the right sleeve (right as you would wear the sweater). You’ll be turning on either side of the front sts so that the extra short rows will add to the height of the back of the sweater.
Round one is shown in the diagram below. Begin at marker 1 (beginning of round) and work through markers 2 and 3 (with the increases). At marker 4, turn and work the German short row.
For Round two work back to the beginning of round through markers 3,2 and 1 (with increases), then k2 and turn for the German short row.
Then repeat rounds one and two working one more stitch past the last turning point each time. It helps to place a marker on that stitch or the double stitch just as a reminder.
Thank you so much!! After round 1 it says to K1. Do I do this then after making the increase and before doing the German short row?
Yes, make the increase, knit that stitch, K1 and then make the GSR turn.
Good luck with it and if it’s still not making sense, come back and ask again.
Thank you so much, you saved me!!! Btw, the pattern is the sammen sweater from pickles.no ![]()
Oooh, nice one!
Hi,
So now I have reached the increases for the sleeve. But for me it is not clear, whether the first marker is the centre of the back or the sleeve.
I would guess it would be marker 3 from your drawing? ![]()
Hello
It looks like you will need to move the BOR to the centre back. Currently you have no marker there. Leave the 4 markers (marking each side of sleeves or each side of front and back) in place and add a new marker in the centre back- count the stitches between the 2 back markers to find the centre and place your new BOR marker there. I suggest something that looks different to the others, a yarn strand instead of a removable marker, or removable marker with an extra marker dangling off it, something clear so you know this is not the increase marker. If you had an obviously different marker for the previous BOR you will need to remove it.
Work to the new BOR marker (in pattern, looks like it has been rib) and then begin the instruction regarding increases from there.
Hope this helps
Hi,
Thank you but sorry, this doesn’t help… ![]()
Does it mean that the BOR marker would then be the first MM of the pattern? Then I would start making increases in the Centre of the back, which seems a bit weird, no? Or would the increases start at the sleeves, then marker 3 from the drawing?
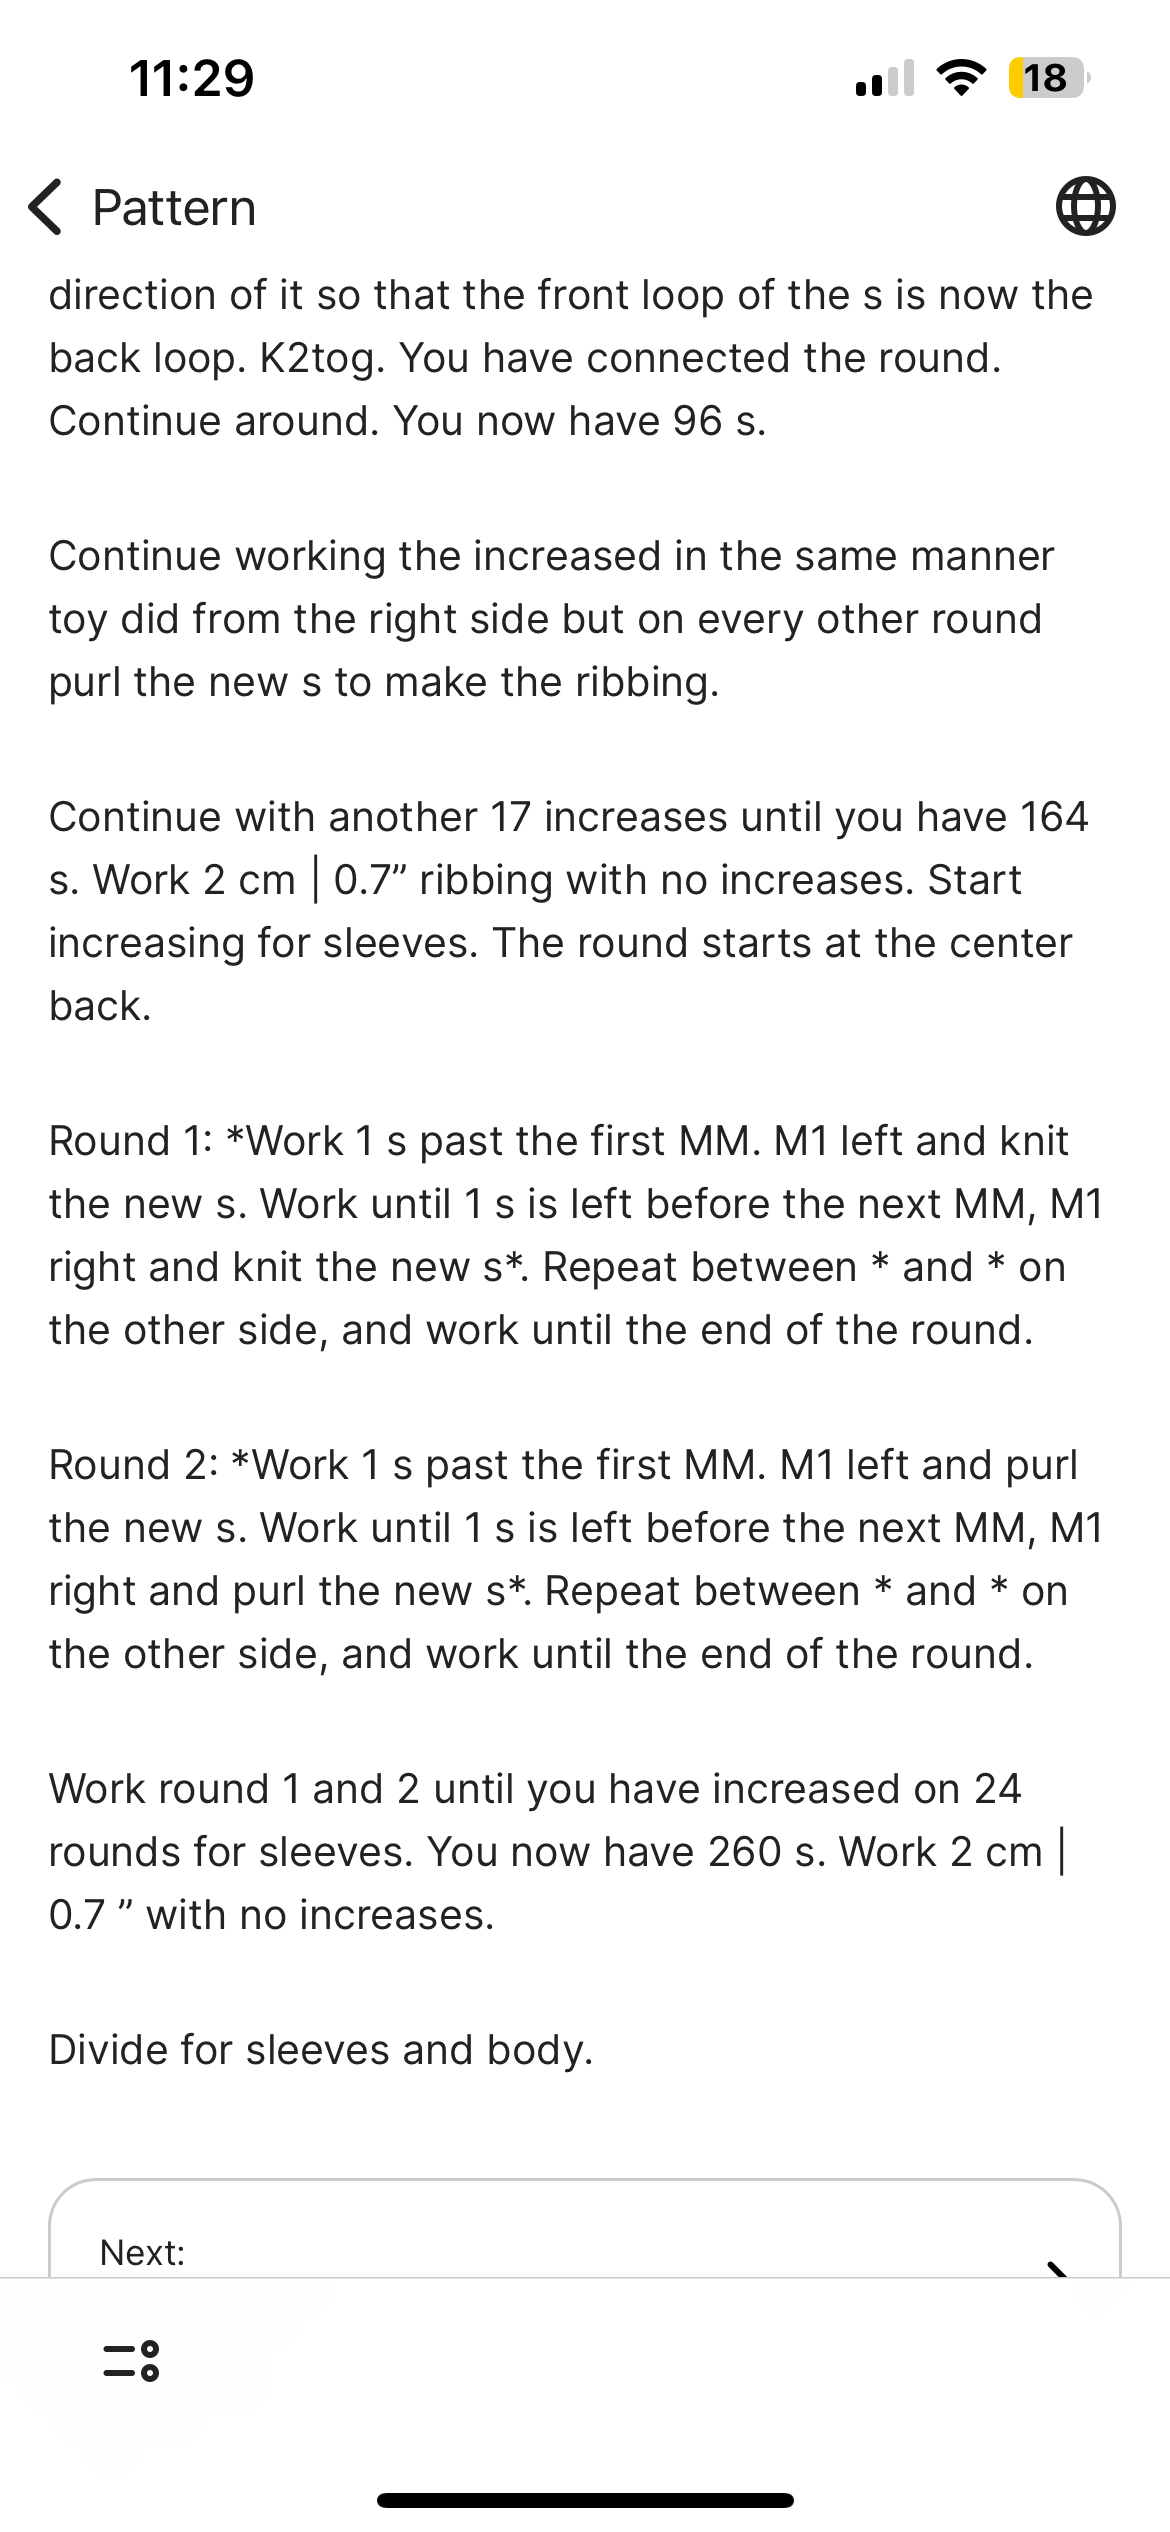
There’s no increase at the BOR marker, that’s only so you can count the rounds. So, yes, you’re right you work themround the the sleeve marker, marker on the pic although now it will be marker 1 of the new round. Increasing in the 4 places previously marked.
If this is still not clear I’m sure salmonmac will be along to help out. I may not have worded it well.
Do just say if it still doesn’t make sense.
No no now I get it, thank you!! ![]()
Yes, the BOR marker is now at the center back but it isn’t an increase marker (confusing, right?). Make it a different color or use a loop of yarn for the BOR so you don’t accidentally increase there.
With the center of back as your new BOR, marker 3 becomes the next marker and the increase is one stitch past that marker and then the round continues as written. The increases are only on the sleeve side of the markers for these directions.
Thank you both for helping me out!! ![]()
You’re making good progress on a pattern that’s not so straightforward. Good going!
Come back any time if another odd directions comes up or any question arises.
The pattern doesn’t get any easier… now I don’t understand which marker is the first one. Personally, I would think the first MM here is marker 3 from the drawing. But then they also had me place the other marker beforehand as BOR. ![]()
Yup, the best part is that once you accomplish this pattern you will be well equipped to take on the next challenge!
The BOR marker is on the back between markers 2 and 3 in the drawing. So knit to marker 3, slip the marker and place the sleeve sts (between markers 3 and 4) on hold for the sleeve. Cast on one stitch and work around to marker one, slip marker, place sts on hold for sleeve (sts between markers 1 and 2), cast on one stitch and continue to the BOR.
If you want to change the numbering on the markers to make possible future directions easier, the go ahead. Marker 3 would then, as you thought be the new first marker.
I find it easier to place the held sts for the sleeves on stitch holders or waste yarn so that you don’t have that spare needle flying around.
Oh my that’s gorgeous! You worked it out beautifully, short rows, increases and all. Looks grand.
Thank you so much, I couldn‘t have done it without you!!
Looks greatly perfect knitting and perfect fit, what a success.