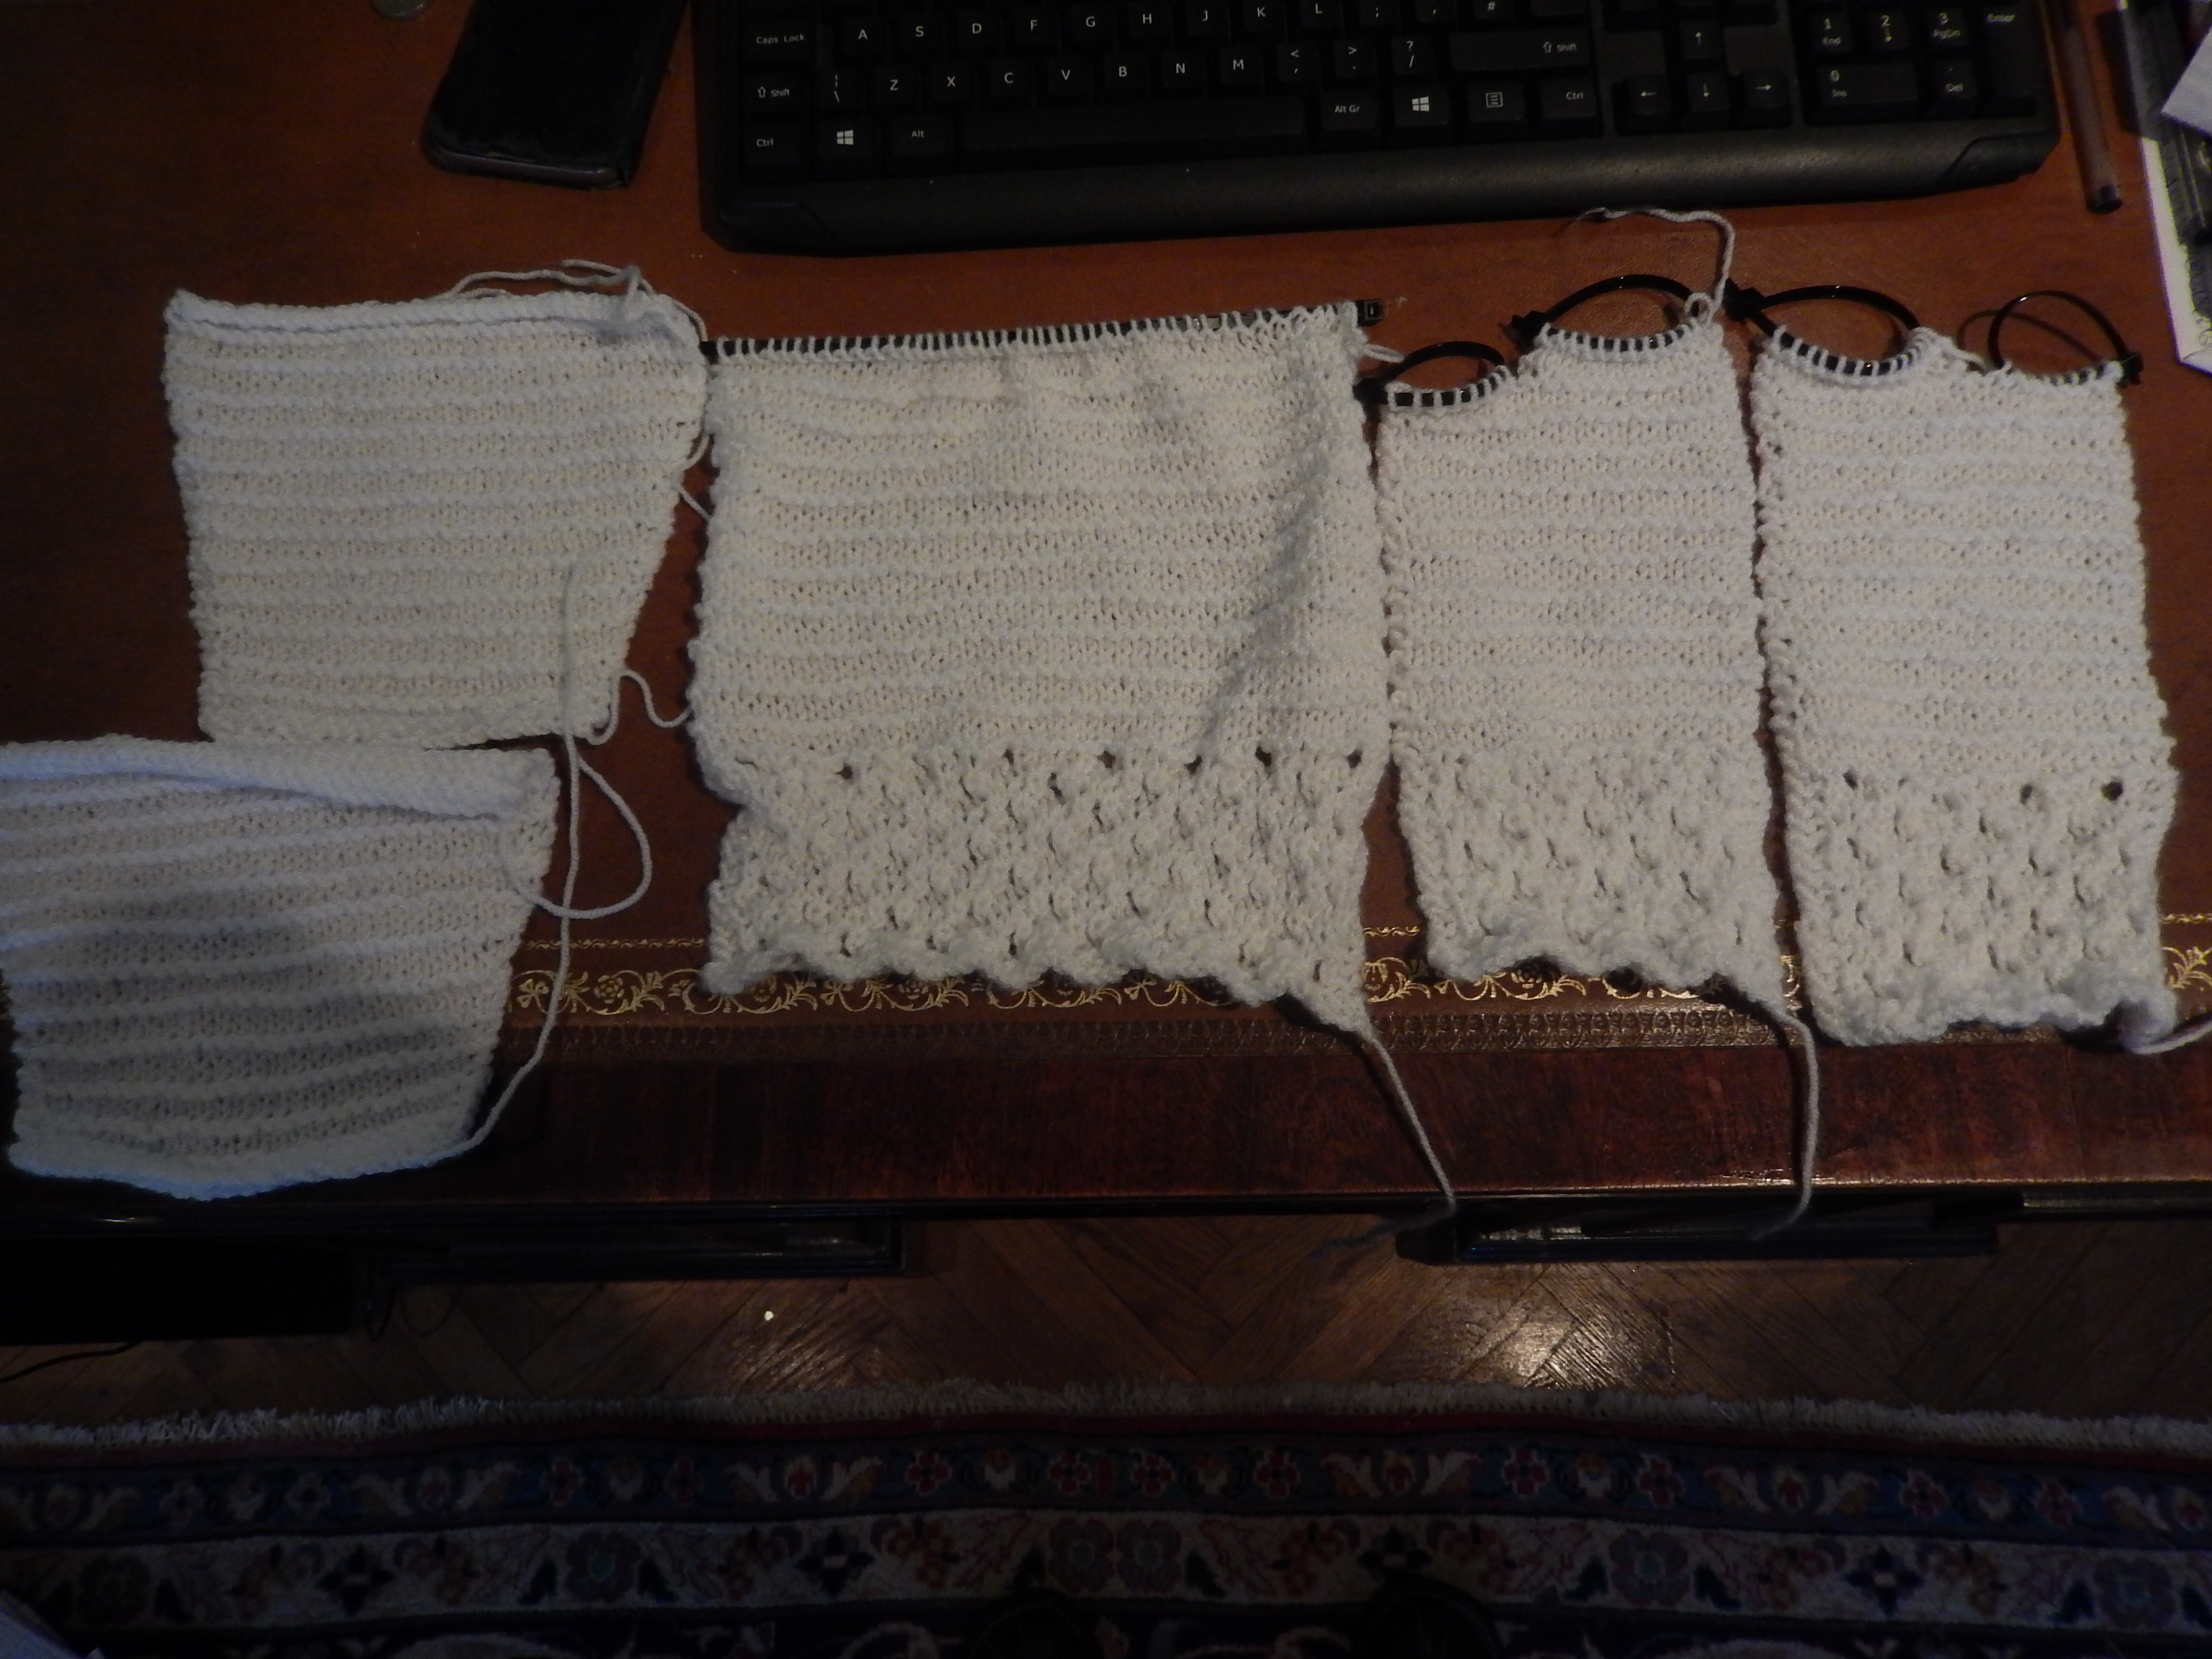
I haven’t been able to knit for a few months but have now come back to this project as I want to finish it for a friend’s grandchild arriving next month. I seem to be rusty as I’m already stuck! Can’t figure out how to put together the pieces I’d knitted before (sleeves, right front, left front and back). Please can someone show me how to (or more specifically where to!) “graft the shoulders” as per the pattern instructions, any help much appreciated.

That’s a project well worth finishing. Very sweet baby cardigan.
The pieces seem to me to go like this:
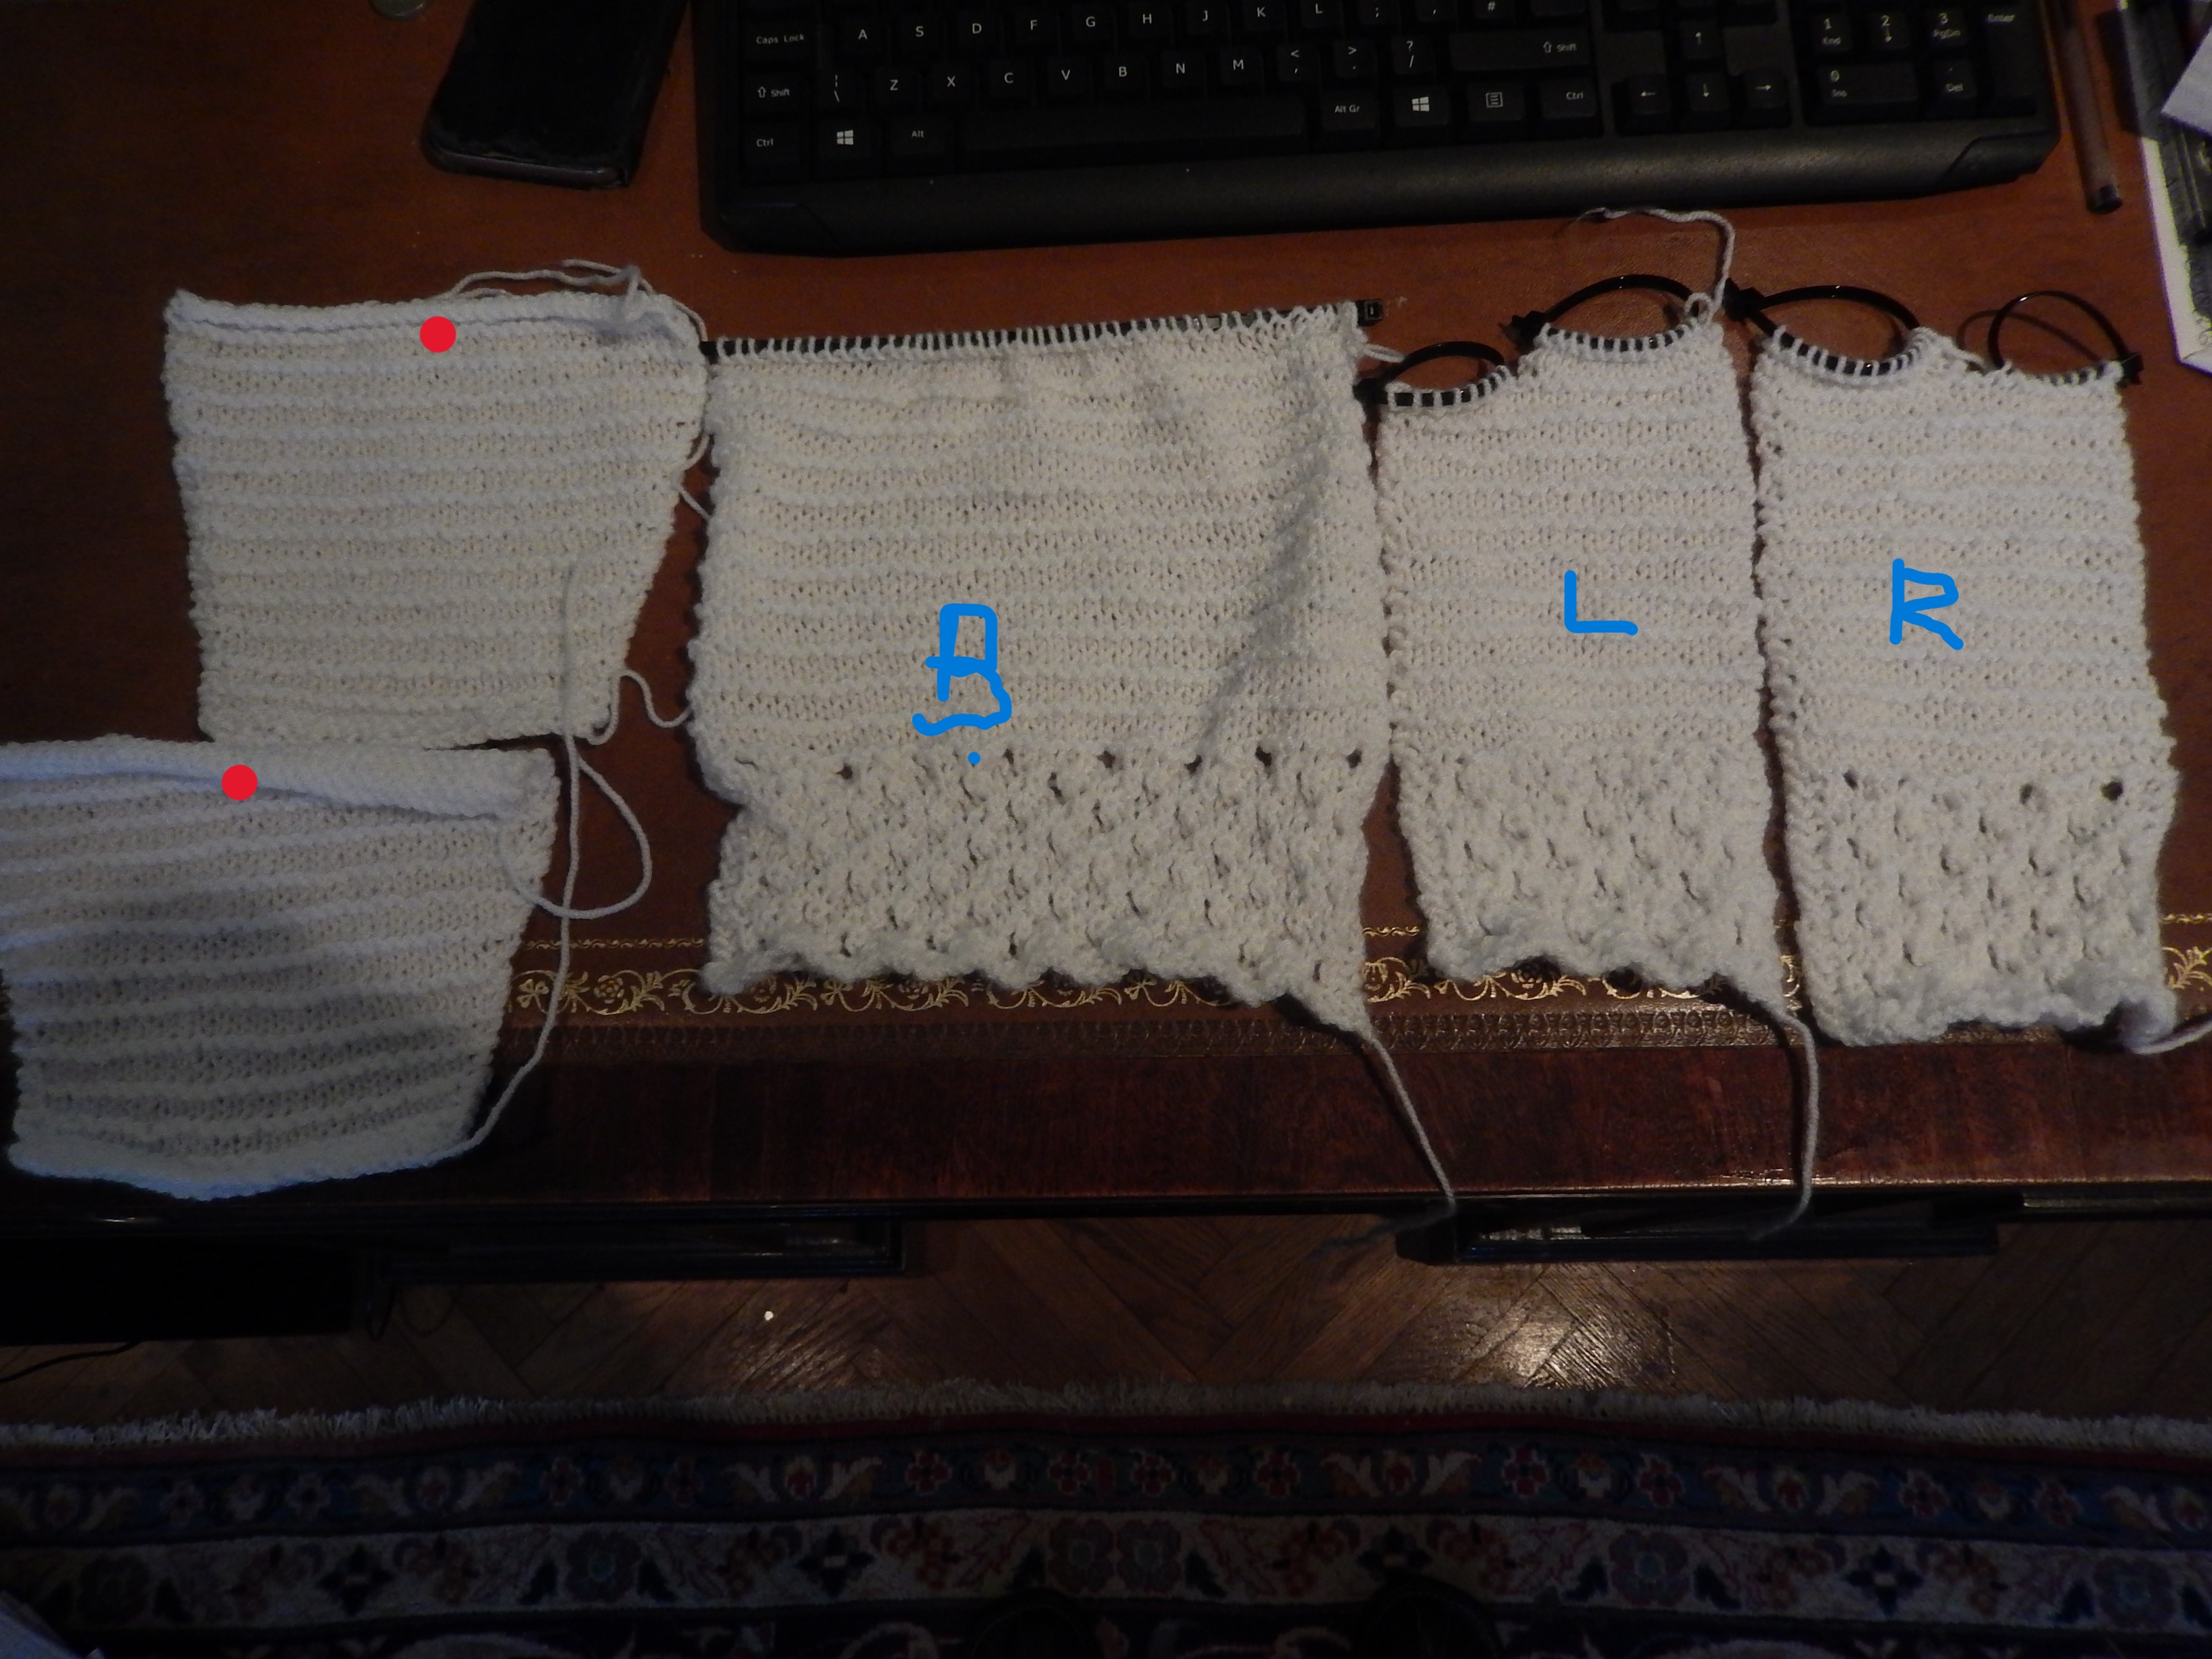
The B is the back, R the right front and L the left front as you would wear the sweater. (you can count the sts to be sure of which are the held neck sts vs the final sts for the shoulder seam for your size) The red dot looks to be the top of the sleeve.
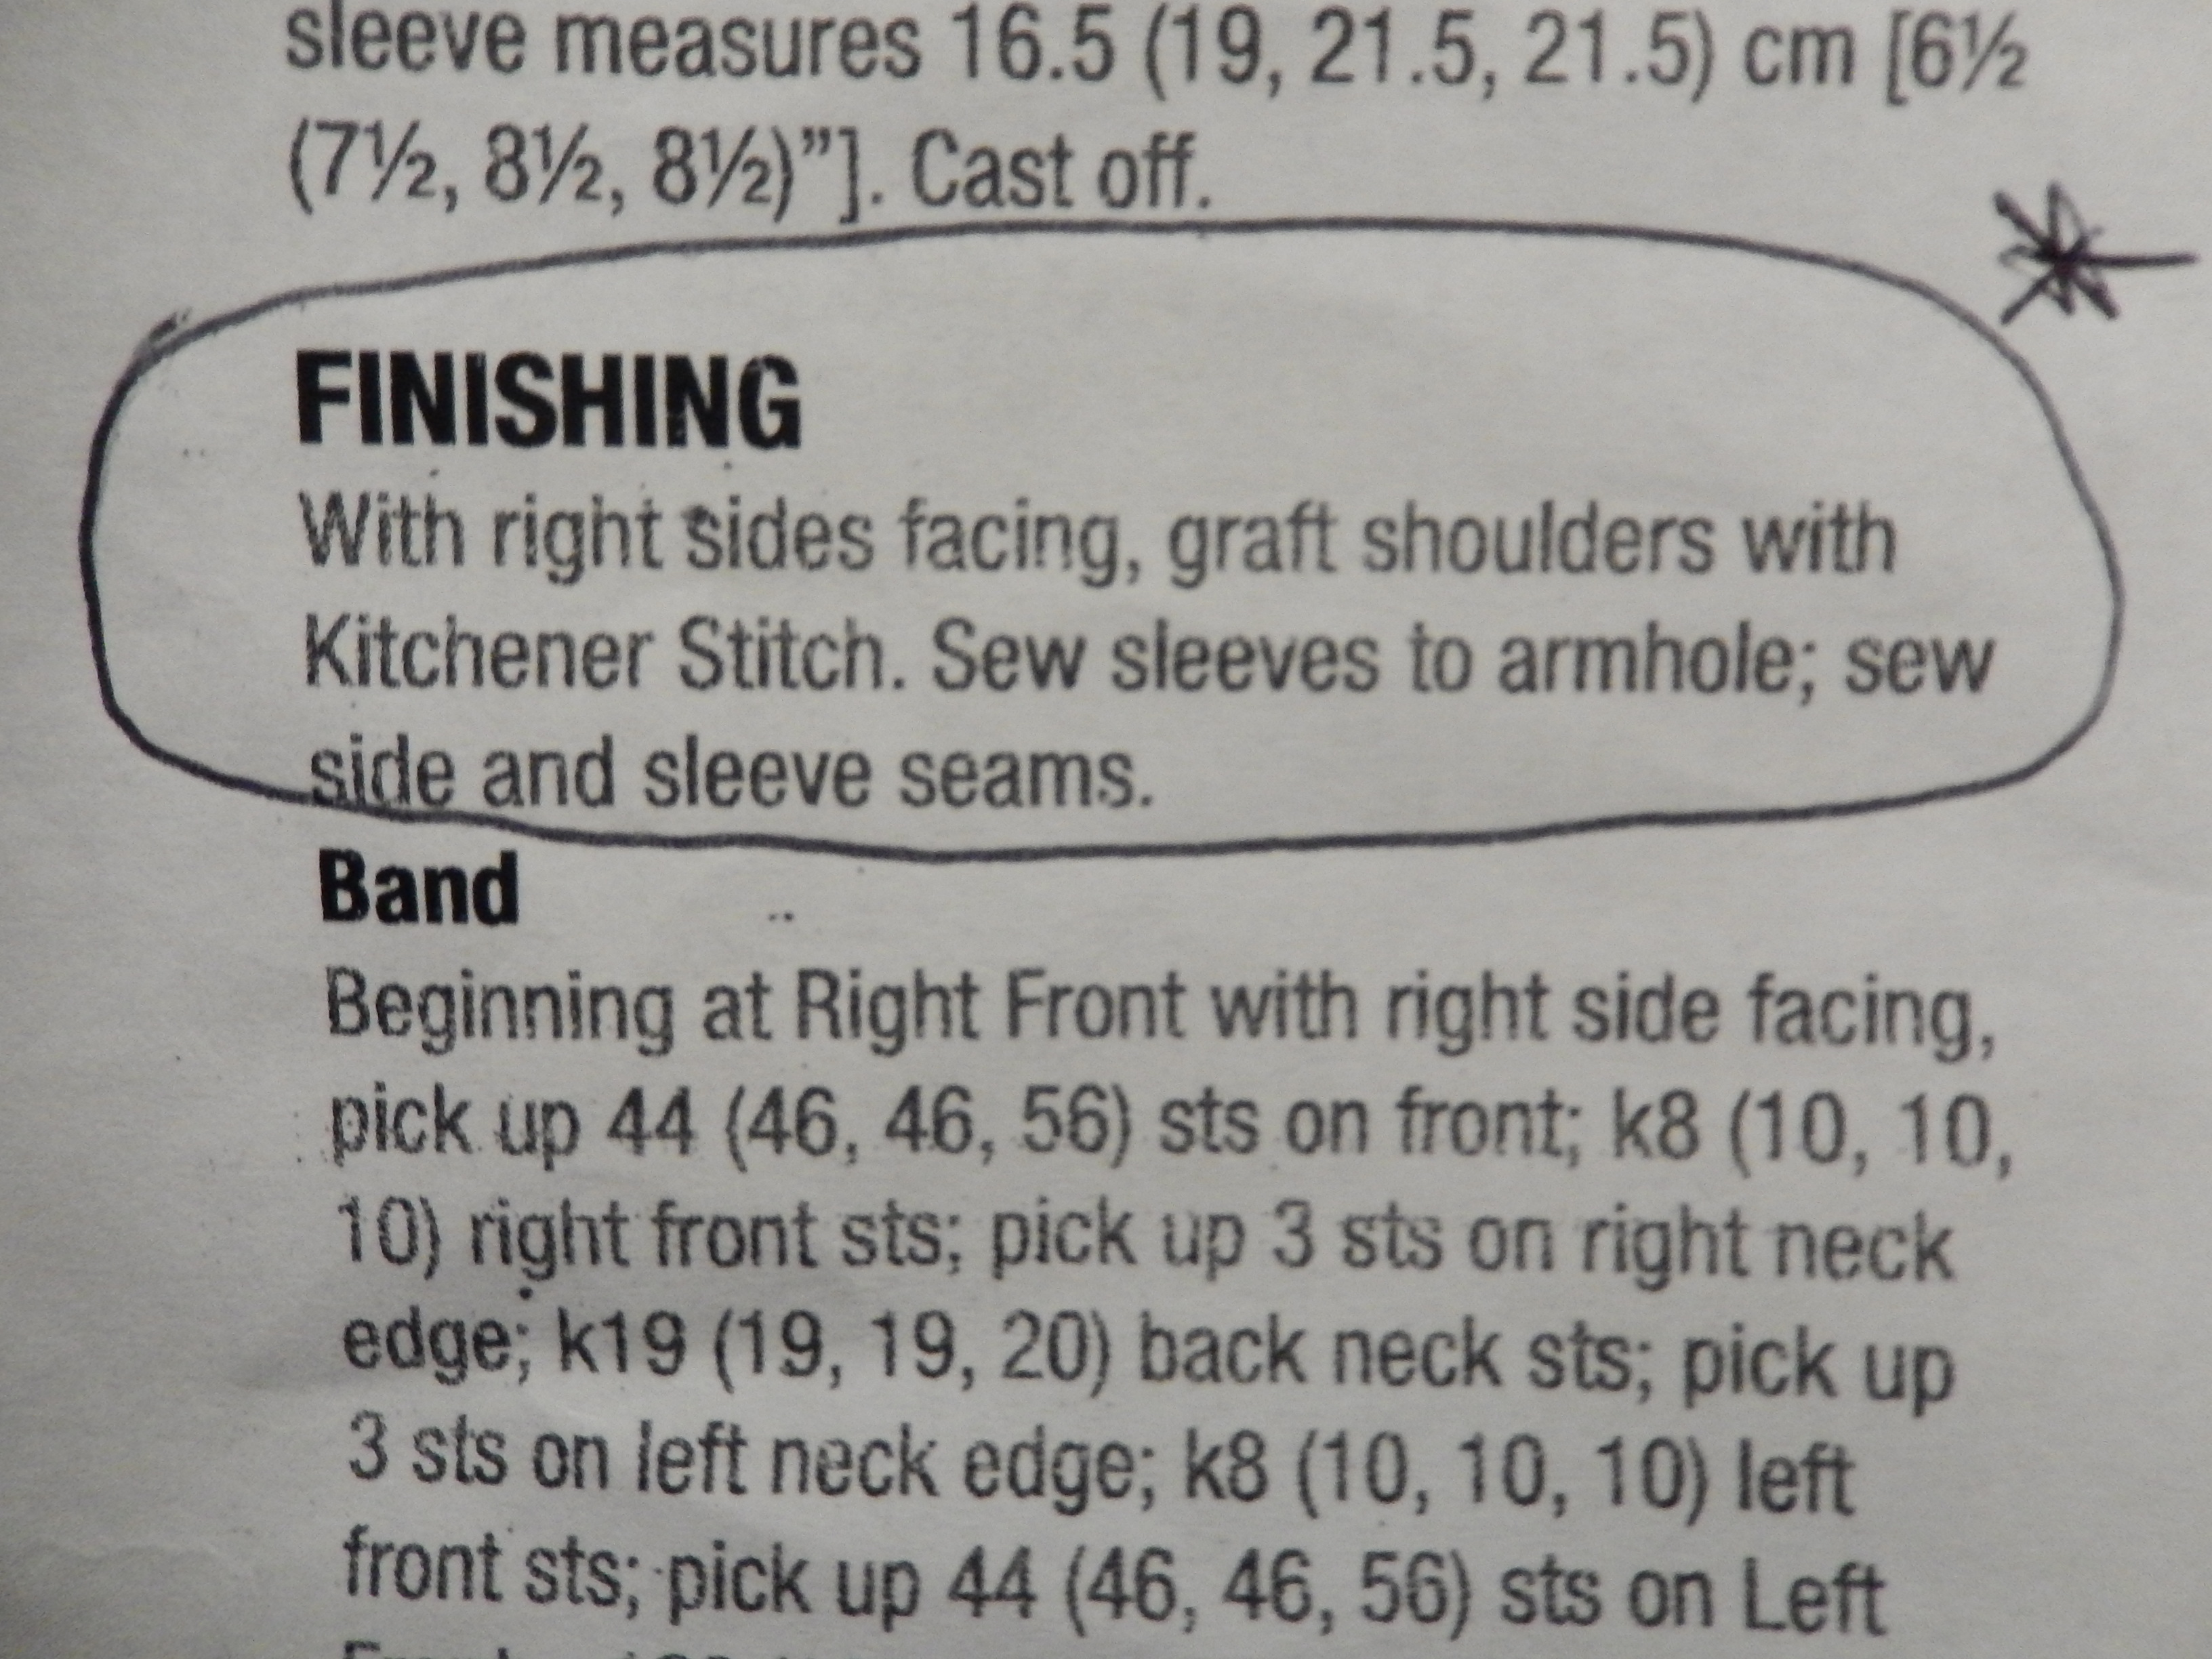
The pieces go together like this:
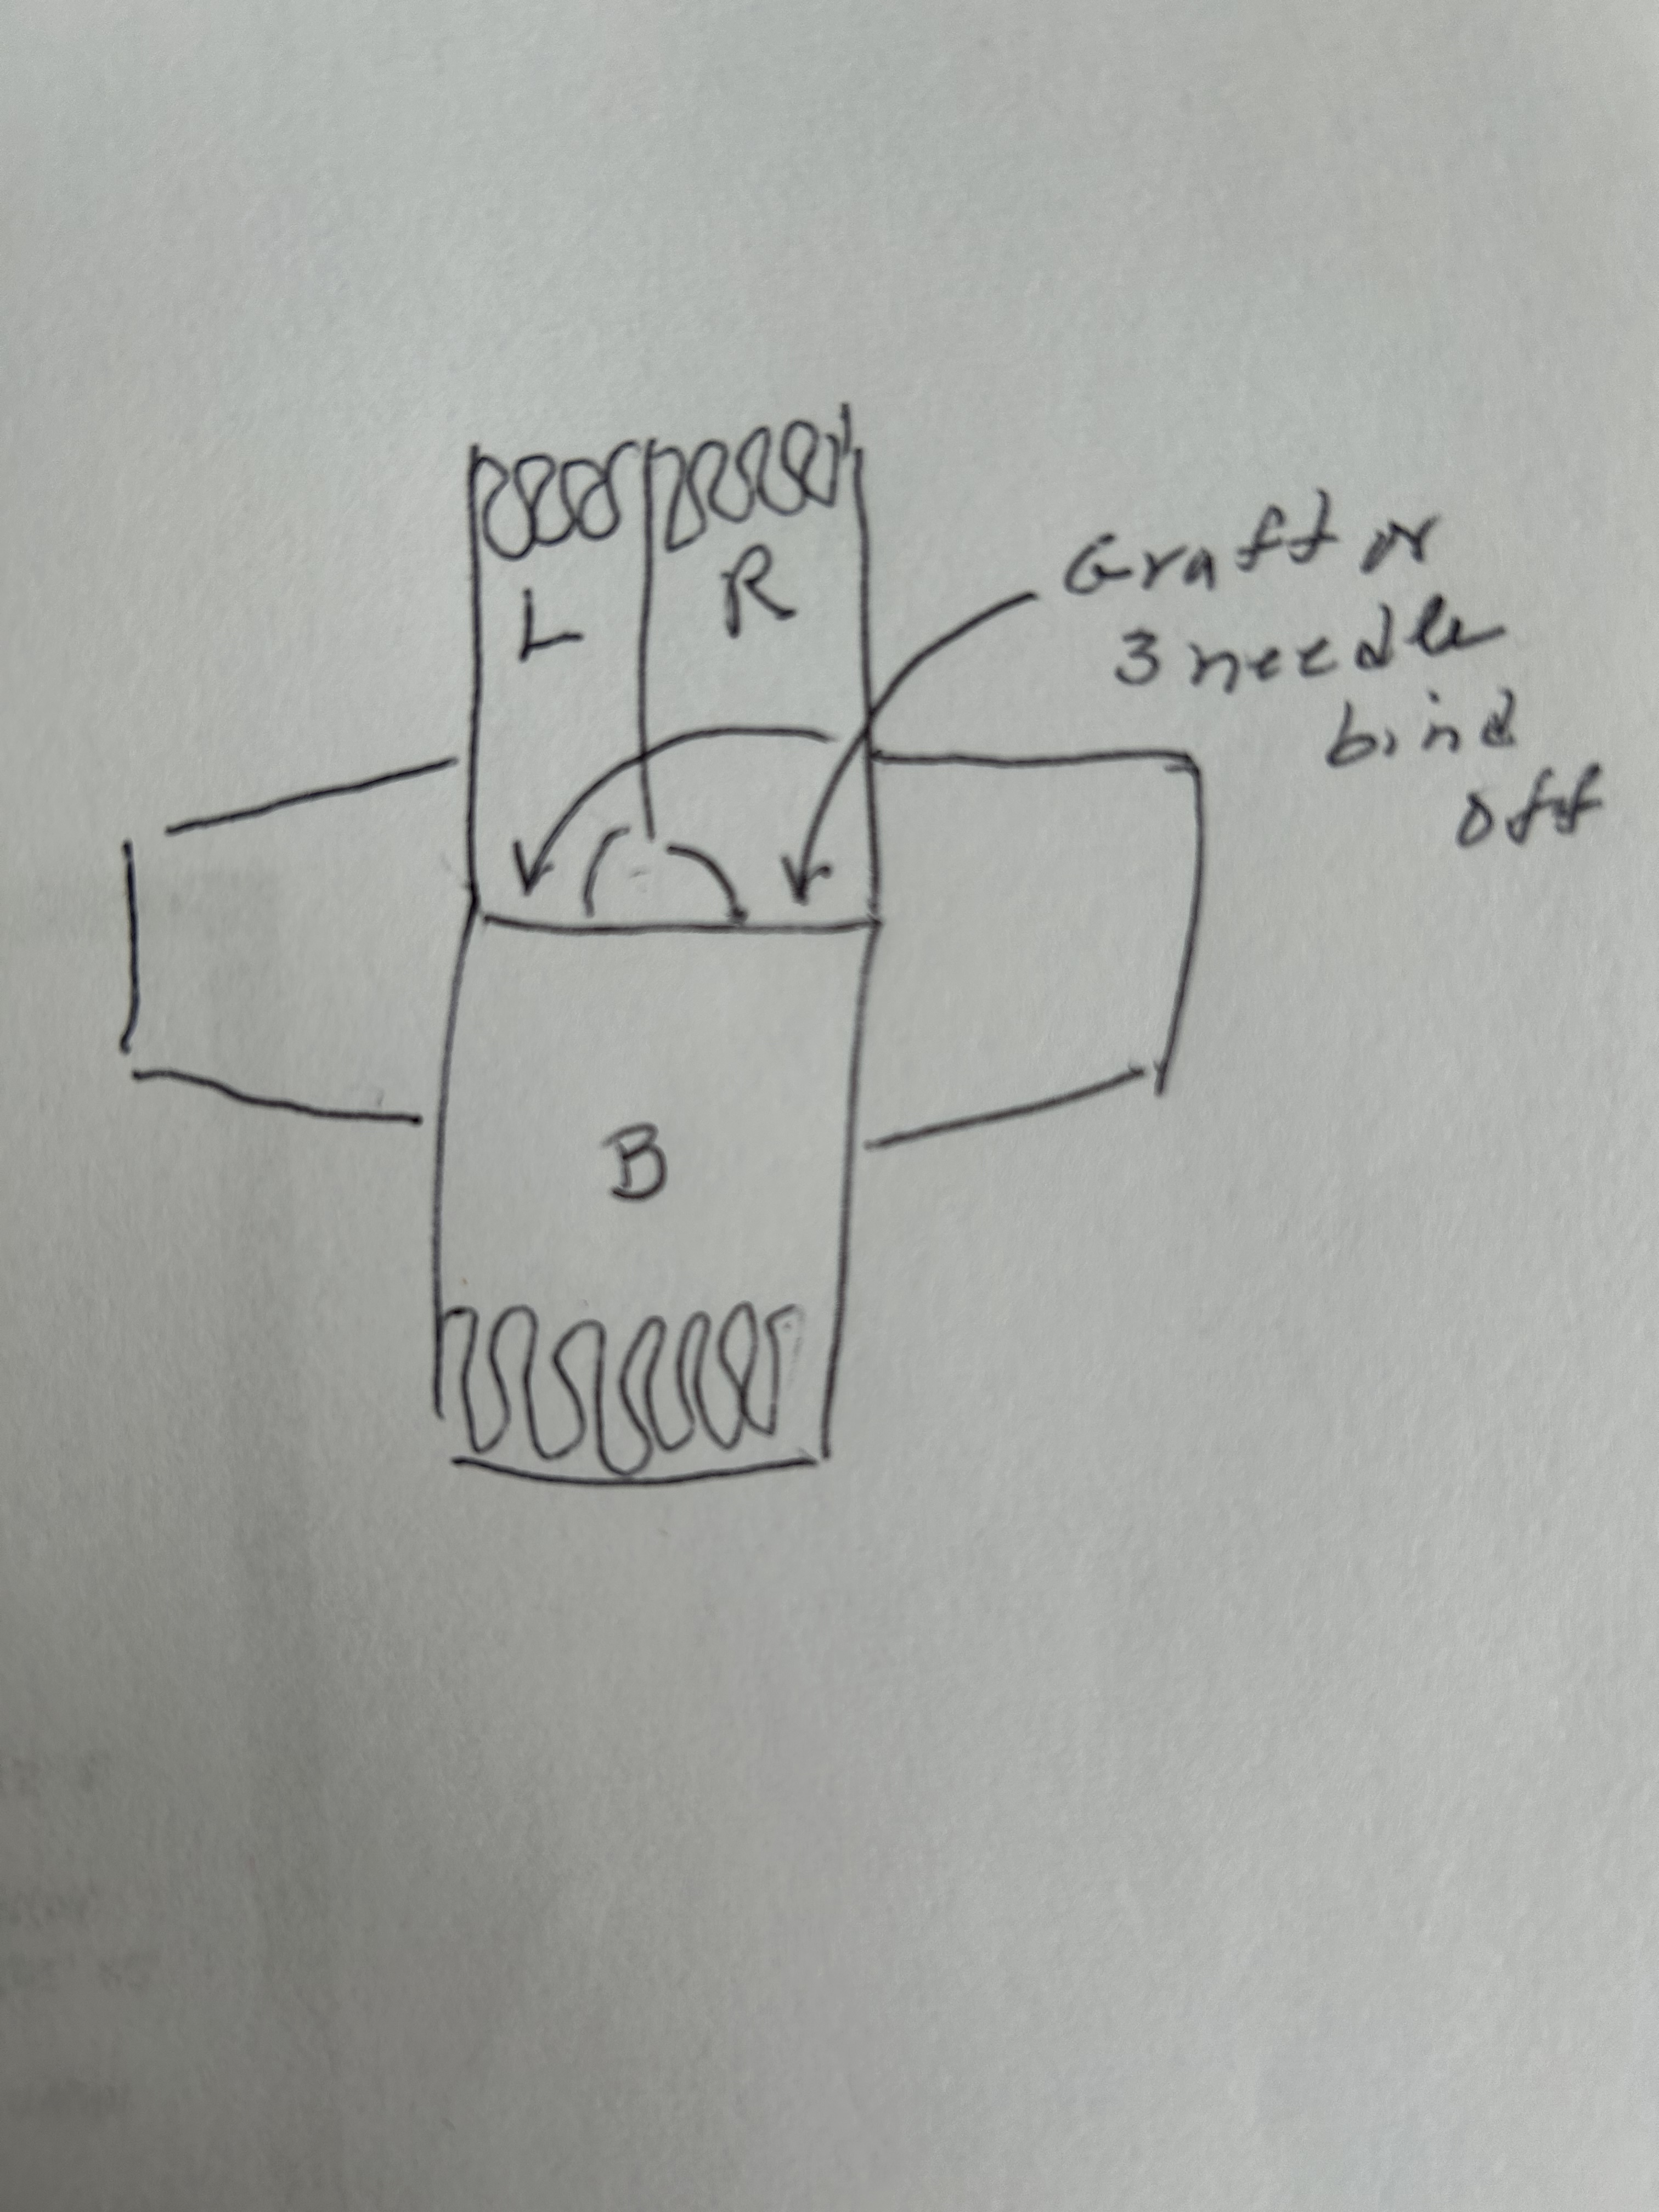
Rather than grafting the shoulder seam you could use a 3-needle bind off. It’s a sturdier seam at the shoulders and easier than a graft. The sleeves can be joined to the body with a mattress stitch (tops of rows at the sleeves joined to row ends of the body).
Just in case you need it:


2 Likes
This is SO helpful, thank you. Whilst I know what the pieces are I wasn’t sure what was the left front and the right front and I would never have known from the pattern how they all joined together! It is also helpful knowing how to graft them together, I’ll watch the video clips and then get going…
Often (although not always because it depends on the style of neck opening) the shoulder will be worked a bit higher/longer than the neck. This can help in working out which way around the pieces go and which is left and right front.
Good to hear you are back to knitting again.
Also very helpful thanks
I’ve now joined the front left shoulder using the 3 needle bind off which was quite easy to do. I only used the 13 stitches on the stitch holder (well cable ties actually but they work just as well!) as I figured the other 8 on the separate stitch holder are meant to be part of the armhole. The problem now is the resulting hole looks smaller than the top of the sleeve to be inserted. Also, am puzzled as to how to attach those 8 stitches on the stitch holder…please can you let me know if I’ve gone wrong somewhere as it’s relatively easy to unpick at the moment!

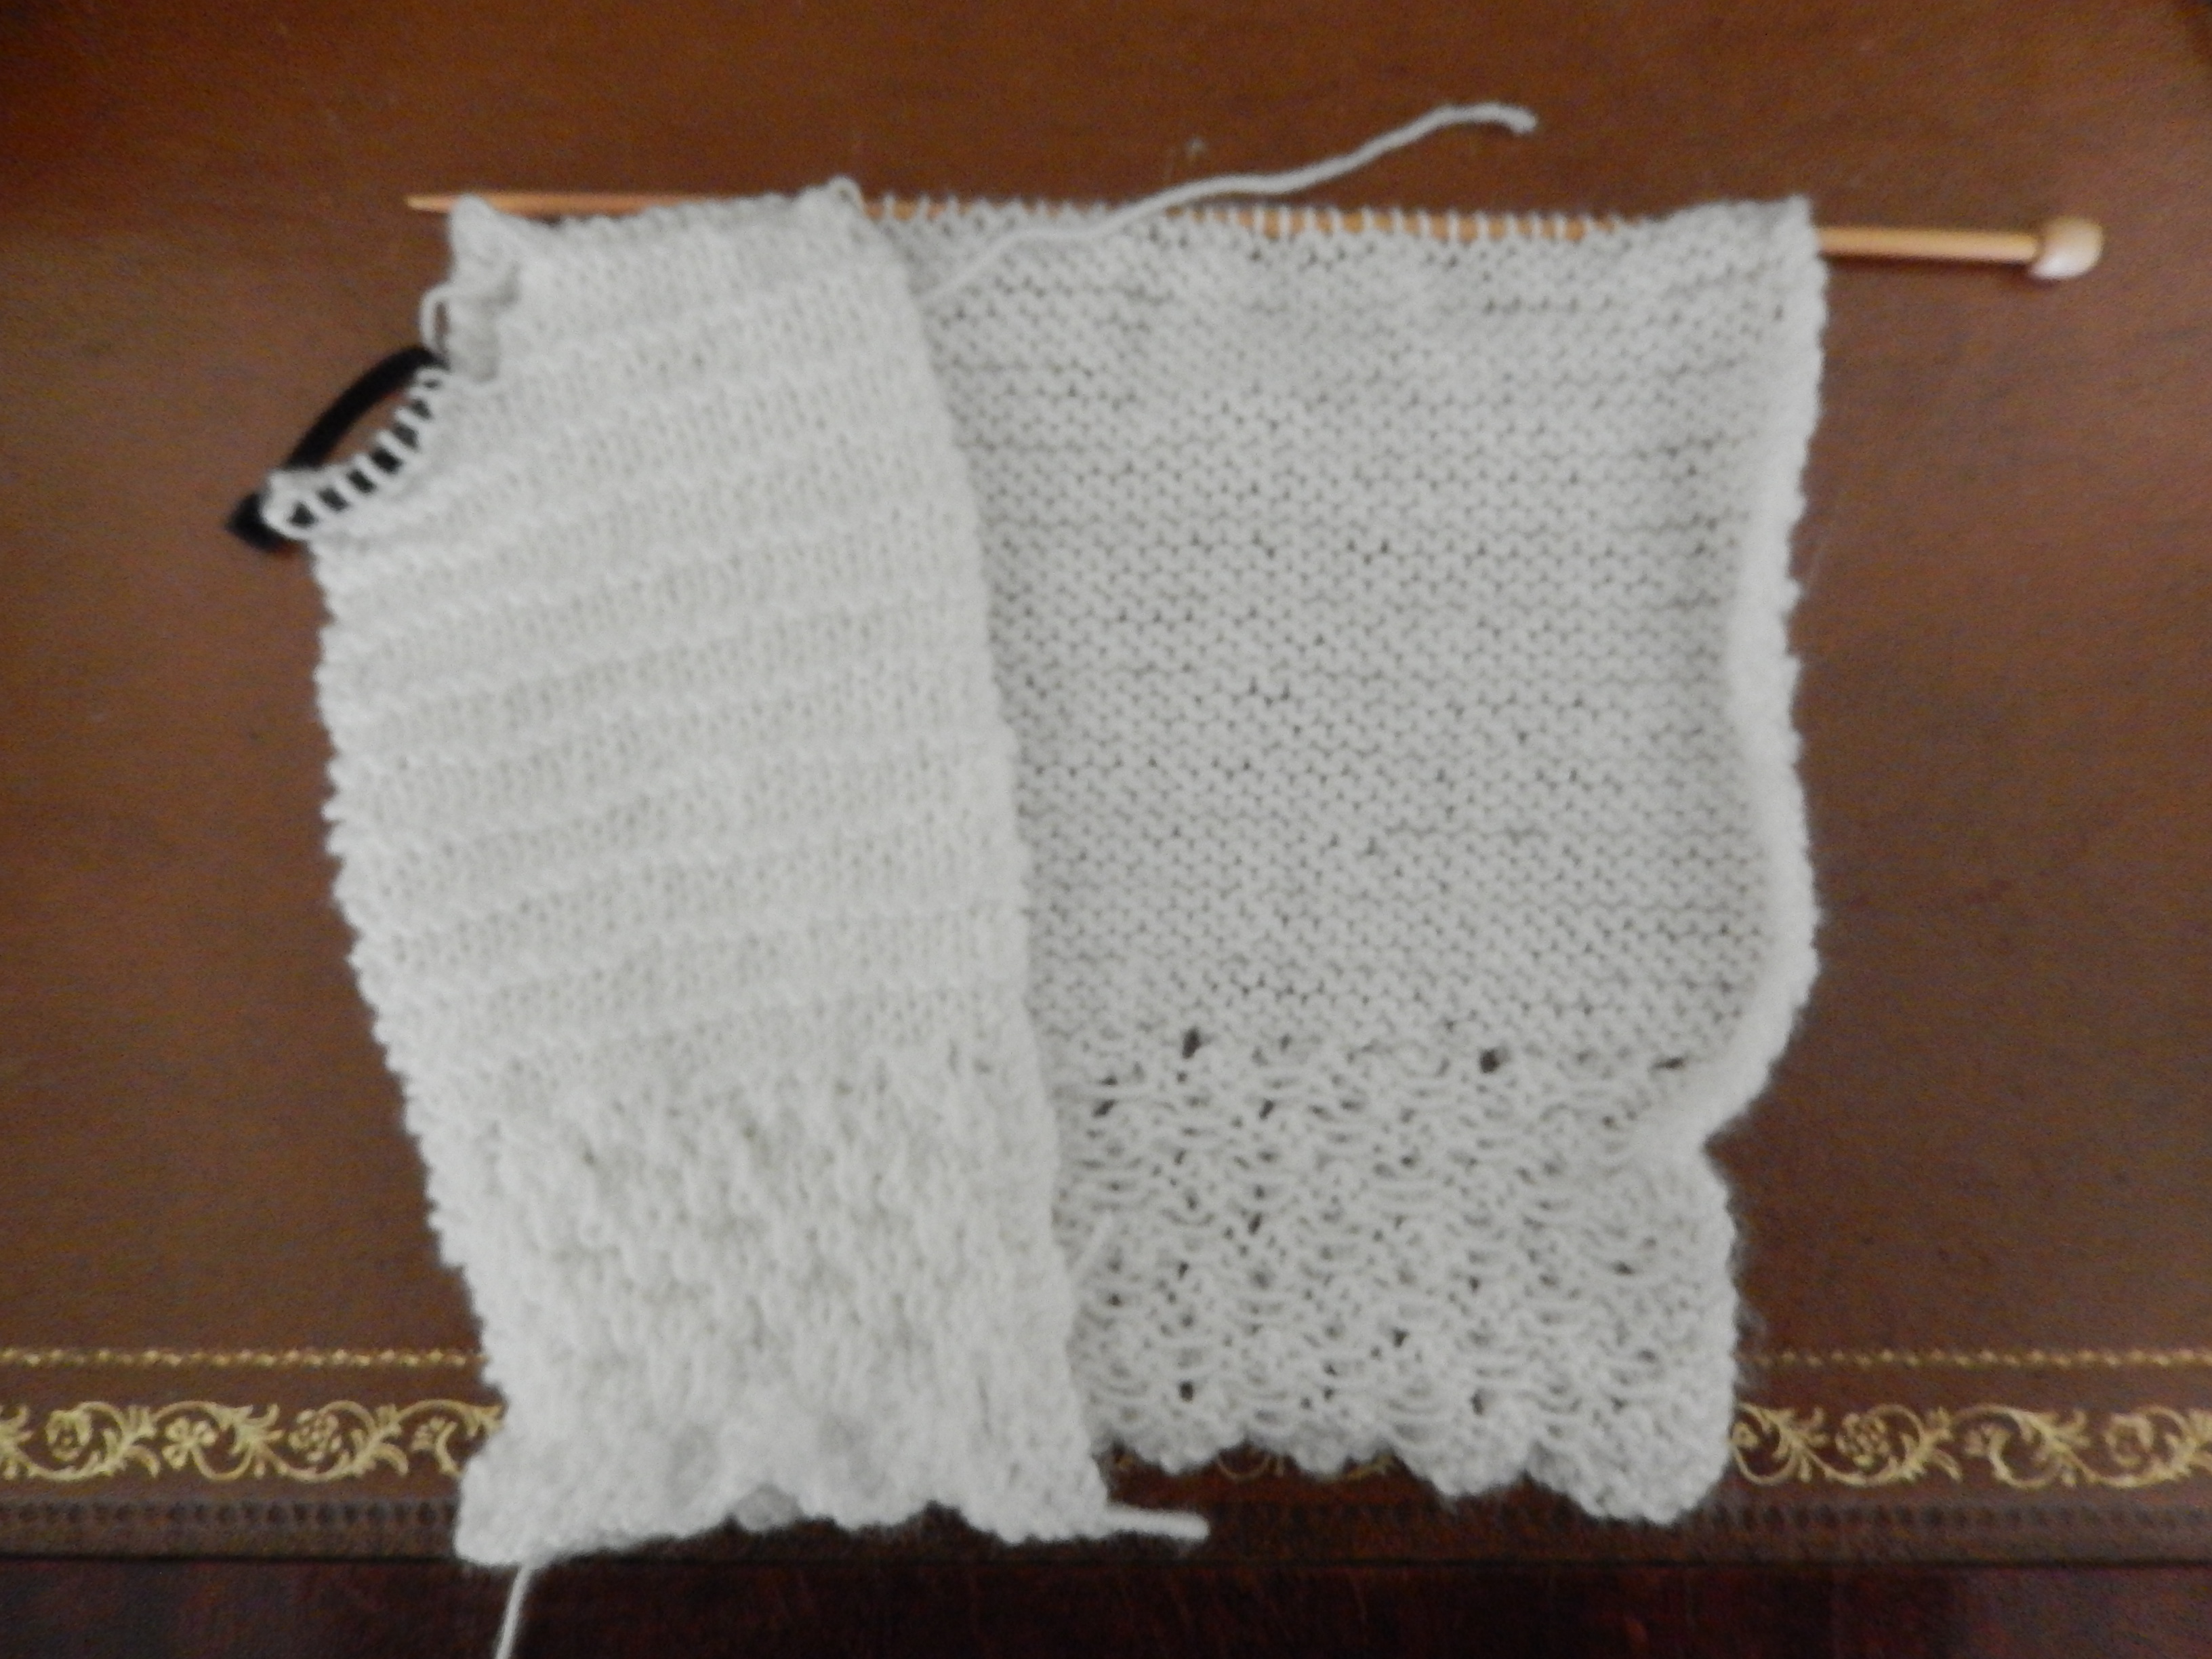

The 8sts are the neck shown in red below:

This is for the smallest size, is that right?
Those 8sts should be facing toward the center line of the back. The sleeve top looks like it was bound off straight across so it needs a straight line to attach to. See the line where the sleeve attaches to the opened up body at each side.
The 3 needle bind off is easy to unpick. I’m sorry that you have to do this.
Oh yes, I can see it now, I don’t seem to be a natural at this as it’s only obvious after it’s been pointed out to me! Yes, it’s the smallest size although at the rate I’m going the ‘baby’ will be starting school by the time it’s finished ![]()
1 Like
Oh no, you’re almost there. The 3 needle bind off can be tinked out. Even if you end up with both sts on the same needle (one from the back needle and one from the front needle) it’ll still work out.
Here’s a video for tinking (tink is knit spelled backwards).
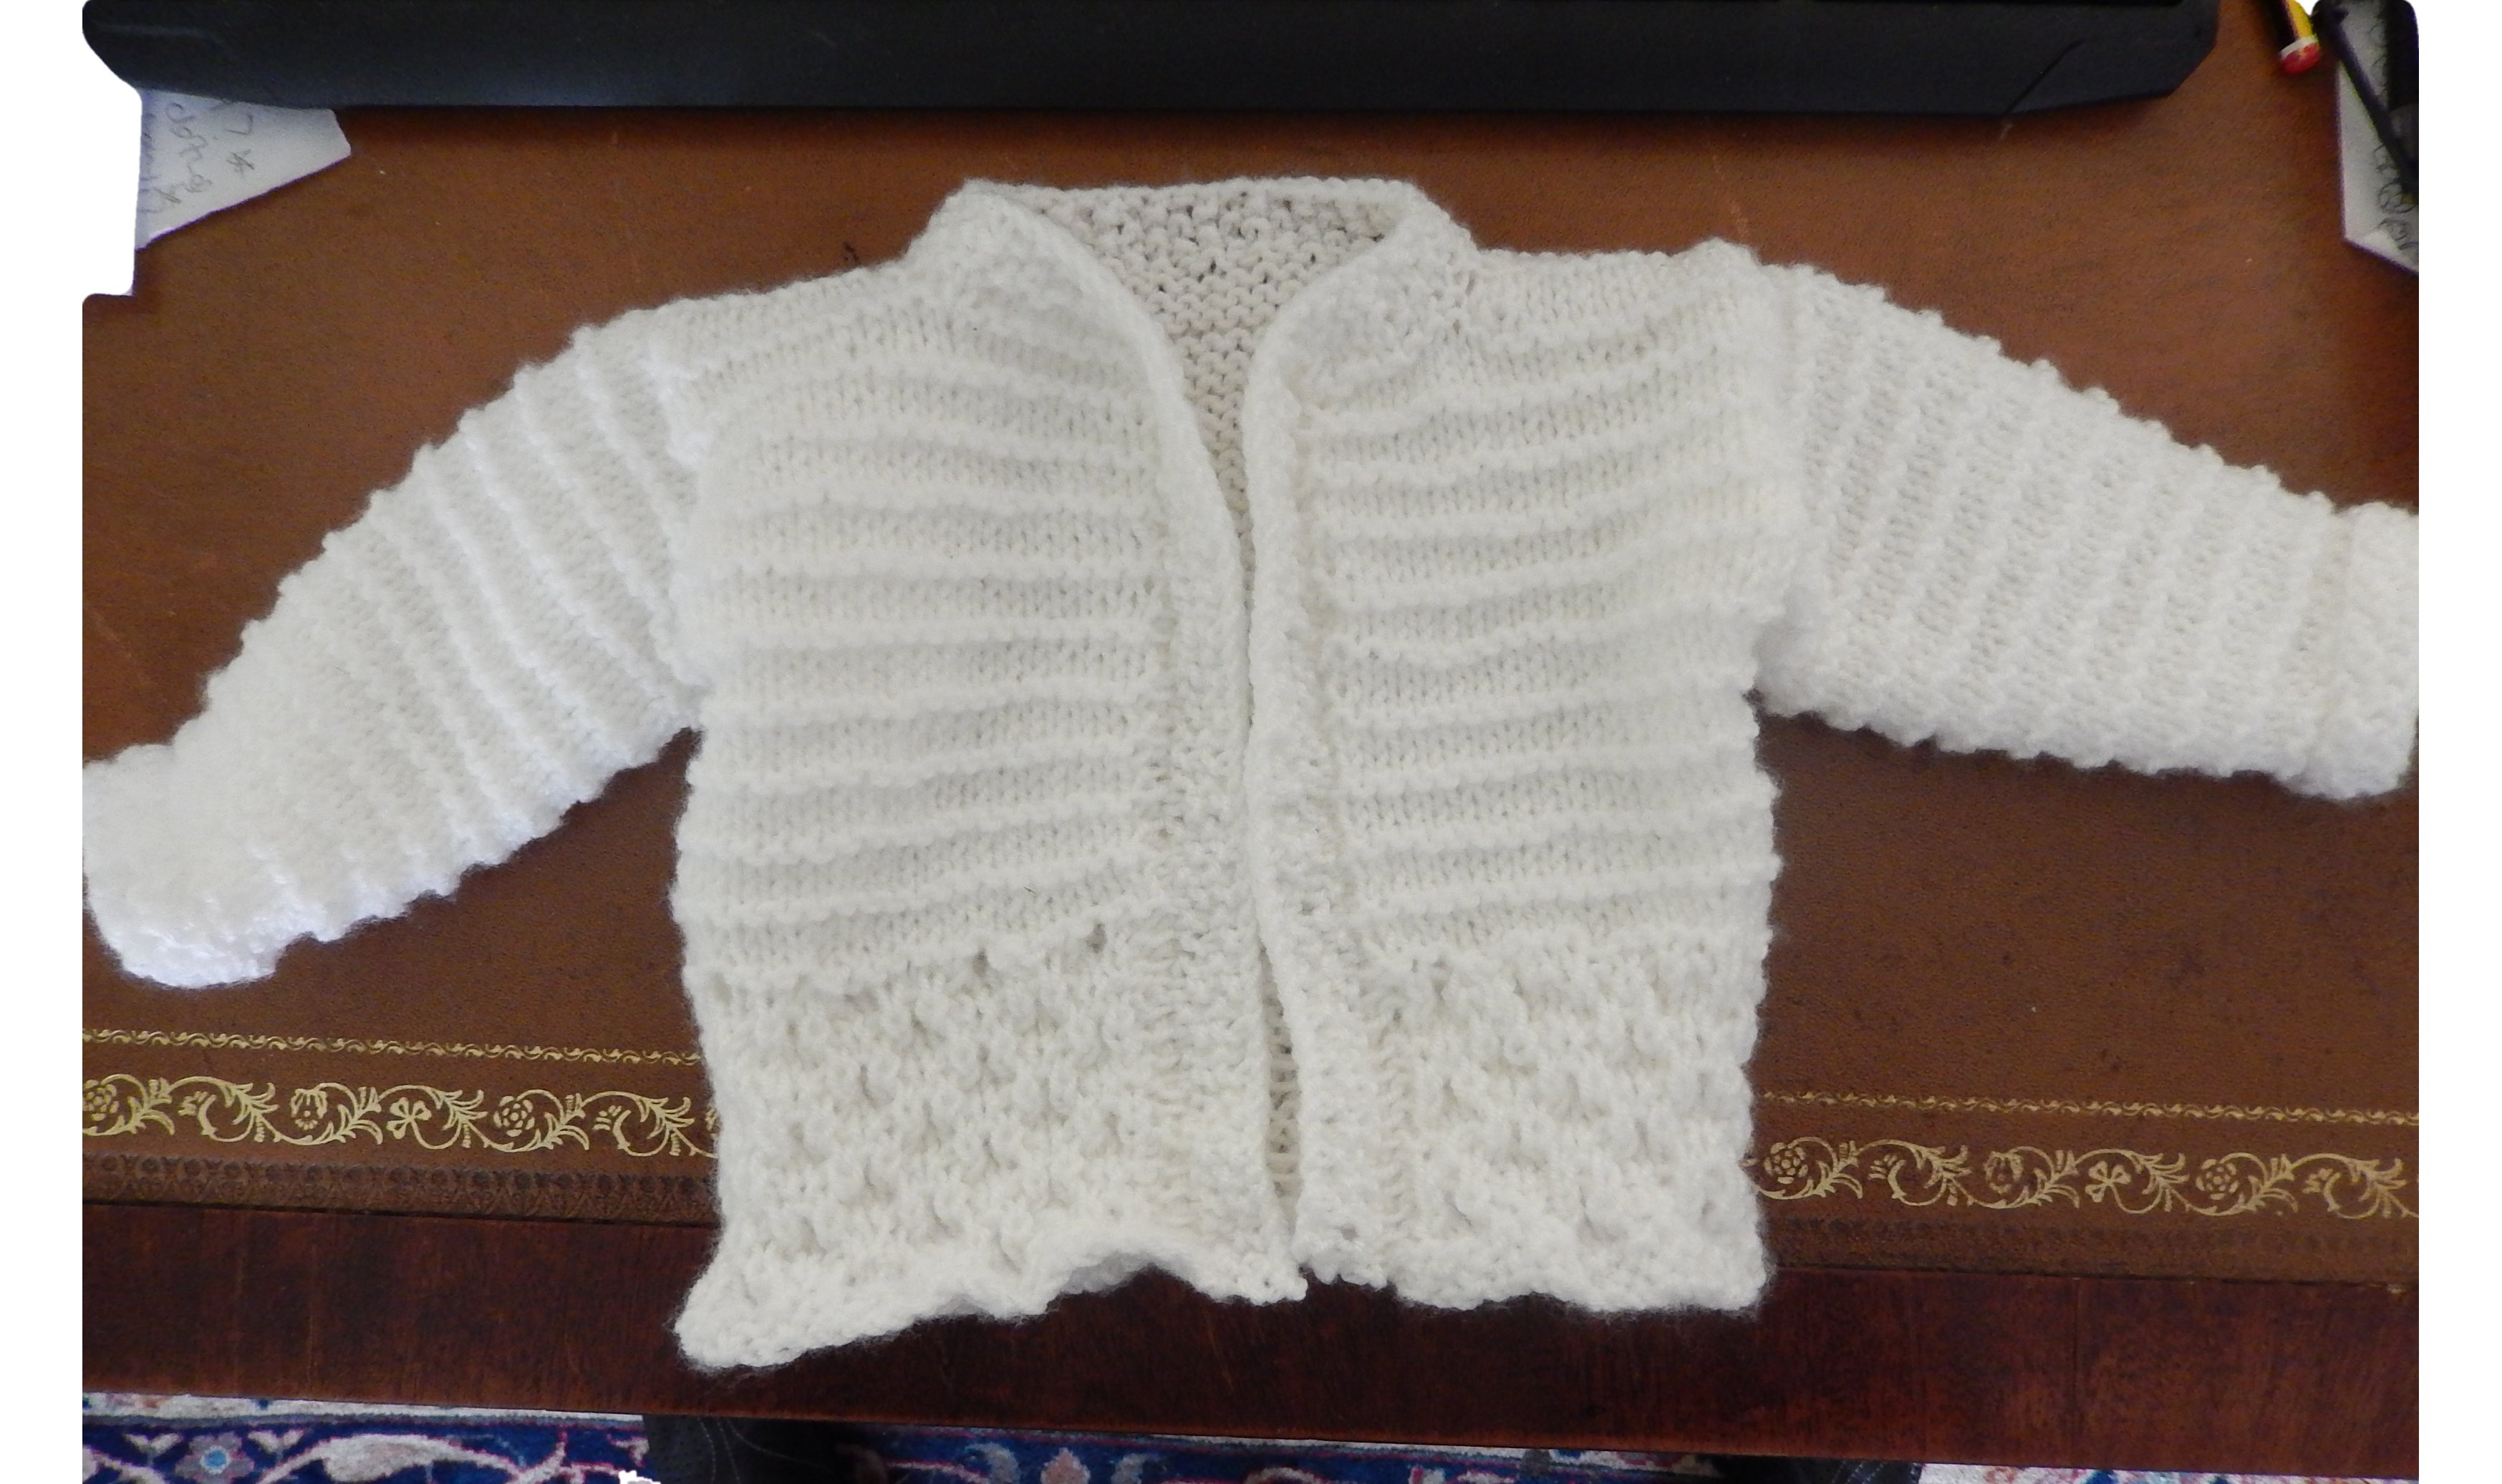
Ta da! The finished article…it actually went quite quickly after that. Just waiting to find out if it’s a boy or girl to know what coloured buttons to put on. Not perfect as I had to do a minor repair round the neck (I’m not very good at picking up stitches so there aren’t any holes anywhere!!!) but a good learning exercise. Many thanks again for the help, I wouldn’t have been able to finish without it. M
3 Likes
That little cardigan is a treat to see. It looks perfect and will be a fantastic gift.
Back again ![]() On a new project (simple!) jumper for an 8 year old. Sorry to trouble you once more but I’ve just finished the ribbing at the hem, now pattern says purl a row decreasing to 53 stitches (from 81). By purl 1, slip two I think I would be left with 54 stitches (maths not my strong point!) but I would need to get rid of that extra stitch. Can you see another way of doing this please? Many thanks in advance for any help. M
On a new project (simple!) jumper for an 8 year old. Sorry to trouble you once more but I’ve just finished the ribbing at the hem, now pattern says purl a row decreasing to 53 stitches (from 81). By purl 1, slip two I think I would be left with 54 stitches (maths not my strong point!) but I would need to get rid of that extra stitch. Can you see another way of doing this please? Many thanks in advance for any help. M
This is a nice little calculator for increases and decreases. At this point the pattern probably wants the decreases approximately evenly distributed. It doesn’t have to be perfect.
Give this a try:
https://www.worldknits.com/knitting-calculators
1 Like
That’s very helpful, thanks. I shall make a note of that link as I’m sure I’ll be using it a lot in the future!
1 Like
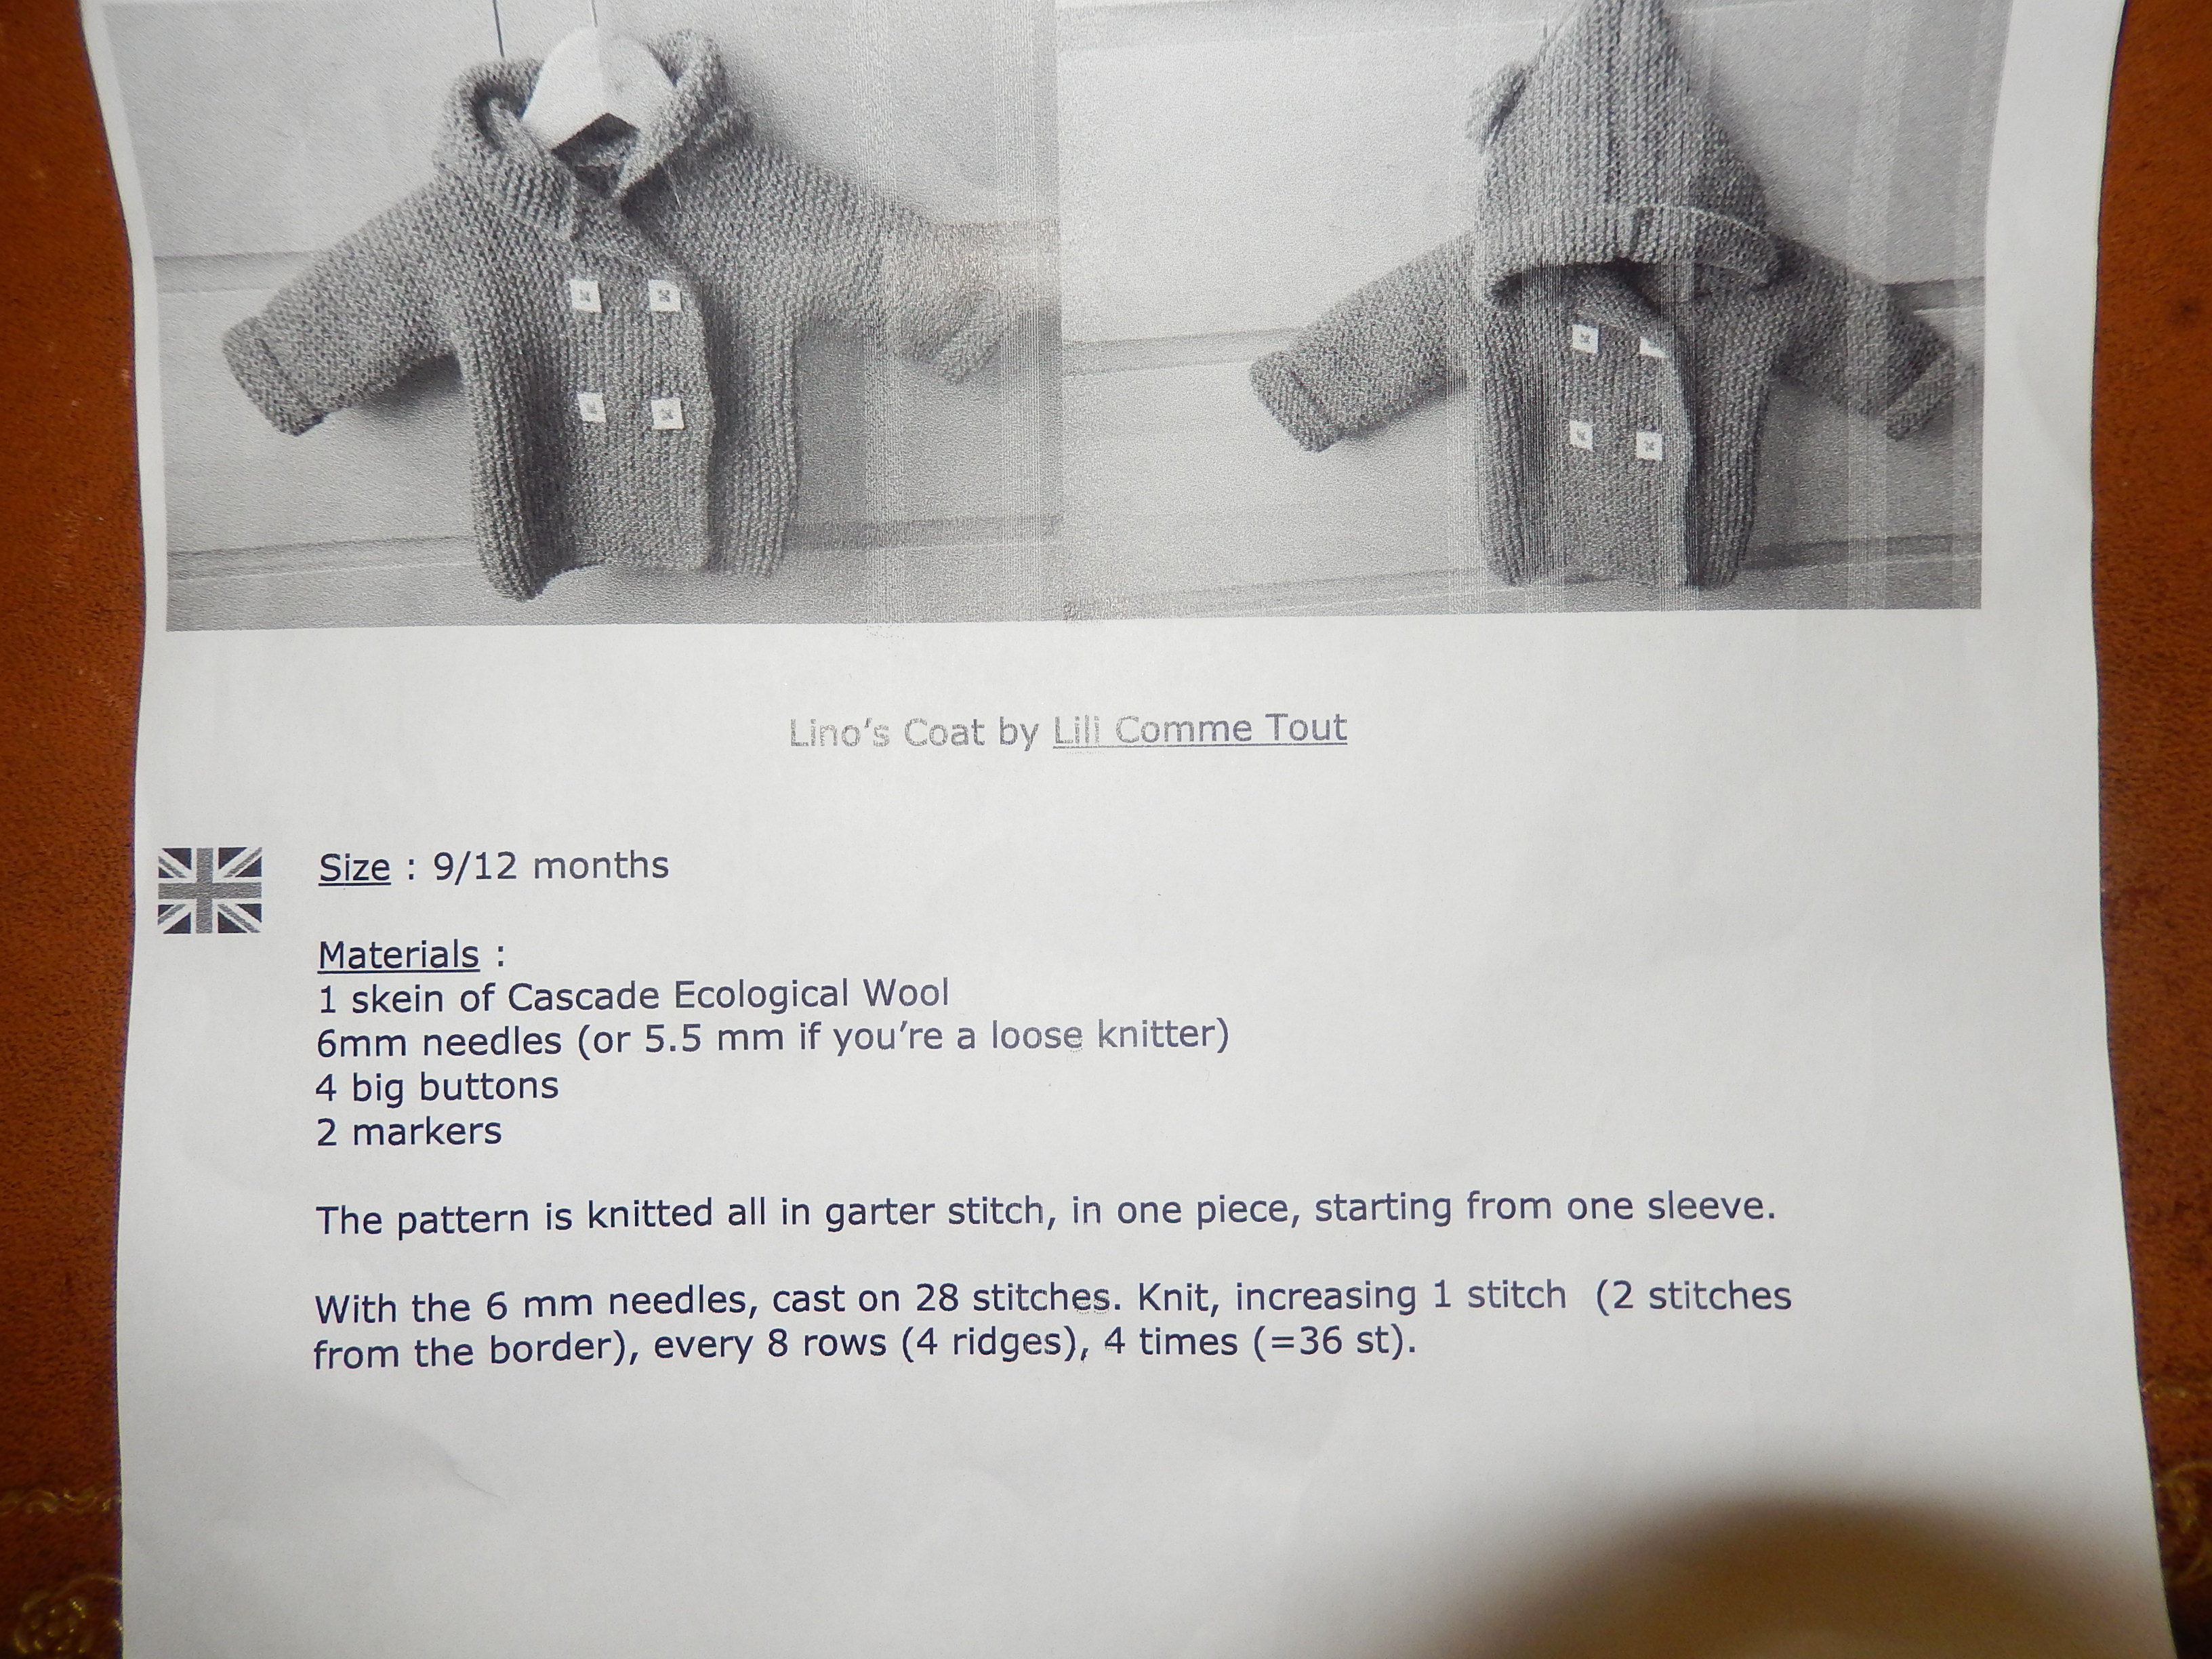
Unfortunately, I’ve had to put this on hold due to a yarn shortage! I’ve now started this baby jacket/coat instead and have reached the cast on 34 either side =104 stitches bit…104!!! I thought I could get round this by using circular needles and actually cast on these extra stitches before I realised this isn’t going to work. Should I try and find some extra long needles (strikes me it would be very ungainly trying to knit with some this size) or is there a hack/something I’m not aware of? TIA for your continuing help. M
!
The first thing that comes to mind is circular needles. You won’t join to knit in the round. Instead you can knit back and forth on the circular.
Why did you think that the circular needle wouldn’t work?
Please edit to delete page two of the pattern. We can’t post large portions of patterns on the forum due to designer copyright. You can use the pencil icon in the lower right of the post to edit.
Sorry about posting all the pattern…won’t happen again! Also, it didn’t occur to me that I could knit up and down on circular needles!! Obviously still have a lot to learn. Many thanks
1 Like
Thank you for the edit.
Yes, just switch the needles in your hands at the end of a row and work back. It’ll work a treat.