I have made a top with dc vertically. I used fingering weight cotton. It is too short. I made a separate piece (following the same stitches) to attach to to the bottom of the top. I used straight edges as i created the works. I have tried attaching the two pieces together using slip, mattress, and invisible stitches. It creates a very messy seam (loose or tight). What other way can I attach them? Is there a stitch I can use to make a band or stripe or a way I can add another row of dc vertically? I really don’t want to frog the whole thing. Thank you so much!
Welcome to the forum!
The crocheters will likely have some suggestions.
@GrumpyGramma, @OffJumpsJack, @ColoCro, @ZKOhio
There is the Bickford seam which isn’t the sturdiest but this shouldn’t be an area that needs to take a lot of strain (like a shoulder seam).
https://www.youtube.com/watch?v=KL2l_J3i8-I
I’m not best to answer your question since I don’t crochet wardrobe. What I would suggest is to while crocheting last row of extension attach it to main body with sls or chs in same time.
just like granny square blanket.
Maybe someone else have better options. Good luck.
I’ve very, very limited experience joining crochet pieces. You could try 6:18 Flat Slip Stitch Seam or 4:17 Single Crochet Seam. Both look like something I might use.
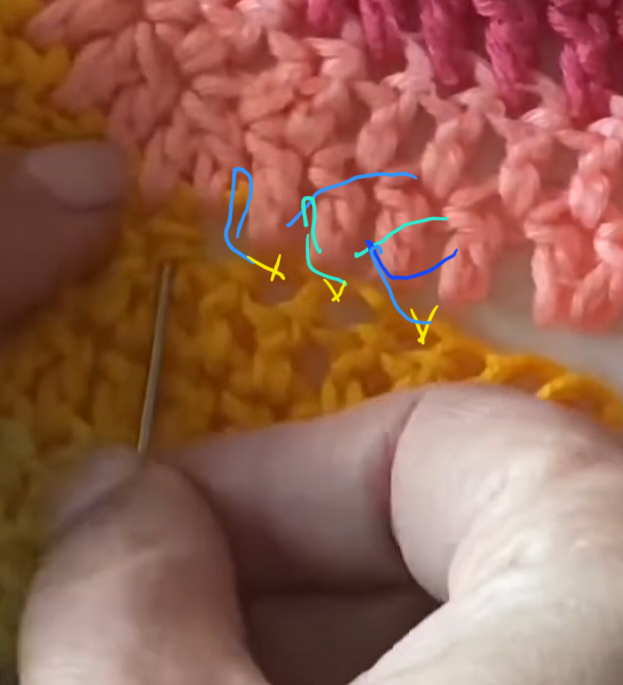
A photo of your work if possible would be helpful.
It would help to see what your stitch pattern is. Can you post a photo of your work?
My suggestion is, if you can’t hide it, feature it! Start working in the opposite direction, from the bottom edge of your top. Use a totally different stitch pattern, or different color, or both.
Or attach your strip with a mesh stitch that will feature the seam itself.
2 Likes
It seems a long time ago now that I was looking to repair a crocheted blanket my mom had made for my wife. I asked about it on KH and found some videos. I had matching yarn and I made the seamless repairs. It was a bit like sewing with a hook. The hard part was removing the hook between stitches to pull the top (working) loop through the bottom of the next stitch in the upper row to connect.
What I do recall is starting the stitch by first inserting my hook through the front loop of what will be the stitch above your joining stitch. Hmm. No it will take to long in words. (The Princess Bride)
Picture a DC stitch (you have your work as a three dimensional model to help).
The top loop at the finish of the DC passes through the bottom of the stitch in the row above.
To seamlessly join you ** drop your yarn (or release tension on working yarn) and remove your hook from your working loop. Then reinsert it from left to right through the bottom of the stitch above (keeping any matching twist in the dc above) & pull that working loop through to join. Now again remove the hook and place it back in from the regular and DC your next stitch. **
It is the removing of the hook that is the hardest to imagine.
That seems to easy. I must have forgotten some details. I will do 2 swatches and try it out and return with and additions, deletions or rewordings.
(I have the scene from 1970’s Kung Fu TV series of “when you can snatch the pebble from my hand…” playing in my head) ![]()
2 Likes
Here is a repair with a darning needle video about fixing a crocheted blanket.
At about 1:58 in the video the author uses a darning needle to connect and secure the loose stitches. ![]()
All the orange loops are there and waiting to be pulled through in pattern.
I how this helps.
2 Likes