Hi! I’m starting a 2 color project and want to use the color dominance method in the YouTube video by Brooklyn Tweed: color dominance 101, keeping both yarns in my right hand. I’ve done color strand knitting but never while at the same time using color dominance. My first question is - can I do both things at once? I catch floats every 4 to 5 stitches but how is that going to interfere with dominant below and background above? Also on the last swatch he uses I see a lot of very long floats in the back. He doesn’t address this but that can’t be right. Could he be ignoring the floats because he’s just knitting for demonstration purposes? Can someone help me untangle my brain on this please? Thanks!
Very interesting and clear video. I do colorwork with both yarns in the right hand. I hold the two differently, pinched between thumb and index finger but the idea is the same. Keep the two yarns separate so that they don’t twist around each other. Always bring color one over or above color two. Bring color two from below color one.
When you catch floats however the yarns twist in order to keep the carried yarn caught in the float. The idea of the dominant color still holds true on the front of the knitting it’s just that the two yarns are twisting on the back. The caught yarn doesn’t show through (or very little).
Here’s a Brooklyn Tweed video for one way of trapping floats.
It’s good to catch floats about every inch depending on what you’re making. Mittens might be better with more frequent catches than hats for example.
The very long strands along the back of the orange/blue sample? Is that what you’re asking about? Those aren’t floats but just one way of knitting a swatch in the round. At the end of the row both yarns are loosely pulled across to begin the row again. That way the pattern is always facing on the knit side.
Thanks for the video recommendation!
Thanks, I think I understand it as well as I can now without actually doing it. So I just need to dive in. Also I have another question. I have two areas with as many as 50 stitches in one color. What is the rule about breaking the yarn and picking up again later?
1 Like
That sounds like an intarsia panel. If there’s a block of one color over a large number of sts and rows it’s worth cutting the yarn and reattaching the new end. If that 50stitch stretch is only for a row or maybe two then go ahead and carry the yarn over. No hard rule about this, it’s more the pattern design and personal preference.
Try these techniques, colorwork and intarsia on a swatch to practice and see what your preferences are. And have fun exploring!
If you have a pattern pic we might be able to give some ideas of where to carry or switch to an intarsia method or combination.
It will be your decision ultimately but it can sometimes help to hear different approaches and options.
Ladderback jacquard is a great technique for managing very long floats. You create a section with a double layer, so the “carried” yarn stays at the back but is controlled.
Again, it would depend somewhat on how many rows of carrying 50 stitches there might be.
1 Like
This is the Frida Bag on Ravelry. I’ve changed almost everything about the pattern except the face - it’s on the front. The back has a similar space of one color. The dark squares are midnight navy. The background is burnt orange. Isn’t intarsia the use of bobbins? I guess if I had more than 2 colors that would help. I’m up for any suggestions, there’s nearly always more than one way to do these things. Thanks!
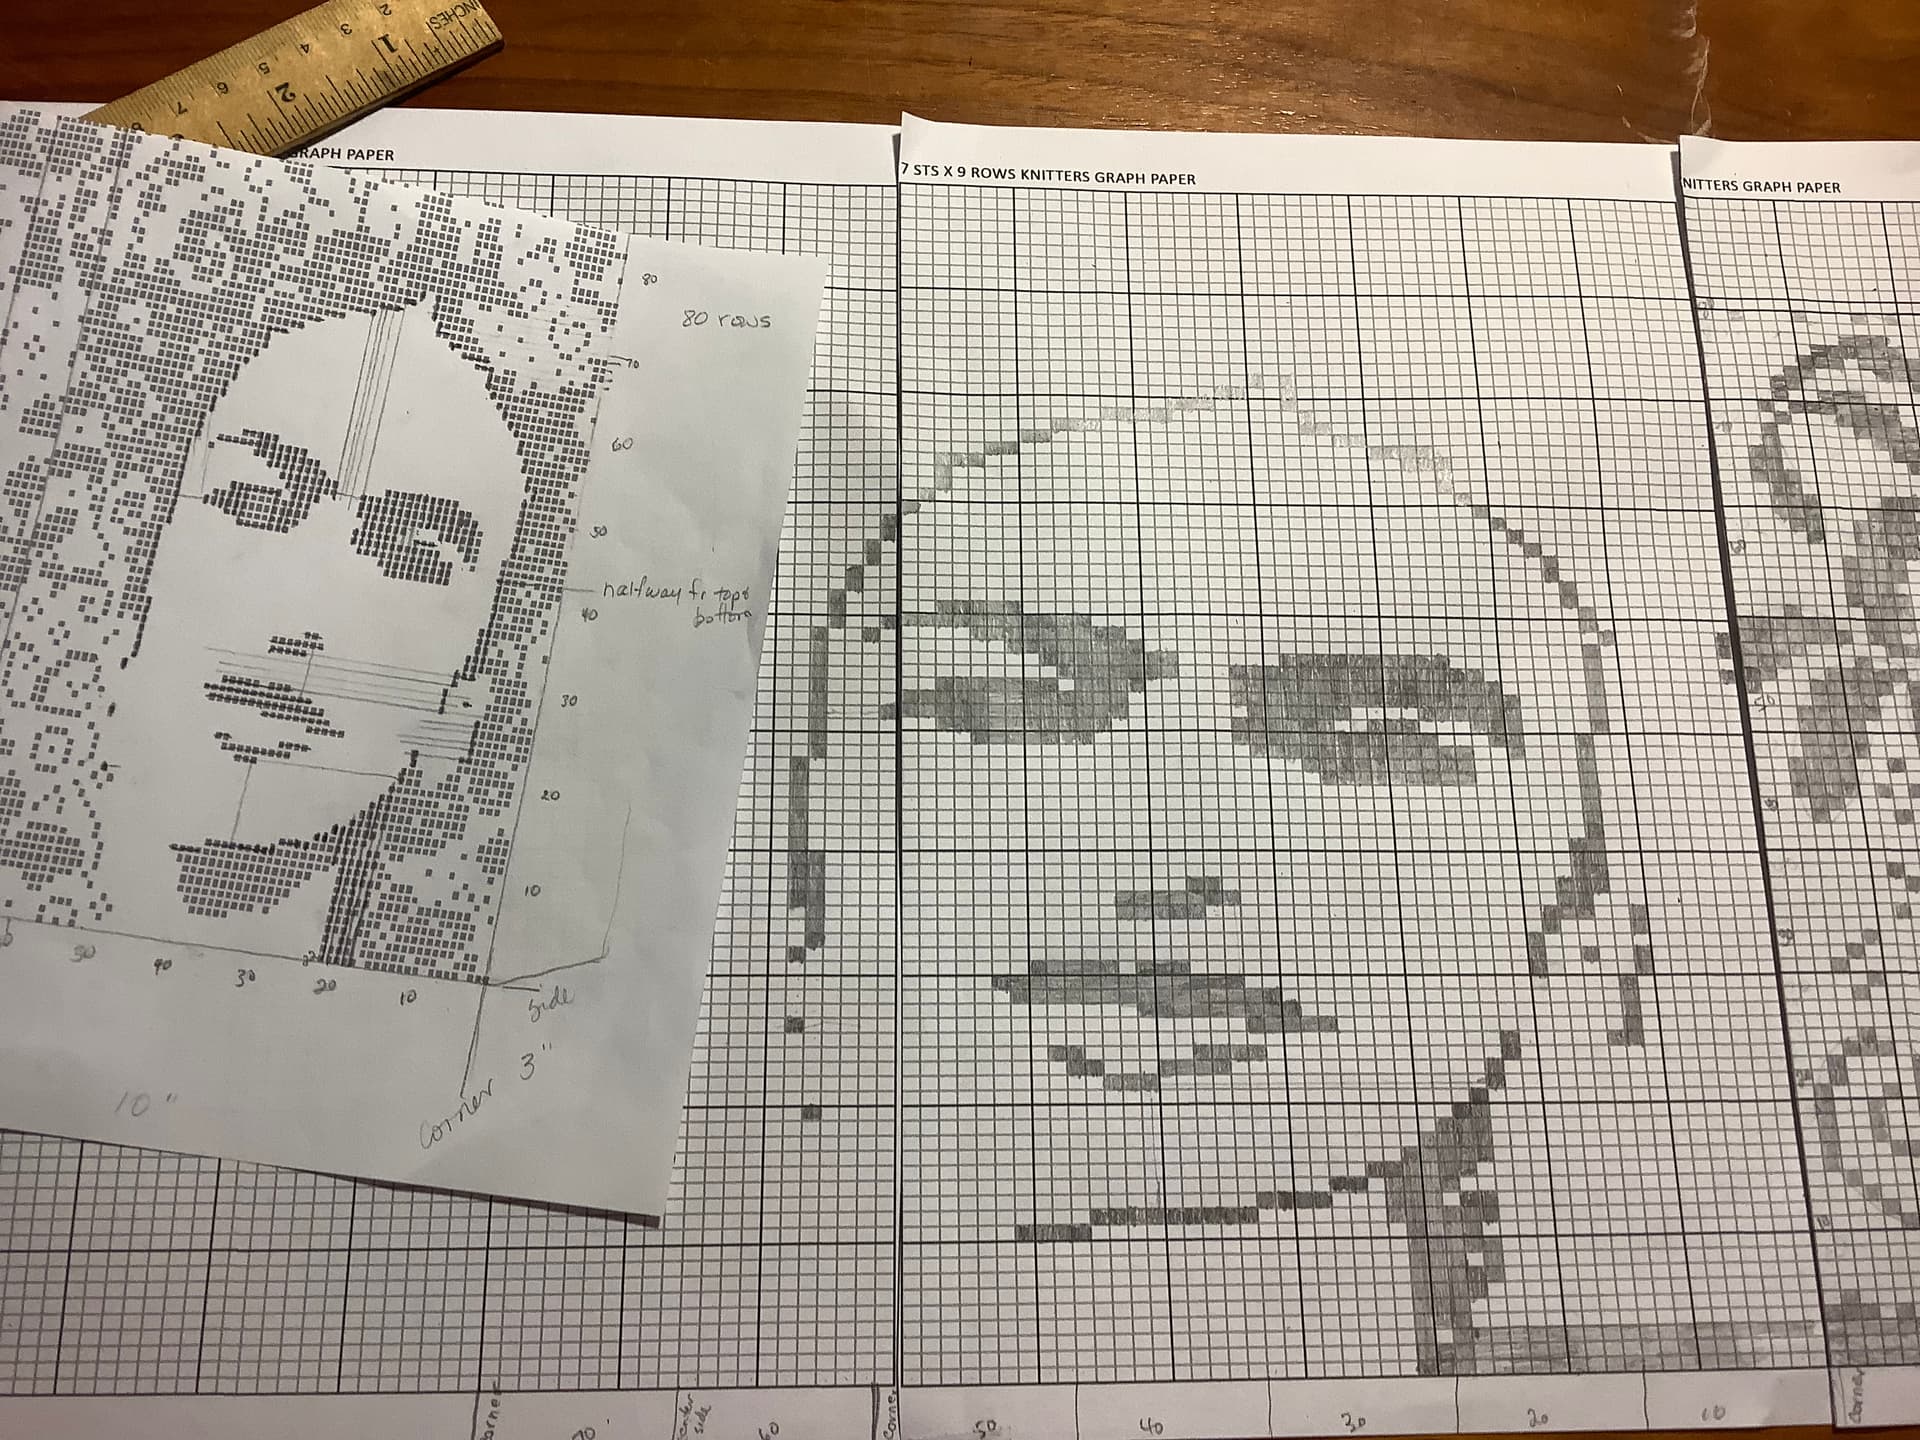
1 Like
Are you knitting the bag in the round? That makes the large blocks more difficult to work, not impossible but more complicated. ColoCro’s suggestion of ladderback jacquard is a good one for these long sections of carried yarn (used instead of intarsia).
Here’s one of several online videos for the technique.
1 Like
Ah, yes, the frida bag.
I agree with ColoCro and salmonmac about the ladder back, especially as you’ve planned to work in the round on this. When I experimented with ladder back (i am a real beginner with it) i found it useful to plot on the graph where the stitches for the ladder back should be put in and where to stop or move them, as you have a clear chart you can do this.
You could practise with scrap yarn on a rectangle which starts with say the upper section of the top lip and works past the nose and beyond for some rows in height, and a full face width to give you a bit of stranded at each side (you could just alternate the 2 colours for a few stitches as a mock pattern), then ladder back across the face encorporating the lips and nose, then stranded again for a fews stitches at the other side. It would give a really good practise on the area and give you a feel for where the ladders need to be. You can use the method of swatching in the round so you don’t have to work the wrong side and don’t need to cut your yarn ( at the end of the row scoot the stitches up to the other end of the needle and leave long strands of yarn behind the fabric to get the yarns back to the beginning of the row where you need them, RS stays facing you, ignore the long strands they are just on the practise swatch not on the real bag).
Very exciting!
I watched the ladder back video and realized I’m completely in over my head. Alternating between catching floats and using ladder back technique while also holding both strands in my right hand making sure to keep the dominant color above and the background below - or is it the other way around - is overwhelming. And also while trying to navigate the most complicated graph I’ve ever used. I admire all of you who can do this and I appreciate all your suggestions. Thanks very much!
It can seem like a lot all at once and it is. Try working a small portion on a swatch, maybe carry the floats for several row to see how that goes. Then try the ladderback jacquard if you’d like.
As for the color dominance, don’t be too concerned about that for now. That can be practiced on the next project or swatch as a subtle refinement. Learning these techniques one at a time will be easier and more enjoyable. Good luck however you decide to go.
1 Like
Oh, don’t think for a minute that I could do this! Many knitters wouldn’t dream of tackling something so complex (and without a pattern too!)
You are designing a one off piece of art and craft which, even at the planning stage, is a massive undertaking. The work you’ve done so far is admirable and you have, bit by bit, prepared each aspect of the project. You’ve already acheived a huge amount just in the research and planning and the early stages of making.
The ladderback would be in its own section, just the face, so you’d switch at that point from trapping floats to knitting one or two stitches into the ladders and at the other side of the face you would return to the regular stranded method so each part only needs one method.
It’s ok not to work the ladderback though as salmonmac said, just trap your floats. I’ve worked a sweater where i decided to trap a second strand throughout the entire sweater to produce an even fabric even though there were huge areas with no second colour use at all. I just kept trapping. I love the result.
Just take your time, all your planning and practises will be well worth the effort you’ve put in.
One stitch at a time. You’ll get there.
1 Like
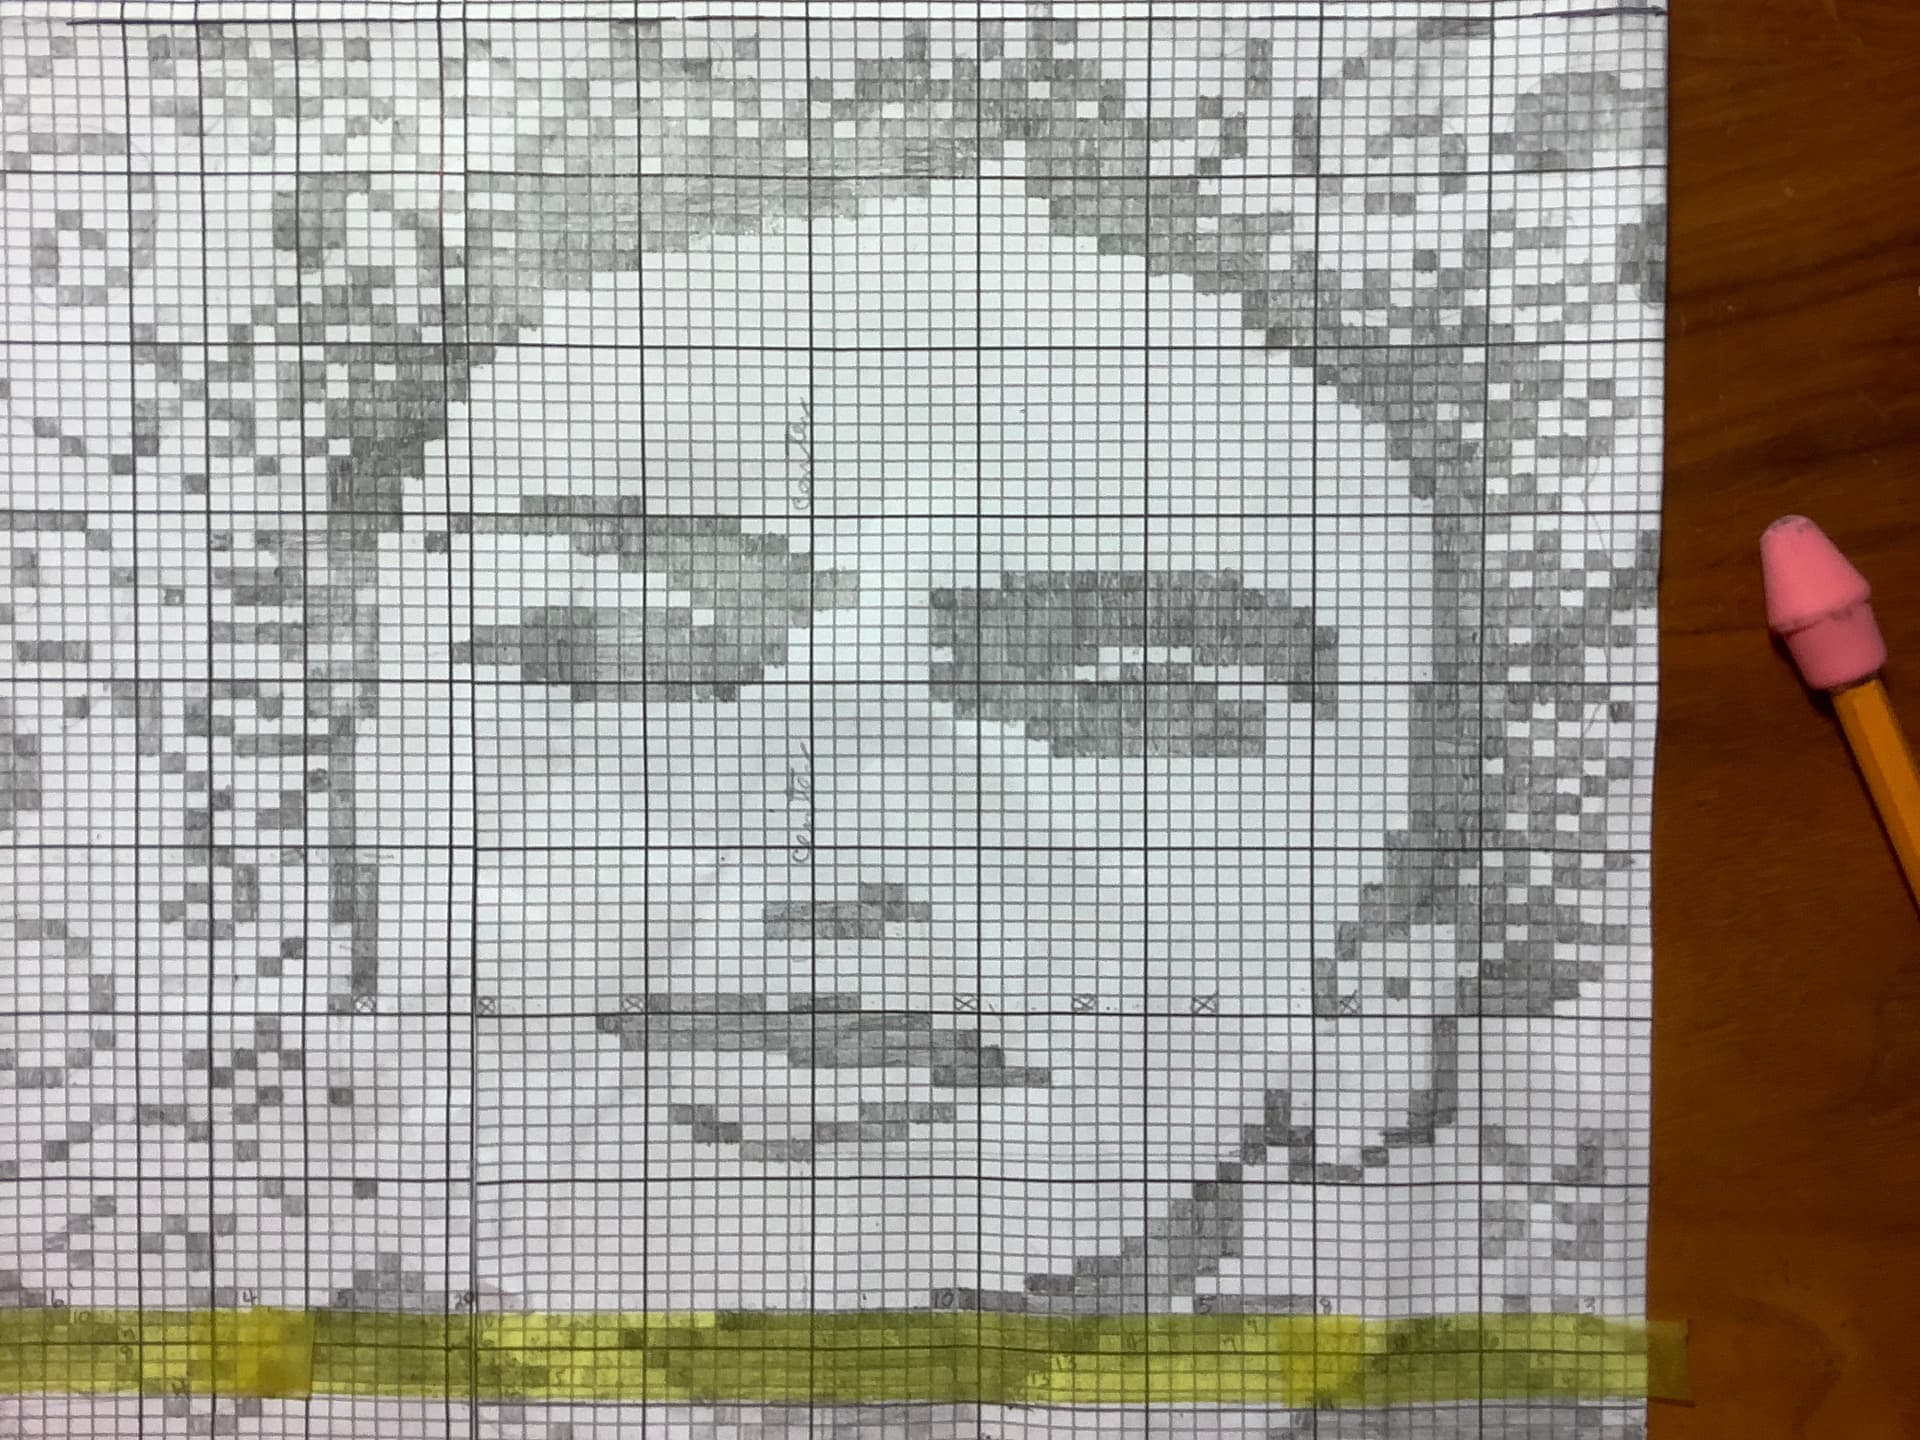
Ok, I haven’t given up, just had to stew for awhile.  Watched a lot of videos and I did knit a swatch to practice LBJ and left it on the needle to refer to. I decided to count through each row before I start and put a marker at every color change. That really helps. I’m sending a pic of where I’m at. The 20 stitch row at the bottom is where I think I should start with the ladders. At the top there is a 17 stitch row and a 12 stitch row where I guess I should stop at one of those. I marked where I think the ladders should be set up with an O and X, 5 stitches apart. There are 7 which I think will encompass all rows that will have very long floats. I welcome all opinions about all that. Also do I leave all the ladders in place as I pass thru the facial features and just skip the ladders? Thanks very much !
1 Like
You’ll continue to use at least some of the ladders as you do the facial features, but will be laddering with the opposite color.
1 Like
I’m pretty sure you know more about ladder back than I do considering the amount of research and prep you’ve done, so take what I say as mere passing observation rather than knowledgeable guidance.
ColoCro makes a good point about the ladders in the facial features being used for the opposite colour. Along with this I’ll add that it seems to me you would need one or two, maybe three, where i can’t see any marked. These would cover the distance across the long length of lip (using ladder to carry white behind the black lip) but also to cover the area lower down below the lips and down to the chin area.
I’m not sure the one in the ear is needed at all (dont forget you can also do a regular float trap where needed, you’re not constrained to all ladders).
I’m not sure the one directly left of the lip is useful as it comes where there is no long strand (black and white meet here so the ladder would be better positioned a few stitches away).
Similarly there is one placed at the far left of the face where white and black meet , although perhaps your indication is to end the ladder there.
I dont think you can just skip a ladder when it isn’t needed and then use it in the next row because the stitch would have to stretch across 2 rows, maybe it can manage 2 rows without pulling on the fabric? But I wouldn’t go more than that, they need working in one colour or the other if you want to keep them going. Otherwise I think you end the one not needed by joining it behind, then begin again on another row or in another postion with a new ladder.
It’s great to see your progress.
Both of you brought my attention to things I hadn’t thought of or considered. It’s so helpful to get different perspectives. Thanks so much!
1 Like
Glad it was some use.