Cabled Fingerless Mitts With or Without Short Row Extensions
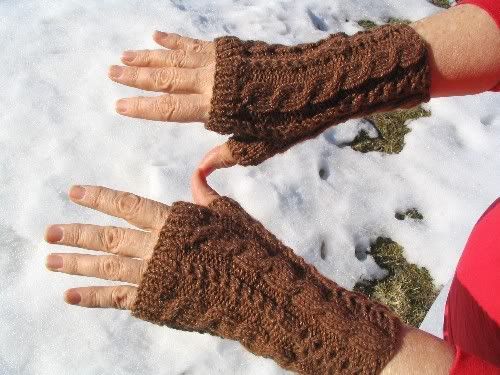
You can make these with or without the short row extensions for the palms. They are easier to do without them if you want to keep it simple. I give the cast-on and bind off I used but any you know would work.
Gauge is a little hard to measure on this stretchy fabric, but it is 12 stitches equal 1 ½ inches on the hand pattern stitch. I measured it between the out side edge of one mini-cable to the outside edge of the next one. This is measured relaxed. These mitts look very small when off, but stretch to fit. They fit a medium size woman’s hand. That’s a medium size hand that belongs to a woman, not a medium size woman with a hand of any size. 
If you were getting 21 sts =4 inches in stockinette it would probably work.
Materials:
Less than one skein of Wool-Ease worsted weight
1 set of 4 US size 4 double pointed needles (or needles you need to get gauge, or close )
1 set of 4 US size 3 double pointed needles for cuff and edge ribbing (Or 1 size smaller than gauge needles).
Cable needle
A bit of waste yarn
Stitch markers if you like to use them
Tapestry needle to work in ends and do bind off
Abbreviations used:
MC= mini-cable worked as follows: Skip the 1st st on the needle, K into the 2nd st, don’t slide anything off. Now knit into the skipped 1st stitch and slide off.
YO= yarn over
SKP= slip 1, K1, pass the slipped stitch over the knit stitch.
C4F= slip next 2 stitches to a cable needle and hold in front, K2, K2 from cable needle.
WT= Wrap and turn
Left Mitt:
Cast on 40 sts on the larger needle with the twisted German cast-on. Divide onto the smaller needles so that you have:
16 sts on needle #1, 10 sts on needle #2, and 14 sts on needle #3.
Join to work in the round as you do the first stitch of rnd 1, checking for twists before you begin. Note: I CO 1 extra stitch and slip it from needle 3 to needle one and knit it together with the first stitch to join. (Do it any way you want.)
Begin pattern for cuff as follows:
Rnd 1: *K4, P2, K2tog, YO, P2; rep from * around.
Rnd 2 and all even rnds: *K4, P2, K2, P2; rep from 8 around. (This is just as the stitches present themselves, knitting any YO strands.)
Rnd 3: *C4F, P2, YO, SKP, P2; rep from * around.
Rnd 5: As round 1.
Rnd 7: *K4, P2, YO, SKP, P2; rep from * around.
Rnd 8: Do one more rnd 2.
These 8 rounds make one pattern repeat. Work 3 complete pattern repeats for the cuff.
Hand section:
Switch to the larger needles. Keep track of the rnds (unless you can count them by looking) because you need to continue to do the C4F every 8th round as you were doing for the cuff, and begin to do the MC (mini-cable) every 3rd rnd beginning here.
Rnd 1: *K4, P2, K2, P2; rep from * around.
Rnd 2: Same as rnd 1.
Rnd 3: * C4F, P2, MC, P2; rep from * around.
Note again, you will continue this pattern, but only twist the big cables every 8th round, and the mini-cables every 3rd round.
Work until 5 ½ inches (or as desired) from the cast on edge. If it falls right on a big cable twist round, work one more round, then begin the next round.
Next rnd: With the short piece of waste yarn, knit 5 stitches, then slip the stitch loops of those 5 stitches back to the left needle. Now using the mitt yarn, work the stitches again in pattern.
Work 6 more rounds in pattern.
Without short rows: Work one more round in pattern and then begin at the ribbing edge section.
With short rows:
Note: when you are working the short rows keep the work in pattern, remembering that sometimes you are working from the front and sometimes from the back. If the cable twists fall on a back side, twist them on the next right side pass. (Unless you know a better way. )
Row 1: K4, P2, WT (place a marker if you’d like)
Row 2: Work in pattern over 21 sts, WT (place a marker if you’d like)
Row 3: Work to within one st of the last WT and WT.
Row 4: Work to within one st of the last WT and WT.
Now work in pattern all the way around picking up the wraps as you come to them. When you have gone all the way around and are back at the place where the rounds normally start, begin the ribbing edge.
Ribbing edge section:
Switch to smaller needles and work in K1, P1 ribbing for 5 rounds. Bind off with the sewn bind off.
Thumb:
Carefully remove the waste yarn putting the resulting 9 sts on two of the larger dpns, 5 on bottom, 4 on top. (Use the larger dpns for the stockinette stitch part of the thumb.)
Rnd 1: Join the yarn as you begin to knit the stitches from the bottom needle. With needle #1, knit those 5 sts. Take another needle and pick up 4 stitches in the gap between that needle and the top one, knit 2 stitches from the top needle on to that needle (needle 2). With needle 3, knit the last 2 stitches from the top needle. Continuing with needle #3, pick up 4 stitches in the gap before needle 1. (17sts for thumb)
Next round: Work in st st around the 17 thumb stitches knitting into the back loop of the first stitch on each needle.
Work 4 more rounds in st st in the normal way.
Next round: Switch to the smaller needles, K2tog, *P1, K1; around ending P1 (16 sts).
Work 2 more rounds in K 1, P1 ribbing.
Bind off with the sewn bind off. Work in tails for the whole mitt.
Right Mitt:
If you don’t do the short row part the mitts are both worked the same way, and will fit either hand. If you are doing the short rows work the right mitt the same as the left until you are ready to begin the last of the 6 rounds of the palm before the short row section, then come here.
Short rows for the right mitt:
(The note from the left mitt still applies.)
When you work the last of the 6 rounds for the palm, stop when you still have 2 stitches to work on the 3rd needle, slip those 2 stitches to needle one.
Row 1: Now begin working across needle #1, working 21 stitches in pattern (some of these will be on needle #2), WT (place a marker if you’d like).
Row 2: Work in pattern until you have 2 stitches left on needle 1, WT.
Row 3: Work in pattern until you are 1 st before the last WT, WT.
Row 4: Work until you are 3 sts before the end of needle #1, WT.
Next round: Work all the way around in pattern, picking up the wraps as you come to them. Move the first 2 stitches on needle #1 back to needle #3.
Switch to smaller needles and work 5 rounds of K1, P1 ribbing (I think you still have a wrap to pick up as you begin needle 1, just do it in ribbing pattern as you pick it up. Maybe there are 2, can’t remember. Sorry. Just pick them up as you rib if they are there. )
Bind off with the sewn bind off. Work in ends.
The thumb is the same as on the left mitt.
Sewn bind off: Cut a nice long tail to sew up with. Thread it onto a tapestry needle. Insert the needle purlwise into the first 2 stitches together, then go back through the first stitch knitwise and slide that first stitch off the needle. Keep doing that around. When you have one stitch left run the needle through it purlwise and purlwise into the first little loop you see along the already bound off edge. Then work the tail in to get the best result you can.
 .
.