It’s late- and going over these instructions has my head spinning I am making the poncho (so cute isn’t it?) Anyway, I don’t understand the instructions https://www.garnstudio.com/pattern.php?id=3948&cid=17
This is the part that isn’t clear to me (sorry if this is elementary- I just can’t wrap my head around what it is asking me to do!
AT THE SAME TIME on second round dec 1 st on the left side of each P-section by P2 tog. Repeat the dec on every 2-2-2 (3-3) round on the right and left side of each P-section alternately a total of 22-23-25 (20-21) times = 84-90-90
Is that the last two stitches in the purl section? It is the left side thing that has me confused then right and left- HUH???
That is an extremely cute poncho! Nice choice!
The way I understand it is, yes, on the left side of each purl section will be the last 2 purl stitches worked as p2tog, just as you said.
The next round where a decrease is to happen (every 2nd or 3rd round depending on size) instead of working the left side of the purl section (last 2 sts p2tog) you will work the right side of the purl section, that will be the first 2 sts worked as p2tog.
The next time you have a dec round you will position them on the left (last 2 sts) and the dec round following that you will position them on the right (first 2 sts).
Overall the decreases will end up balanced but they are spaced out this way, perhaps for a smoother decrease overall, not so step-stair as perhaps happens if both left and right are on the same round
I hope this helps
I am still confused. I thought maybe I should add some stitch markers for my sections. But explain to me where I do my decreases (before or after stitch markers) I know this is not difficult and probably I am making it harder than it is, but explain this to me like I am 5-
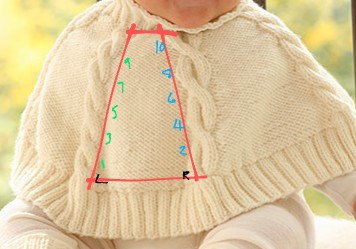
Perhaps this will help.
Red outline - The purl section is between each cable
Black L and R - marking the left and right of the purl section.
Green numbers - indicate decrease rounds position within this purl section, on the left.
Blue numbers - indicate decrease rounds position within this purl section, on the right
Depending on size you have 20, 21 or 22 decrease rounds, I have only written in 10. They will happen every 2nd or third round which you know how to track.
The position of the first is left, second is right, third is left, 4th is right and so on.
Green. You can imagine the odd numbered decrease rounds coming either at the end of the purl section or just before the cable chart (green, left). Place marker before cable chart and work p2tog before marker.
Blue. You can imagine the even numbered decrease rounds coming either at the beginning of the purl section or just after the cable chart (Blue, right). Place marker after cable chart and work p2tog after marker.
Any clearer?
2 Likes
Thank you- I think I figured out the rhythm of this pattern and it is so much clearer! I appreciate you explaining this to me!
1 Like
Glad to help. Hope it turns out to be a pleasant project to work.
I frogged the whole thing. I do much better with written instructions and I forgot that when you do charts, you have to do one way, then back the other way for the second row. I was wondering why my product wasn’t looking right. Plus the purl sections and the decrease- there was just a lot going on… I think I am just going to find a different pattern that is a little more clear
2 Likes